> Source: [sk90422](https://support.checkpoint.com/results/sk/sk90422)
# sk90422 - How to modify URL Filtering cache size?
| Property | Value |
|----------|-------|
| Solution ID | sk90422 |
| Date Created | 2012-12-24 |
| Last Modified | 2025-04-09 |
| Technical Level | General |
| Products | Security Gateway |
| Versions | R82, R81.20, R81.10 (EOS), R81 (EOS) |
## Solution
This article can be used to troubleshoot the following issue:
1. RAD process on Security Gateway constantly consumes CPU at 100%.
2. SmartView Tracker / SmartLog shows multiple "`internal system error occurred ...`" logs from Application Control / URL Filtering.
**Table of Contents:**
1. When is it recommended to enlarge the cache limit?
2. How to check the current number of entries in the URL Filtering cache?
3. How to check the current limit of the URL Filtering cache?
4. How to clear URL Filtering kernel cache?
5. How to modify the limit of the URL Filtering cache?
6. Related solutions
### (1) When is it recommended to enlarge the cache limit? {#When is it recommended to enlarge the cache limit?}
When the cache is full, about 20% of the entries are cleared. If this occurs repeatedly, then you should consider enlarging the cache size. The URL Filtering cache limit default value is 20 000, which is usually enough for a Security Gateway holding 1000 users.
To check if URL Filtering cache has been cleared, run the command (in Expert mode) -
version R80.30 Gaia 3.10 and above: ***fw ctl multik print_bl urlf_cache_tbl -s***
lower version: ***fw tab -t urlf_cache_tbl -s***
several times on Security Gateway and look at the ***#VALS*** column.
If the value decreases from \~20,000 to \~0 in a short time (i.e., seconds), then the cache has been cleared.
**Note:** The cache size can also decrease due to TTL expiration. However, that decrease will be slower (only a few records during several seconds).
If the cache has been cleared, all URL Filtering requests are sent to the cloud again. This produces a high load on the RAD process and can cause timeout and failure. In such cases, it is recommended to enlarge the cache size.
### (2) How to check the current number of entries in the URL Filtering cache? {#How to check the current number of entries in the URL Filtering cache?}
On the Security Gateway / each cluster member, run the command (in Expert mode) -
version R80.30 Gaia 3.10 and above: ***fw ctl multik print_bl urlf_cache_tbl -s***
lower version: ***fw tab -t urlf_cache_tbl -s***
and look at the ***#VALS*** column, which shows the current number of entries in the cache.
*Example*:
```
[Expert@HostName]# fw tab -t urlf_cache_tbl -s
HOST NAME ID #VALS #PEAK #SLINKS
localhost urlf_cache_tbl XXX 1723 0 0
```
### (3) How to check the current limit of the URL Filtering cache? {#How to check the current limit of the URL Filtering cache?}
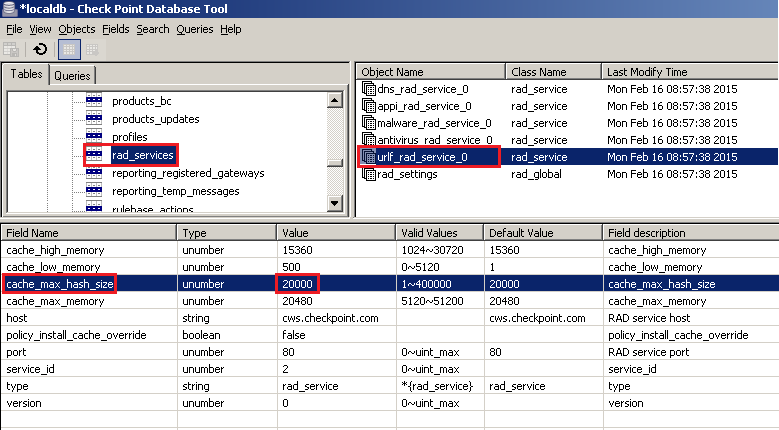
1. Connect to Security Management Server / Domain Management Server with [GuiDBedit Tool](http://supportcontent.checkpoint.com/solutions?id=sk13009).
2. In the upper left pane, go to ***Table*** - ***Other*** - ***rad_services*** .
3. In the upper right pane, select ***urlf_rad_service_0*** .
4. In the lower pane, look at the value of ***cache_max_hash_size***.
**Note:** The default value for URL Filtering cache limit is 20,000.
> [](https://sc1.checkpoint.com/sc/SolutionsStatics/sk90422/urlf_rad_service_0__cache_max_hash_size.png "Click the image to see it in full size in a new tab/window")
### (4) How to clear URL Filtering kernel cache? {#How to clear URL Filtering kernel cache?}
1. Connect with SmartDashboard to Security Management Server / Domain Management Server.
2. Go to ***File*** menu - click on ***Database Revision Control...*** - create a revision snapshot.
3. Close all SmartConsole windows (SmartDashboard, SmartView Tracker, SmartView Monitor, etc.).
4. Connect with [GuiDBedit Tool](http://supportcontent.checkpoint.com/solutions?id=sk13009) to Security Management Server / Domain Management Server.
5. In the upper left pane, go to ***Table*** - ***Other*** - ***rad_services*** .
6. In the upper right pane, select ***urlf_rad_service_0*** .
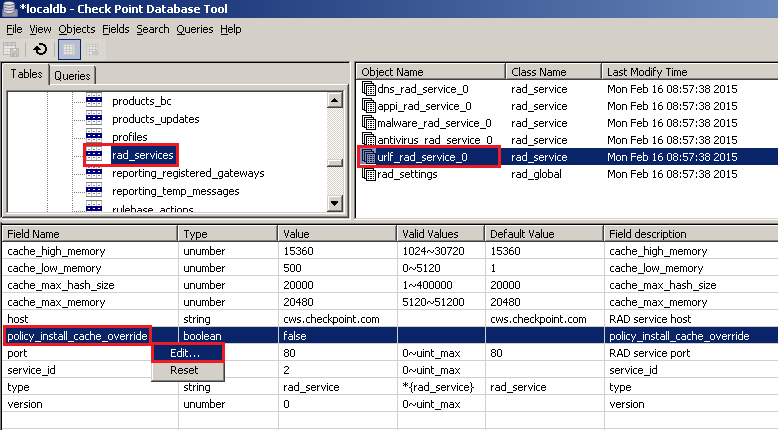
7. In the lower pane, right-click on the ***policy_install_cache_override*** - select ***Edit...*** - select "**`true`** " - click on ***OK***.
[](https://sc1.checkpoint.com/sc/SolutionsStatics/sk90422/urlf_rad_service_0__clear_cache.png "Click the image to see it in full size in a new tab/window")
8. Save the changes: go to ***File*** menu - click on ***Save All*** .
9. Close the GuiDBedit Tool.
10. Connect with SmartDashboard to Security Management Server / Domain Management Server.
11. Install the policy ***only*** on the involved Security Gateway / Cluster object.
12. Verify that the URL Filtering kernel cache table is empty on the involved Security Gateway / cluster members:
version R80.30 Gaia 3.10 and above: ***\[Expert@HostName\]# fw ctl multik print_bl urlf_cache_tbl -s***
lower version: ***\[Expert@HostName\]# fw tab -t urlf_cache_tbl -s***
Output should be:
```
HOST NAME ID #VALS #PEAK #SLINKS
localhost urlf_cache_tbl XXX 0 0 0
```
13. ***CRUCIAL STEP:*** Restore the default value for ***policy_install_cache_override*** ("false"):
**Note:** If default value ("false") is not restored, then URL Filtering kernel cache will be cleared on each policy installation.
1. Close all SmartConsole windows (SmartDashboard, SmartView Tracker, SmartView Monitor, etc.).
2. Connect with [GuiDBedit Tool](http://supportcontent.checkpoint.com/solutions?id=sk13009) to Security Management Server / Domain Management Server.
3. In the upper left pane, go to ***Table*** - ***Other*** - ***rad_services*** .
4. In the upper right pane, select ***urlf_rad_service_0*** .
5. In the lower pane, right-click on the ***policy_install_cache_override*** - select ***Edit...*** - select "**`false`** " - click on ***OK*** .
6. Save the changes: go to ***File*** menu - click on ***Save All*** .
7. Close the GuiDBedit Tool.
14. Connect with SmartDashboard to Security Management Server / Domain Management Server.
15. Install the policy on the relevant Security Gateway / Cluster object.
### (5) How to modify the limit of the URL Filtering cache? {#How to modify the limit of the URL Filtering cache?}
1. Connect with SmartDashboard to Security Management Server / Domain Management Server.
2. Go to ***File*** menu - click on ***Database Revision Control...*** - create a revision snapshot.
3. Close all SmartConsole windows (SmartDashboard, SmartView Tracker, SmartView Monitor, etc.).
4. Connect with [GuiDBedit Tool](http://supportcontent.checkpoint.com/solutions?id=sk13009) to Security Management Server / Domain Management Server.
5. In the upper left pane, go to ***Table*** - ***Other*** - ***rad_services*** .
6. In the upper right pane, select ***urlf_rad_service_0*** .
7. In the lower pane:
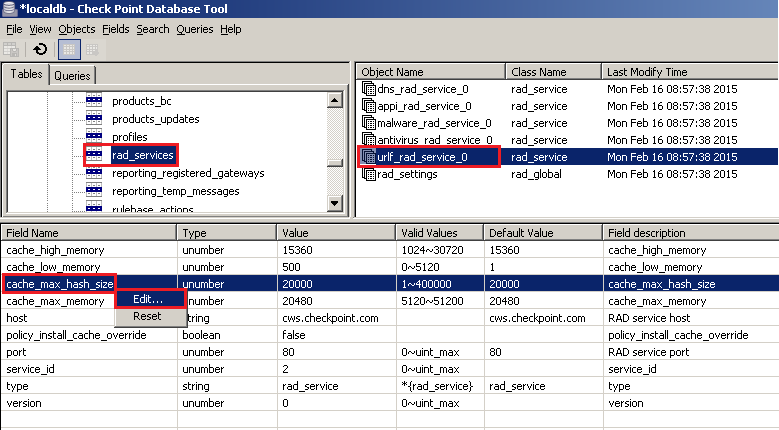
1. Right-click on the ***cache_max_hash_size*** - select ***Edit...*** - set the desired limit **(in R75.46 and lower, value must NOT exceed 25000 !!! In R77.20 the limit is 400000!!)** - click on ***OK***:
[](https://sc1.checkpoint.com/sc/SolutionsStatics/sk90422/urlf_rad_service_0__modify_cache_size.png "Click the image to see it in full size in a new tab/window")
2. Right-click on the ***policy_install_cache_override*** - select ***Edit...*** - select "**`true`** " - click on ***OK***:
[](https://sc1.checkpoint.com/sc/SolutionsStatics/sk90422/urlf_rad_service_0__clear_cache.png "Click the image to see it in full size in a new tab/window")
8. Save the changes: go to ***File*** menu - click on ***Save All*** .
9. Close the GuiDBedit Tool.
10. Connect with SmartDashboard to Security Management Server / Domain Management Server.
11. Install the policy ***only*** on the involved Security Gateway / Cluster object.
12. ***CRUCIAL STEP:*** Restore the default value for ***policy_install_cache_override*** ("false"):
**Note:** If default value ("false") is not restored, then URL Filtering kernel cache will be cleared on each policy installation.
1. Close all SmartConsole windows (SmartDashboard, SmartView Tracker, SmartView Monitor, etc.).
2. Connect with [GuiDBedit Tool](http://supportcontent.checkpoint.com/solutions?id=sk13009) to Security Management Server / Domain Management Server.
3. In the upper left pane, go to ***Table*** - ***Other*** - ***rad_services*** .
4. In the upper right pane, select ***urlf_rad_service_0*** .
5. In the lower pane, right-click on the ***policy_install_cache_override*** - select ***Edit...*** - select "**`false`** " - click on ***OK*** .
6. Save the changes: go to ***File*** menu - click on ***Save All*** .
7. Close the GuiDBedit Tool.
13. Connect with SmartDashboard to Security Management Server / Domain Management Server.
14. Install the policy on the relevant Security Gateway / Cluster object.
### (6) Related solution: {#Related solutions}
* [sk105179 - How to clear Anti-Virus kernel cache?](http://supportcontent.checkpoint.com/solutions?id=sk105179)
---
# Agent Instructions
This content is from the Check Point Support Center (https://support.checkpoint.com), the official knowledge base for Check Point cybersecurity products.
## Navigating This Knowledge Base
- **Complete index**: [llms.txt](https://support.checkpoint.com/llms.txt)
- **All SK articles**: [SecureKnowledge Sitemap](https://support.checkpoint.com/sitemaps/secureknowledge-sitemap-index.xml)
- **SK article URL pattern**: `https://support.checkpoint.com/results/sk/{skId}`
- **Markdown responses**: AI bot User-Agents automatically receive `text/markdown` content