> Source: [sk65205](https://support.checkpoint.com/results/sk/sk65205)
# sk65205 - How to install Gaia OS from a USB device on Check Point appliance and Open Servers using ISOmorphic Tool
| Property | Value |
|----------|-------|
| Solution ID | sk65205 |
| Date Created | 2011-09-06 |
| Last Modified | 2026-06-25 |
| Technical Level | General |
| Products | Security Gateway, Security Management Server, Hardware, Scalable Platforms |
| Versions | R82.10, R82, R81.20, R82.10, R82, R81.20, Not Version-Specific, R82.20, R82.10, R82, R81.20, R82.20 |
| OS | Gaia |
| Platform | Smart-1, 15000, 3000, 5000, 7000, 28000, 9000, LightSpeed QLS, LightSpeed MLS, 3900, 16000, 26000, Maestro Orchestrator, 19000, 29000, 6000, TE |
## Solution
**Important Notes:**
--------------------
* **On 04 May 2025, the ISOmorphic package was updated to Build 218 (requires Windows 10 or higher).**
Introduction {#Introduction}
----------------------------
**ISOmorphic** is the Check Point utility used for creating a bootable USB device, capable of installing Gaia / SecurePlatform OS on Check Point appliances and Open Servers.
The ISOmorphic tool supports two modes of deployments - Regular (interactive) and Unattended. Unattended deployment is a way to install the Gaia / SecurePlatfrom OS on the appliance without a need for interaction from the user performing the installation.
**Notes:**
* Check Point does not enforce the use of the ISOmorphic tool, which is provided as a utility to make the installation easier. Note, however, that Check Point has developed and verified the ISOmorphic tool to work with all Check Point appliances (excluding IP Series Appliances).
* A bootable USB device might fail to identify the Gaia image if the USB device was formatted with a file system different from FAT32. In such an exceptional case, customers can use any tool they want to reformat a USB device before starting the ISOmorphic creation process.
* Make sure the USB device does not contain bad sectors before starting the ISOmorphic creation process.
* The Check Point ISO might not contain the required driver for the USB storage device. As a result, the installation might fail.
**Table of Contents**
* What's New?
* Unsupported features
* Known Limitations
* Preparing a USB device for Deployment (+ download link)
* Installing Gaia OS on the Appliance / Open Server using the USB device
* Restoring to Factory Defaults
* Manual USB Device Initialization
* Related solutions
* Previous ISOmorphic Tool Article
* Revision History
Click Here to Show the Entire Article
What's New? {#What's New?}
--------------------------
* Build 218 adds support for Quantum Force appliances 3900 ([sk183199](https://support.checkpoint.com/results/sk/sk183199))
* Build 207 adds support for Quantum Force appliances 9000 ([sk181698](https://support.checkpoint.com/results/sk/sk181698)), 19000 ([sk180520](https://support.checkpoint.com/results/sk/sk180520)), and 29000 ([sk180520](https://support.checkpoint.com/results/sk/sk180520)).
* Build 201 adds support for the Gaia OS maintenance password (starting from R81.20) and Quantum LightSpeed MLS appliances ([sk176466](https://support.checkpoint.com/results/sk/sk176466)).
* Build 198 adds support for Quantum LightSpeed QLS appliances ([sk176466](https://support.checkpoint.com/results/sk/sk176466)).
* Build 194 adds support for adding Hotfixes with `*.tar` extensions for versions R81 and higher.
* Build 187 adds support for Smart-1 6000-L, Smart-1 6000-XL, Smart-1 600-S, and Smart-1 600-M appliances ([sk171903](https://support.checkpoint.com/results/sk/sk171903)).
**Note** - To see the build of your ISOmorphic tool, click the "**About**" button in the bottom left corner.
Unsupported Features {#Unsupported}
-----------------------------------
Show / Hide this section
|---------------------------------------------------------------------------------------------------------------------------------------------------------------------------------------------------------------------------------------|
| Description |
| ISOmorphic tool does not support USB 3.0 devices (use only a USB 2.0 device). |
| ISOmorphic tool does not support VMware Virtual Machines. |
| Scalable Platforms (ElasticXL, Maestro, Scalable Chassis) do not support these optional settings configured in the ISOmorphic tool: * Product * Hostname * IP Address * Subnet Mask * Default Gateway * OS Password * Hotfix packages |
| ISOmorphic tool does not support the installation of the R81.20 Jumbo Hotfix Accumulator. |
| ISOmorphic tool does not support the installation of the R81 or higher versions on these appliances: * Smart-1 205, Smart-1 210 * 2200 * 4200, 4400, 4600, 4800 * 12200, 12400, 12600 * 13500, 13800 * 21400, 21600, 21700, 21800 |
| ISOmorphic tool does not support Quantum Spark and Quantum Rugged appliances (that run Gaia Embedded OS). |
Known Limitations {#Limitations}
--------------------------------
Show / Hide this section
|---------------------------------------------------------------------------------------------------------------------------------------------------------------------------------------------------------------------------------------------------------------------------------------------------------------------------------------------------------------------------------------------------------------------------------------------------------------------------------------------------------------------------------------------------------------------------------------------------------------------------------------------------------------------------------------------------------------------------------------------------------------------------------------------------------------------------------------------------------------------------------------------------------------------------------------------------------------------------------------------------------------------------------------------|
| Description |
| ISOmorphic tool supports only Clean Install (Fresh Install). Upgrade is not supported. |
| Only public HotFixes and Jumbo Hotfix Accumulators were tested. Test the installation of private HotFixes manually before selecting them in the ISOmorphic tool. |
| Basic networking settings can be preconfigured only for Gaia R77.20 and higher, and only for Check Point appliances. |
| Basic/Advanced configuration type and HotFix installation (Enhanced ISOmorphic) are available only on 3000 / 5000 / 15000 / 23000 appliances with their dedicated R77.30 Gaia Clean Install package. |
| On Smart-1 525, Smart-1 5050, and Smart-1 5150 appliances, the post-installation reboot is stuck while the ISOmorphic USB device is still plugged in, and Gaia OS cannot be loaded. Workaround: Remove the USB device and reboot the appliance. |
| PMTR-51749: When using the ISOmorphic tool to configure the installation of a StandAlone server with a specific IP address, it is necessary to follow these steps: 1. In the ISOmorphic tool, select the applicable ISO image and configure the required settings. 2. Install the StandAlone server from the prepared USB device. 3. Connect to Gaia Portal at the preconfigured IP address. 4. Go through the Gaia First Time Configuration Wizard and configure it as a StandAlone server (select the Security Gateway and the Security Management products). 5. Install the SmartConsole package for the version installed on the StandAlone server. 6. Connect with SmartConsole to the StandAlone server at the preconfigured IP address. 7. From the left navigation panel, click the "Gateways \& Servers" view. 8. Double-click the StandAlone server object. 9. From the left tree, click the "Network Management" page. 10. Click "Get Interfaces" \> "Get Interfaces with Topology". 11. Accept the configuration. 12. Click OK. |
Preparing a USB device for Deployment {#Preparing USB device for Deployment}
----------------------------------------------------------------------------
**Important** - Make sure the USB device does not contain bad sectors before starting the ISOmorphic creation process.
**Note** - Read the [**Release Notes**](https://support.checkpoint.com/search#q="Release%20Notes"&f[commonsource]=C.%20Documentation&f[versions]=R80.40,R81,R81.10,R81.20) document for the software version you need to install to make sure it supports your Check Point appliance.
|-----------------------------|--------------------------------------------------------------------------------------------------------------------------|-------------|-------------------------------|
| Download Package | Link | Date | Comment |
| ISOmorphic tool - Build 218 | [](https://support.checkpoint.com/results/download/137495) (EXE) | 04 May 2025 | Requires Windows 10 or higher |
### Procedure for the ISOmorphic tool Build 207 and higher
Show / Hide this section
1. Download the ISOmorphic tool.
2. Plug in the USB device to your computer.
3. Double-click the downloaded file.
**Important** - To have full access to the USB device, the ISOmorphic tool requires administrator permissions. If you are an administrator, and you see the popup about the administrator permissions, then right-click the ISOmorphic tool and click "Run as administrator".
4. In the **Select source ISO file** field, browse for the Gaia ISO file.

5. In the **Installation target** field, select the required profile:
|-----------------|------------------------------------------------------------------------------------------------------------------------------------------------------------------------------------------------------------------------------------------------------------------------------------------------------------------------------------------------------------------------|
| Profile | Description |
| **BIOS** | Only for these Check Point appliances: * Quantum LightSpeed (QLS, MLS) * All Smart-1 models (except Smart-1 700 and Smart-1 7000) * All Threat Emulation models * Maestro Orchestrator MHO-175 * Maestro Orchestrator MHO-170 * Maestro Orchestrator MHO-140 * 28000 * 26000 * 23000 * 21000 * 16000 * 15000 * 13000 * 12000 * 7000 * 6000 * 5000 * 4000 * 3000 * 2000 |
| **UEFI** | Only for these Check Point appliances: * Smart-1 7000 * Smart-1 700 * Quantum Force 29000 * Quantum Force 19000 * Quantum Force 9000 * Quantum Force 3900 |
| **Open Server** | Only for these: * Open Servers (non-Check Point hardware) |
**Notes:**
* See the Home Page SK article for your Check Point appliance model (listed in [sk96246](https://support.checkpoint.com/results/sk/sk96246)) to see the release date.
* If you selected the **UEFI** profile, then the USB device will contain a hidden EFI partition. If you want to delete all content completely from such a USB device, follow the section "Manual USB Device Initialization" below.
6. In the **Select destination drive** field, select the USB device drive.
7. **Optional:** To configure additional settings, click the **Options** button.
1. In the **Device configuration** line, click **Configure**.
**Note** - This configuration is **not** supported for Scalable Platforms (ElasticXL, Maestro, Scalable Chassis).
The Gaia First Time Configuration Wizard uses the specified configuration during the installation.
**Important Note** - When you restore the Check Point appliance to factory defaults, the Gaia OS will use the default values based on the advanced parameters you configure in this section.
Show / Hide this section
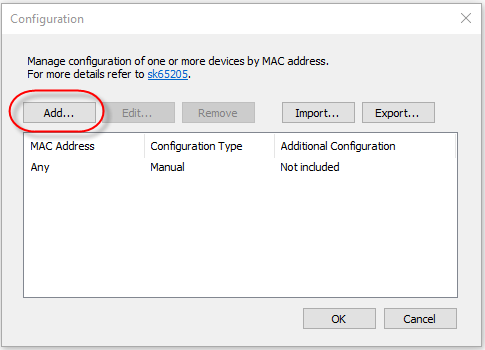
1. There is a pre-defined profile that is valid for **any** Check Point appliance / Open Server (is not based on a MAC address).
To edit the pre-defined profile, double-click the entry "**Any - Manual - Not included**".
To create a custom profile for a **specific** Check Point appliance / Open Server (based on a MAC address), click the **Add** button.
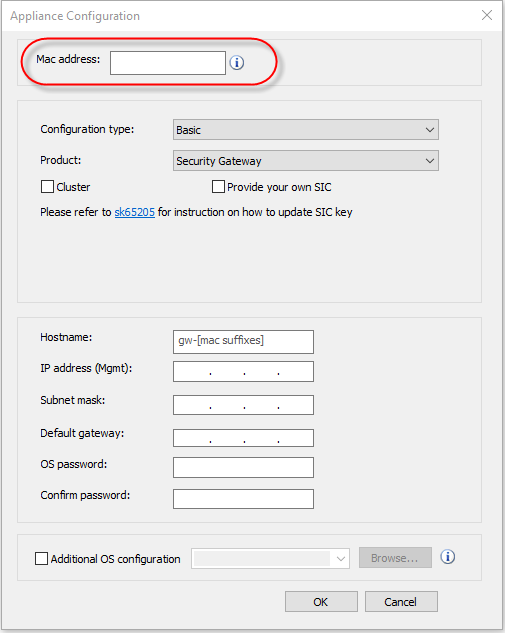
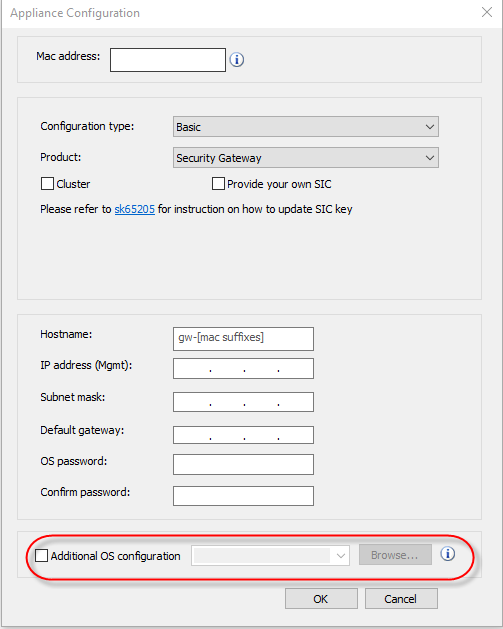
The **Appliance Configuration** window opens.
2. If you create a custom profile, then enter the MAC address of the Gaia management interface on the specific Check Point Appliance / Open Server.
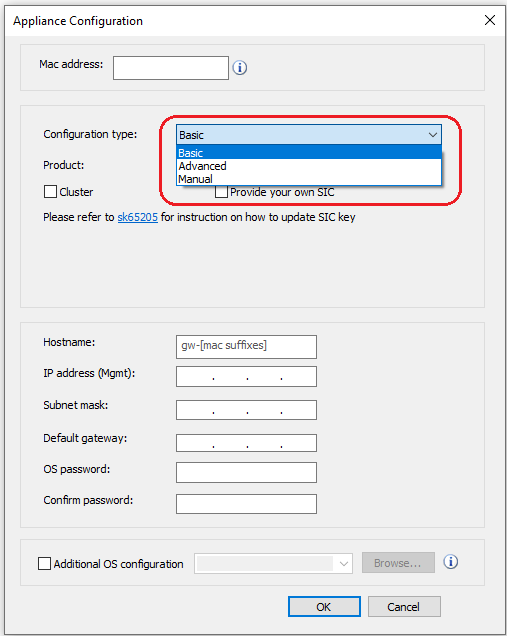
3. Select the applicable configuration type (which major products to configure):
|--------------------|---------------------------------------------------------------------------------------------------------------------------------------------------------------------------------------------------------------------------------------------------------------------------------------------------------------------------------------------------------------------------------------------------------------------------------------------------------------------------------------------------------------------------------------------------------------------------------------------------------------------------------------------------------------------------------------------------------------------------------------------------------------------------------------------------------------------------------------------------------------------------------------------------------------------------------------------------------------------------------------------------------------------------------------------------------------------------------------------------------------------------------------------------------------------------------------------------------------------------------------------------------------------------------------------------------------------------------------------------------------------------------------------------------------------------------------------------------------------------------------------------------------------------------------------------------------------------------------------------------------|
| Configuration Type | Description |
| **Basic** | Requires to select one of the pre-defined configuration templates. The Gaia First Time Configuration Wizard uses the specified configuration during the Gaia OS installation. Pre-defined configuration templates: * **Security Gateway** * Installs a single Security Gateway. * Select "`Cluster`" to install a Security Gateway as a ClusterXL Cluster Member. * You can specify the one-time activation key for SIC (**it is saved in clear-text on the USB device**). You must use this one-time key in SmartConsole when you create the Security Gateway / Cluster Member object. * **Security Management** * Select "`Primary`" to install a single Security Management Server, or a Primary Security Management Server in the Management High Availability environment. By default, all GUI clients are allowed. You can change this later (connect to the command line on the Management Server \> run the "`cpconfig`" command \> refer to the option "`GUI Clients`"). * Select "`Secondary`" to install a Secondary Security Management Server in the Management High Availability environment. You can specify the one-time activation key for SIC (**it is saved in clear-text on the USB device**). You must use this one-time key in SmartConsole when you create the Check Point Host object for this Secondary Security Management Server. * **Standalone (Security Management and Gateway)** * By default, all GUI clients are allowed. You can change this later (connect on the command line on the Gaia server \> run the "`cpconfig`" command \> refer to the option "`GUI Clients`"). |
| **Advanced** | Required to provide your advanced configuration file "*config_system* " for Gaia First Time Wizard (see [sk69701](https://support.checkpoint.com/results/sk/sk69701)). |
| **Manual** | Required to run the Gaia First Time Configuration Wizard manually after the Gaia OS installation completes. |
4. Configure the Gaia OS settings - networking and the Expert mode password:
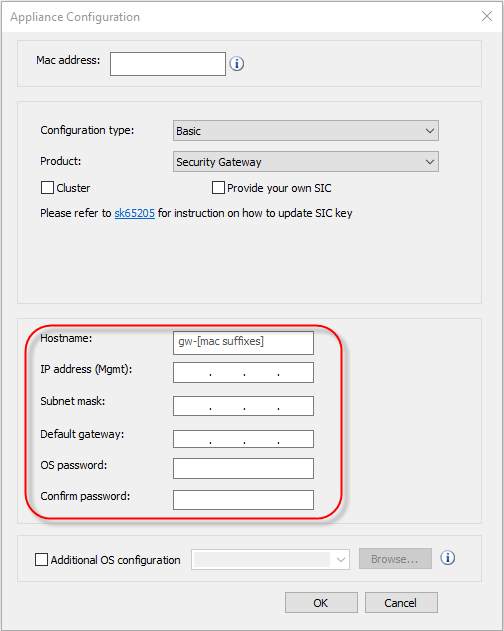
* In the **Hostname** field, enter the desired hostname.
* In the **IP address (Mgmt)** field, enter the applicable IPv4 address.
* In the **Subnet mask** field, enter the applicable IPv4 subnet mask.
* In the **Default gateway** field, enter the applicable IPv4 default gateway.
* In the **OS password** field, enter the password for the Expert mode (**it is saved in clear-text on the USB device**).
**Important** - In R81.20 and higher, this password also configures the Gaia OS Maintenance Mode password. For security reasons, we recommend to change the Maintenance Mode password after the Gaia OS installation completes. See the *[Gaia Administration Guide](https://support.checkpoint.com/product/73#f-commonsource=C.%20Documentation)* for your version.
* In the **Confirm password** field, enter the password for the Expert mode again.
**Note** - In R80 and higher, to change the Management Server Administrator's password after the Gaia OS installation, use the API command "***mgmt_cli set administrator*** " (refer to the [Management API Reference](https://sc1.checkpoint.com/documents/latest/APIs/index.html#cli/set-administrator)).
5. Select the checkbox **Additional OS configuration** to provide additional Gaia OS configuration to be applied after the Gaia First Time Configuration Wizard (for example, dynamic routing settings).
**Important Notes:**
* **This must be a plain-text file with correct Gaia Clish commands (for example, run the "show configuration" command on an existing Gaia OS).**
* **This file must not contain any configuration that reboots the Gaia OS automatically.**
6. Click **OK** to save the **Appliance Configuration** profile.
7. Click **OK** to close the **Configuration** window.
2. In the **Jumbo/Hotfix** line, click **Select**.
**Note** - This configuration is **not** supported for Scalable Platforms (ElasticXL, Maestro, Scalable Chassis).
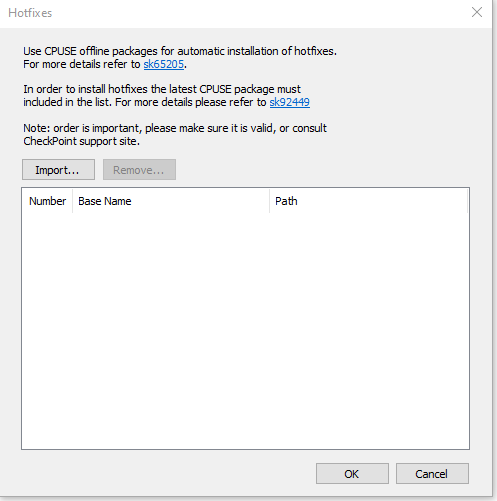
You can select Hotfix or Jumbo Hotfix Accumulator packages to install automatically after the Gaia OS installation completes and the Gaia First Time Configuration Wizard completes.
Show / Hide this section
**Important Notes:**
* Make sure to read the sections "Unsupported features" and the "Known Limitations".
* These must be CPUSE Offline packages.
* Select the packages in the correct order.
**Steps:**
1. Click **Import** and select the required package.
2. Click **OK** to close the **Hotfixes** window.
3. In the **Ask for confirmation** field, select the applicable option.
This field appears only if in the **Installation target** field, you selected the **BIOS** profile or the **Open Server** profile.
Show / Hide this section
|-----------------------------|---------------------------------------|------------------------------------------------------------------------------------------------------------------------------------------------|
| Installation target | Options | Description |
| **BIOS** or **Open Server** | **Yes - confirm before start** | Default option. Requires you to select the corresponding option in the boot menu to start the installation from the USB device. |
| **BIOS** | **No - fully automatic installation** | Starts the Gaia OS installation from the USB device automatically without a prompt. |
| **Open Server** | **No - fully automatic with console** | Starts the Gaia OS installation from the USB device automatically without a prompt. Requires a console connection to the server. |
| **Open Server** | **No - fully automatic with VGA** | Starts the Gaia OS installation from the USB device automatically without a prompt. Requires a VGA monitor connected to the server's VGA port. |
8. Click **Format USB drive**.
9. The **Progress** section shows the steps and their progress.
10. Wait until all steps are complete, and then **unplug** the USB device from your computer.
**Warning** - Do **not** forget to unplug the USB device from your computer after preparing it. Otherwise, the local drive will be formatted without any user confirmation when your computer is rebooted.
### Procedure for the ISOmorphic tool Build 203
Show / Hide this section
1. Download the ISOmorphic tool.
2. Plug in the USB device to your computer.
3. Double-click the downloaded file.
**Important** - To have full access to the USB device, the ISOmorphic tool requires administrator permissions. If you are an administrator, and you see the popup about the administrator permissions, then right-click the ISOmorphic tool and click "Run as administrator".
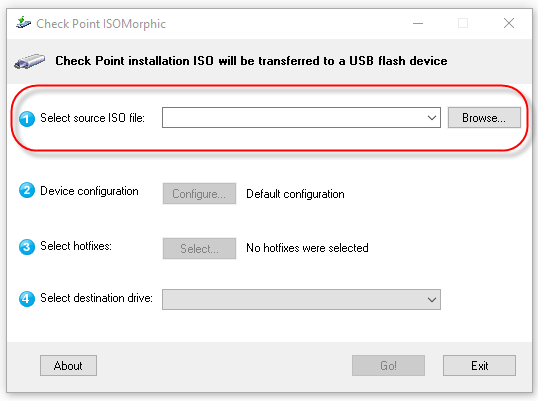
4. In the **Select source ISO file** field, browse for the Gaia ISO file.
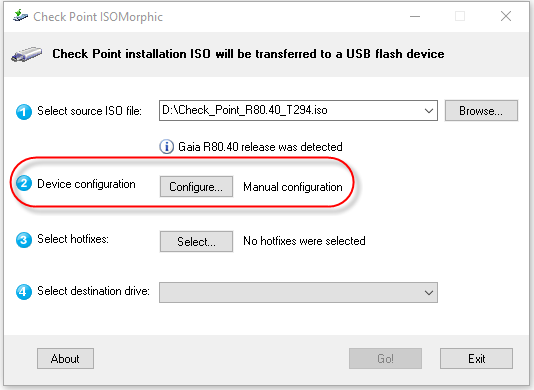
5. **Optional:** To configure additional settings, in the **Device configuration** line, click **Configure**.
**Note** - This configuration is **not** supported for Scalable Platforms (ElasticXL, Maestro, Scalable Chassis).
The Gaia First Time Configuration Wizard uses the specified configuration during the installation.
**Important Note** - When you restore the Check Point appliance to factory defaults, the Gaia OS will use the default values based on the advanced parameters you configure in this section.
Show / Hide this section
1. There is a pre-defined profile that is valid for **any** Check Point appliance model / Open Server (it is not based on a MAC address).
To edit the pre-defined profile, double-click the entry "**Any - Manual - Not included**".
To create a custom profile for a **specific** Check Point appliance / Open Server (based on a MAC address), click the **Add** button.
The **Appliance Configuration** window opens.

2. If you create a custom profile, then enter the MAC address of the Gaia management interface on the specific Check Point Appliance / Open Server.

3. Select the applicable configuration type (which major products to configure):

|--------------------|-----------------------------------------------------------------------------------------------------------------------------------------------------------------------------------------------------------------------------------------------------------------------------------------------------------------------------------------------------------------------------------------------------------------------------------------------------------------------------------------------------------------------------------------------------------------------------------------------------------------------------------------------------------------------------------------------------------------------------------------------------------------------------------------------------------------------------------------------------------------------------------------------------------------------------------------------------------------------------------------------------------------------------------------------------------------------------------------------------------------------------------------------------------------------------------------------------------------------------------------------------------------------------------------------------------------------------------------------------------------------------------------------------------------------------------------------------------------------------------------------------------------------------------------------------------------------------------------------------------|
| Configuration Type | Description |
| **Basic** | Requires to select one of the pre-defined configuration templates. The Gaia First Time Configuration Wizard uses the specified configuration during the Gaia OS installation. Pre-defined configuration templates: * **Security Gateway** * Installs a single Security Gateway. * Select "`Cluster`" to install a Security Gateway as a ClusterXL Cluster Member. * You can specify the one-time activation key for SIC (**it is saved in clear-text on the USB device**). You must use this one-time key in SmartConsole when you create the Security Gateway / Cluster Member object. * **Security Management** * Select "`Primary`" to install a single Security Management Server, or a Primary Security Management Server in the Management High Availability environment. By default, all GUI clients are allowed. You can change this later (connect to the command line on the Gaia server and run the "`cpconfig`" command \> refer to the option "`GUI Clients`"). * Select "`Secondary`" to install a Secondary Security Management Server in the Management High Availability environment. You can specify the one-time activation key for SIC (**it is saved in clear-text on the USB device**). You must use this one-time key in SmartConsole when you create the Check Point Host object for this Secondary Security Management Server. * **Standalone (Security Management and Gateway)** * By default, all GUI clients are allowed. You can change this later (connect to the command line on the Gaia server and run the "`cpconfig`" command \> refer to the option "`GUI Clients`"). |
| **Advanced** | Required to provide your advanced configuration file "*config_system* " for Gaia First Time Wizard (see [sk69701](https://support.checkpoint.com/results/sk/sk69701)). |
| **Manual** | Required to run the Gaia First Time Configuration Wizard manually after the Gaia OS installation completes. |
4. Configure the Gaia OS settings - networking and the Expert mode password:

* In the **Hostname** field, enter the desired hostname.
* In the **IP address (Mgmt)** field, enter the applicable IPv4 address.
* In the **Subnet mask** field, enter the applicable IPv4 subnet mask.
* In the **Default gateway** field, enter the applicable IPv4 default gateway.
* In the **OS password** field, enter the password for the Expert mode (**it is saved in clear-text on the USB device**).
**Important** - In R81.20 and higher, this password also configures the Gaia OS Maintenance Mode password. For security reasons, we recommend to change the Maintenance Mode password after the installation completes. See the *[Gaia Administration Guide](https://support.checkpoint.com/product/73#f-commonsource=C.%20Documentation)* for your version.
* In the **Confirm password** field, enter the password for the Expert mode again.
**Note** - In R80 and higher, to change the Security Management Server Administrator's password after the server installation, use the API command "***mgmt_cli set administrator*** " (refer to the [Management API Reference](https://sc1.checkpoint.com/documents/latest/APIs/index.html#cli/set-administrator)).
5. Select the checkbox **Additional OS configuration** to provide additional Gaia OS configuration to be applied after the Gaia First Time Configuration Wizard (for example, dynamic routing settings).
**Important Notes:**
* **This must be a plain-text file with correct Gaia Clish commands (for example, run the "show configuration" command on an existing Gaia OS).**
* **This file must not contain any configuration that reboots the Gaia OS automatically.**

6. Click **OK** to save the **Appliance Configuration** profile.
7. Click **OK** to close the **Configuration** window.
6. **Optional:** In the **Select hotfixes** line, click **Select**.
**Note** - This configuration is **not** supported for Scalable Platforms (ElasticXL, Maestro, Scalable Chassis).
You can select Hotfix or Jumbo Hotfix Accumulator packages to install automatically after the Gaia OS installation completes and the Gaia First Time Configuration Wizard completes.
Show / Hide this section
**Important Notes:**
* Make sure to read the "Unsupported features" and the "Known Limitations" sections.
* These must be CPUSE Offline packages.
* Select the packages in the correct order.
**Steps:**
1. Click **Import** and select the required package.
2. Click **OK** to close the **Hotfixes** window.

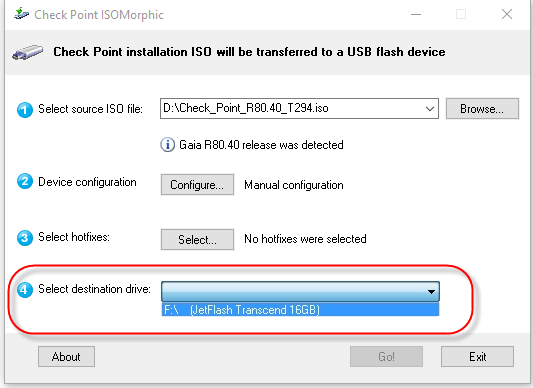
7. In the **Select destination drive** field, select the USB device drive.
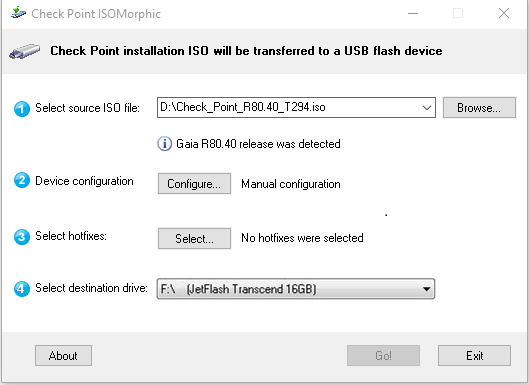
8. Click the **Go!** button.
9. The prompt "**Do you want installation to be interactive or unattended?**" appears.
* If you selected an interactive installation, this warning window appears:
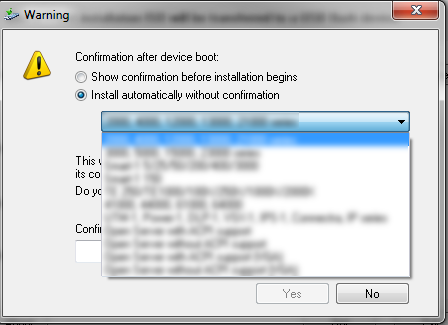
For ISO morphic Tool build 201 and higher, these options are available:
* `Check Point appliance (any model)`
* `Open Server with console`
* `Open Server with VGA`
For ISO morphic Tool build 198 and lower, these options are available:
* `2000, 4000, 12000, 13000, 21000 series`
* `3000, 5000, 15000, 23000 series`
* `Smart-1 5/25/50/200/400/525/3000/5050/5150`
* `Smart-1 150`
* `TE 250/TE1000/100X/250X/1000X/2000X`
* `41000, 44000, 61000, 64000`
* `UTM-1, Power-1, DLP-1, VSX-1, IPS-1, Connectra, IP series`
* `Open Server with ACPI support`
* `Open Server without ACPI support`
* `Open Server with ACPI support (VGA)`
* `Open Server without ACPI support (VGA)`
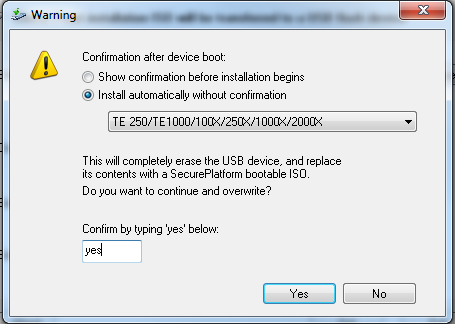
**Important** : For SandBlast Threat Emulation appliances, you must select an interactive installation, and you must select the "**TE \**" option from the dropdown menu. Otherwise, the appliance will not boot properly:
> 
* If you selected an unattended installation, this warning window appears:
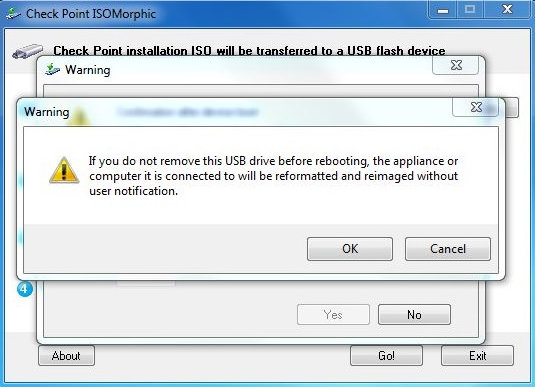
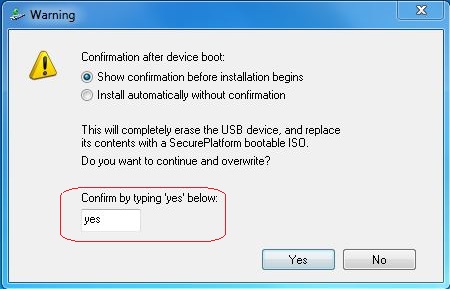
10. Enter '**yes** ' if you are sure you want to continue and click **Yes**.
Example:
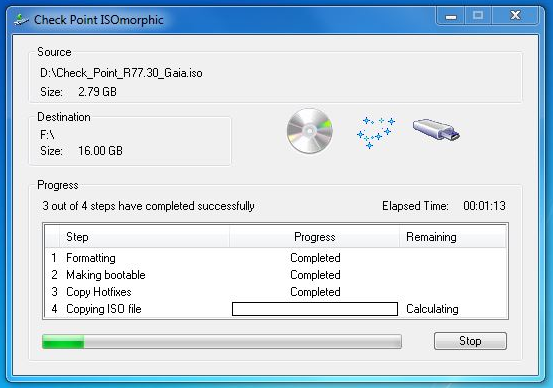
11. The USB drive will be formatted and prepared.
The **Progress** section shows the steps and their progress.
Example:
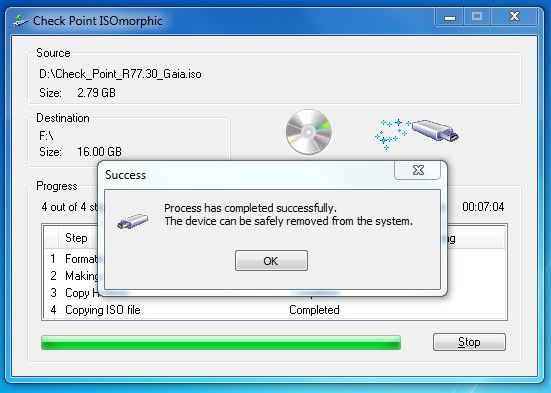
12. Wait until all steps are complete, and then **unplug** the USB device from your computer.
**Warning:** Do **not** forget to unplug the USB device from your computer after preparing it. Otherwise, the local drive will be formatted without any user confirmation when your computer is rebooted.
Installing Gaia OS on the Check Point Appliance / Open Server using the USB device {#Installing}
------------------------------------------------------------------------------------------------
Show / Hide this section
1. Prepare the USB device as described in the "Preparing a USB device for Deployment" section above.
2. Shut down the Appliance / Open Server.
3. Connect to the Appliance / Open Server over console.
* For Check Point Appliances, see the [Getting Started Guide](https://support.checkpoint.com/results/sk/sk96246) for your appliance model.
* For Open Servers, see the vendor documentation
4. Plug in the USB device to the Appliance / Open Server.
5. Turn on the Appliance / Open Server.
6. After booting successfully from the USB drive, the *SYSLINUX* window appears.
**Note**: If the Appliance / Open Server did not boot from the USB device, then check that BIOS settings allow to boot from USB.
For ISO morphic Tool build 201 and higher:
>
> ```
> Available options:
> ------------------
> 1 - Boot from local disk
> 2 - Check Point appliance (any model)
> 3 - Open Server with console
> 4 - Open Server with VGA
> Default is 2, press for a list of options
> ```
For ISO morphic Tool build 198 and lower:
>
> ```
> Available options:
> ------------------
> 1 - Boot from local disk
> 2 - 2000, 4000, 12000, 13000, 21000 series
> 3 - 3000, 5000, 15000, 23000 series
> 4 - Smart-1 5/25/50/200/400/525/3000/5050/5150
> 5 - Smart-1 150
> 6 - TE 250/TE1000/100X/250X/1000X/2000X
> 7 - 41000, 44000, 61000, 64000
> 8 - UTM-1, Power-1, DLP-1, VSX-1, IPS-1, Connectra, IP series
> 9 - Open Server with ACPI support
> 10 - Open Server without ACPI support
> 11 - Open Server with ACPI support (VGA)
> 12 - Open Server without ACPI support (VGA)
> Default is 1, press for a list of options
> ```
7. Enter the number of the applicable boot option and press the Enter key:
**Notes:**
* If you do not enter any number in the *SYSLINUX* window, then after 90 seconds the installation will continue with the default option based on the installation type that you selected when you prepared the USB device in the ISOmorhic window:
* If you selected the option '**Yes - confirm before start** ' / '**Show confirmation before installation begins**' in the ISOmorphic window, then the default option is to abort the installation from USB device boot the Appliance / Open Server from the local drive.
* If you select the option '**No - fully automatic installation** ' / '**Install automatically without confirmation**' in the ISOmorphic window, then you already selected one of the options from the drop-down menu.
* When installation ends successfully:
* On a Check Point Appliance: The LCD panel shows a success message.
* The LEDs on interfaces blink in a round-robin fashion (LEDs light up on one interface, then on the next interface, and so on).
**Warning** - Do **not** forget to unplug the USB device from your Appliance / Open Server. Otherwise, if you selected the '*Install automatically without confirmation*' option when preparing the USB device, the local drive will be formatted without any user confirmation when the Appliance / Open Server is rebooted.
Restoring to Factory Defaults {#Restoring to Factory Defaults}
--------------------------------------------------------------
When restoring the appliance to factory defaults that you installed using the ISOmorphic tool, the Gaia OS uses the default values based on the advanced parameters you configured in ISOmorphic tool in the **Appliance Configuration** window - Product, SIC key, Hostname, IPv4 address, IPv4 Subnet mask, IPv4 Default gateway, OS password.
Manual USB Device Initialization {#Manual USB Device Initialization}
--------------------------------------------------------------------
This section applies to the ISOmorphic build 207 and higher.
Show / Hide this section
If on the main screen of the ISOmorphic tool, in the **Installation target** field, you selected the **UEFI** profile, then the USB device will contain a hidden EFI partition.
If you want to delete all content completely from such a USB device, follow the steps below.
This section describes the steps to initialize a USB storage device using the DiskPart tool in Windows OS.
1. Plug in the USB device to your computer.
2. Open the Windows Start menu and enter:
**cmd**
3. Right-click the **Command Prompt** application and click "**Run as administrator**".
4. In the Command Prompt, enter this command and press the Enter key:
**diskpart**
5. Wait for the prompt to change from "**C:\\WINDOWS\\system32\>** " to "**DISKPART\>**".
6. Run these DiskPart commands:
1. Show all disks / drives:
`DISKPART> list disk`
* Examine the **Size** column - the USB Device Disk has the smallest size.
* Examine the **GPT** column - does the USB Device Disk has the asterisk (\*) character?
2. Select the USB Device Disk:
**Warning - Be very careful! Make sure to specify the correct disk.**
`DISKPART> select disk `
3. Delete all partitions:
`DISKPART> clean`
4. If the USB device is using the GPT layout (the GPT column showed the asterisk (\*) character), then change the layout to MBR:
`DISKPART> convert mbr`
5. Create a primary partition (using MBR):
`DISKPART> create partition primary`
6. Show all partitions (the output should show only one newly created partition):
`DISKPART> list partition`
7. Select the primary partition to operate:
`DISKPART> select partition 1`
8. Make the primary partition active (bootable):
`DISKPART> active`
9. Format the active primary partition as FAT32
`DISKPART> format fs=fat32 [quick]`
The command performs the full format that takes several minutes.
To run a quick format, specify the "`quick`" parameter.
10. Assign a drive letter to the primary partition (just in case, if Windows did not already do it):
`DISKPART> assign`
11. Quit DiskPart:
`DISKPART> exit`
Related Solutions {#Related solutions}
--------------------------------------
* [sk92423 - Errors when machine boots from a USB device formatted by ISOmorphic Tool](https://support.checkpoint.com/results/sk/sk92423)
* [sk100566 - Gaia OS clean install from USB device fails](https://support.checkpoint.com/results/sk/sk100566)
* [sk122014 - Errors during Gaia fresh-install using a bootable USB created with ISOmorphic Tool](https://support.checkpoint.com/results/sk/sk122014)
*** ** * ** ***
**Click Here to Show / Hide the Old ISOmorphic Tool Article**{#Old}
**Table of Contents:**
* General Limitations
* Preparing USB device for Regular Deployment
* Preparing USB device for Unattended Deployment
* Installing Gaia / SecurePlatform OS on the Appliance / Open Server using the USB device
* Possible errors
General Limitations {#General Limitations}
------------------------------------------
* ISOmorphic can be used for **fresh** install only.
* Basic networking can be preconfigured **only** for Gaia R77.20 and higher, and **only** for Check Point appliances.
* VSX NGX R67.10 ISO is **not** supported.
Preparing USB device for Regular Deployment {#Regular Deployment}
-----------------------------------------------------------------
Regular Deployment is used to install Gaia / SecurePlatform OS interactively.
1. **Prepare the USB device with ISO file**
1. Format the USB device as FAT32. Make sure you have the Gaia ISO file corresponding to the appliance model and the relevant release.
2. Run the ISOmorphic tool (download [from here](https://support.checkpoint.com/results/download/12648))
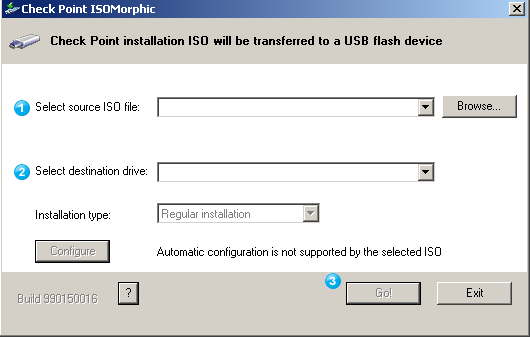
3. In the '**`Select Source ISO file`**' field, browse for the Gaia / SecurePlatform ISO file.
4. In the '**`Select destination drive`**' field, select the USB device drive.
5. In the '**`Installation type`** ' field, select '**`Regular installation`**'.
2. **Optional (for Gaia ISO R77.20 and higher):** Configure basic networking to be applied on the appliance during the installation:
Background:
> Starting in Gaia R77.20, basic networking can be preconfigured using the ISOmorphic tool. The tool saves the configuration on the USB device as an XML file, and applies it automatically on the appliance after installation.
>
> The ISOmorphic tool lets you save different configurations for different appliances on the same USB device.
>
> Each configuration object contains:
> * Interface name to be configured (default is the Management interface)
> * IPv4 address
> * Subnet mask
> * Default Gateway (optional)
> * MAC address of the Management interface of the appliance to be configured, or default.
>
> During the deployment, the appliance searches for its MAC address in the XML configuration file. If the MAC address is not found, then the appliance applies the default configuration.
Configuration procedure:
1. Click the '**`Configure`**' button.
**Note:** For Gaia / SecurePlatform ISO R77.10 and lower, this button is greyed out.
2. The configuration window opens:
**Note:** In this window, you can import a previously prepared configuration file (XML), or export the current configuration.
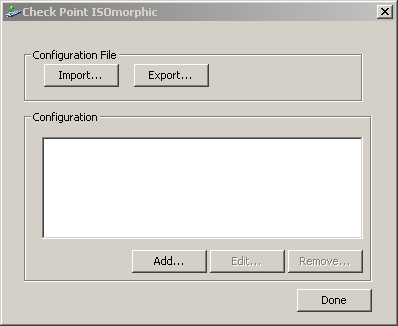
3. Click the '**`Add...`**' button to configure the basic networking settings.
**Note:** Only one interface can be configured on the same appliance.
* Select the '**`Default`**' option.
* Type the name for the interface name.
* Enter the IP address.
* Enter the subnet mask.
* Enter the default gateway (optional).
*Example*:
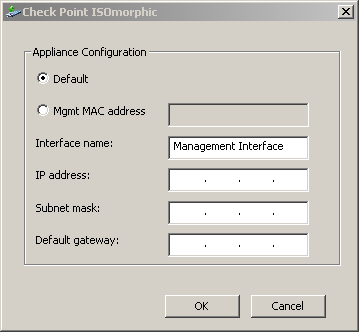
**Note:** If you want to use the same USB device for multiple appliances, then select the '**`Mgmt MAC address`**' option before you enter the configuration settings. When an appliance with the specified MAC address is being installed from the USB device, the pre-configured settings are applied to it. If the appliance's MAC address does not match the MAC address in the tool's configuration file, then the default settings are applied (if a default configuration exists).
4. Click '`OK`'. You return to the previous window.
*Example*:
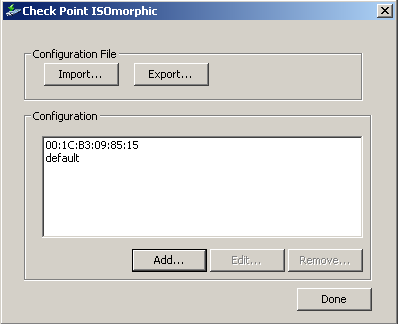
5. You can now reiterate and add more configurations with different MAC addresses (or default, if not configured yet).
6. Click the '**`Done`**' button.
**Limitations:**
* Only Gaia R77.20 and higher are supported (no backward compatibility).
* Only one interface can be configured on the same appliance.
* Only Check Point appliances are supported (excluding IP Series Appliances).
* New features are not supported on SecurePlatform OS.
* IPSO OS is not supported.
* Open Servers are not supported (the installation will prompt the user for the configuration).
* VMWare Virtual Machines are not supported (the installation will prompt the user for the configuration).
3. In the main window, click the '**`Go!`**' button at the bottom.
A warning message appears. Type "**`yes`** " in the warning window to confirm the USB drive formatting, and click the '**`Yes`**' button:

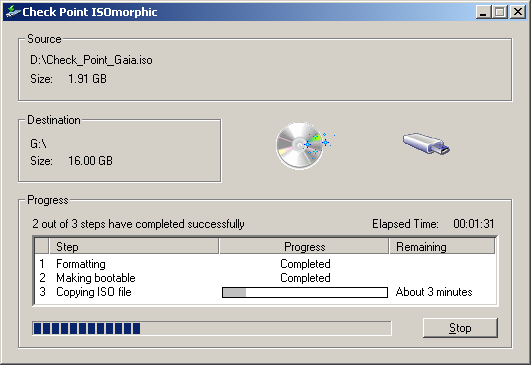
4. The USB drive is formatted and prepared. The progress window is displayed.
*Example*:
5. Wait until all steps are complete and then unplug the USB device from your desktop computer:

6. Continue to section "Installing Gaia / SecurePlatform OS on the Appliance / Open Server using the USB device".
Preparing USB device for Unattended Deployment {#Unattended Deployment}
-----------------------------------------------------------------------
Unattended Deployment is used to install Gaia OS on Check Point appliances without any user input.
1. **Prepare the USB device with ISO file**
1. Make sure you have the Gaia ISO file corresponding to the appliance model and the relevant release.
2. Run the ISOmorphic tool (download it from the section "Preparing USB device for Deployment (+ download link)").

3. In the '**`Select Source ISO file`**' field, browse for the Gaia / SecurePlatform ISO file.
4. In the '**`Select destination drive`**' field, select the USB device drive.
5. In the '**`Installation type`** ' field, select the '**`Unattended installation`**'.
6. The following warning appears (click either '`OK`', or '`Cancel`'):

7. **For Gaia ISO R77.20 and higher:** Configure basic networking to be applied on the appliance during the installation:
Background:
> Starting in Gaia R77.20, basic networking can be preconfigured using the ISOmorphic tool. The tool saves the configuration on the USB device as an XML file, and applies it automatically on the appliance after installation.
>
> The ISOmorphic tool lets you save different configurations for different appliances on the same USB device.
>
> Each configuration object contains:
> * Interface name to be configured (default is the Management interface)
> * IPv4 address
> * Subnet mask
> * Default Gateway (optional)
> * MAC address of the Management interface of the appliance to be configured, or default.
>
> During the deployment, the appliance searches for its MAC address in the XML configuration file. If the MAC address is not found, then the appliance applies the default configuration.
Configuration procedure:
1. Click the '**`Configure`**' button.
**Note:** For Gaia / SecurePlatform ISO R77.10 and lower, this button is grayed out.
2. The configuration window opens:
**Note:** In this window, you can import a previously prepared configuration file (XML), or export the current configuration.

3. Click the '**`Add...`**' button to configure the basic networking settings.
**Note:** Only one interface can be configured on the same appliance.
* Select the '**`Default`**' option.
* Type the name for the interface name.
* Enter the IP address.
* Enter the subnet mask.
* Enter the default gateway (optional).
*Example*:

**Note:** If you want to use the same USB device for multiple appliances, then select the '**`Mgmt MAC address`**' option before you enter the configuration settings. When an appliance with the specified MAC address is being installed from the USB device, the pre-configured settings are applied to it. If the appliance's MAC address does not match the MAC address in the tool's configuration file, then the default settings are applied (if a default configuration exists).
4. Click '`OK`'.
You return to the previous window.
*Example*:

8. You can now reiterate and add more configurations with different MAC addresses (or default, if not configured yet).
9. Click the **Done** button.
**Limitations:**
* Only Gaia R77.20 and higher are supported (no backward compatibility).
* Only one interface can be configured on the same appliance.
* Only Check Point appliances are supported (excluding IP Series Appliances).
* SecurePlatform OS is not supported.
* IPSO OS is not supported.
* Open Servers are not supported (the installation will prompt the user for the configuration).
* VMWare Virtual Machines are not supported (the installation will prompt the user for the configuration).
2. In the main window, click the '**Go!**' button at the bottom.
A warning message appears. Enter "**`yes`** " in the warning window to confirm the USB drive formatting, and click the **Yes** button:

3. The USB drive is formatted and prepared. The progress window is displayed.
*Example*:

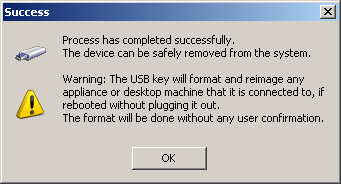
4. Wait until all steps are complete:
**Warning:** Do **not** forget to unplug the USB device from your desktop computer after preparing it. Otherwise, the local drive will be formatted without any user confirmation when your desktop is rebooted.

or
5. Continue to the section "Installing Gaia / SecurePlatform OS on the Appliance / Open Server using the USB device".
Installing Gaia / SecurePlatform OS on the Appliance / Open Server using the USB device {#Installing Gaia / SecurePlatform OS on the Appliance / Open Server using the USB device}
----------------------------------------------------------------------------------------------------------------------------------------------------------------------------------
1. Prepare the USB device either for Regular Deployment, or for Unattended Deployment (supported only on Check Point appliances).
2. Make sure the Appliance / Open Server is turned off.
3. Connect to the Appliance / Open Server over console (configure the standard connection - Rate 9600, Data Bits 8, Parity None, Stop bits 1, No Flow Control).
4. Connect the USB device to the Appliance / Open Server.
5. Turn on the Appliance / Open Server.
6. After booting successfully from the USB drive, the *SYSLINUX* window should appear:
**Note:** If the machine did not boot from the USB device, then check that BIOS settings allow to boot from USB.
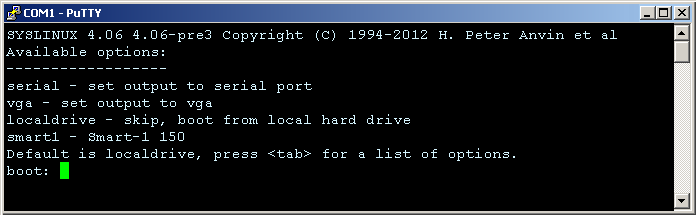
7. Enter the boot option according to the connection type you are using:
* **`serial`** - for serial connection (i.e., console connection on Appliance / Open Server)
* **`vga`** - for VGA or other graphic mode connection (only for Open Servers with video card)
* **`localdrive`** - for booting from local hard disk
* **`smart1`** - only for installing on *Smart-1 appliance* and *Threat Emulation appliances* TE100X / TE250X / TE1000X / TE2000X
**Note:** If no option is entered in the *SYSLINUX* window, then after 90 seconds the installation will continue with the default option based on the installation type that was selected when preparing the USB device:
* If you selected '`Regular installation`' type, then the default option is *`localdrive`*, i.e., the installation from USB device will be aborted and machine will boot from the local drive.
* If you selected '`Unattended installation`' type, then the default option is *`serial`*.
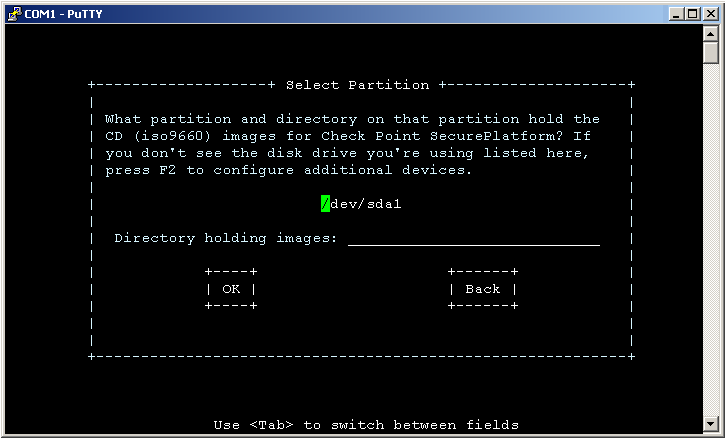
8. If you install SecurePlatform OS, then on some SecurePlatform versions, you will be asked to select the partition from which to load the SecurePlatform ISO image:
Note: Usually, you should select the last option on the list.
*Example for SecurePlatform OS*:
9. When the installation ends successfully, there are two indications:
* LCD panel shows success message.
* The interfaces blink in a round-robin fashion.
10. **Warning:** Do **not** forget to unplug the USB device from the Appliance / Open Server. Otherwise, if you used the '*Unattended installation*' type for preparing the USB device, the local drive will be formatted without any user confirmation when the Appliance / Open Server is rebooted.
Unattended Deployment - Example
-------------------------------
An experienced administrator prepares a USB device with configurations for an unattended R77.20 installation.
An experienced administrator sends the USB device to a remote office site.
At the remote office site, an inexperienced administrator performs the following steps:
* Shuts down the appliance.
* Connects the network cables to the appliance.
* Connects to the appliance over console.
* Connects the USB device to the appliance.
* Turns on the appliance.
* Waits until the installation succeeds (as shown on the LCD panel, or by blinking interfaces lights).
* Removes the USB device from the appliance.
* Reboots the appliance.
An experienced administrator connects remotely to the appliance over SSH, or to Gaia Portal and continues the configuration (e.g., First Time Configuration Wizard).
Possible Errors {#Possible errors}
----------------------------------
The following message might appear on the screen during the ISO installation:
`find: /tmp/hdimage/`**`.iso: Value too large for defined data type`
> *Example*:
>
> `find: /tmp/hdimage/Check_Point_R75.20_Appliance.iso: Value too large for defined data type`
Root cause:
[Busybox](http://busybox.net/about.html) that is used for ISO installation from USB device was not compiled with 64-bit file-offsets (*`_FILE_OFFSET_BITS=64`*).
The ramdisk on the USB device mounts the ISO image, and then mounts '`stage2.img`' from the ISO image, afterwards it unmounts the ISO image, and '`stage2.img`' remounts the ISO.
When '`stage2.img`' is running, the '`find`' command complains when it sees an ISO file larger than 2 GB.
Next steps:
This message can be safely ignored. The installation completes successfully, and installed software works correctly.
Revision History {#Revision History}
------------------------------------
Show / Hide this section
|--------------|--------------------------------------------------------------------------------------------------------------------------------------------------------------|
| Date | Description |
| 12 June 2025 | Release of ISOmorphic package *Build 218* |
| 12 May 2025 | In the "Procedure for the ISOmorphic tool Build 207 and higher", added Maestro Orchestrator models in the section |
| 25 Oct 2023 | In the "Procedure for the ISOmorphic tool Build 207 and higher", updated the appliance models in the profiles that appear in the "Installation target" field |
| 24 Oct 2023 | Release of ISOmorphic package *Build 207* |
| 29 Aug 2023 | Release of ISOmorphic package *Build 203* |
| 02 July 2023 | Improved formatting of this article |
| 23 Nov 2022 | Release of ISOmorphic package *Build 201* |
| 18 Apr 2022 | Release of ISOmorphic package *Build 198* |
| 02 Dec 2021 | Release of ISOmorphic package *Build 194* |
| 07 Nov 2021 | Updated the What's New section with Smart-1 support in *Build 187* |
| 18 May 2021 | Release of ISOmorphic package *Build 187* |
| 21 Oct 2020 | Added support for R81 |
| 27 Apr 2020 | Release of ISOmorphic package *Build 181* |
| 23 Oct 2019 | Updated the Unsupported features list |
| 01 Sep 2019 | Release of ISOmorphic package *Build 180* |
| 31 Jul 2019 | Release of ISOmorphic package *Build 178* |
| 28 Apr 2019 | Added support for R80.30 |
| 23 Jan 2019 | Release of ISOmorphic package *Build 168* |
| 01 Nov 2018 | Added "Restoring to Factory Defaults" section |
| 27 June 2018 | Release of ISOmorphic package *Build 166* |
| 22 May 2018 | Release of ISOmorphic package *Build 164* |
| 22 June 2017 | Release of ISOmorphic package *Build 160* |
---
# Agent Instructions
This content is from the Check Point Support Center (https://support.checkpoint.com), the official knowledge base for Check Point cybersecurity products.
## Navigating This Knowledge Base
- **Complete index**: [llms.txt](https://support.checkpoint.com/llms.txt)
- **All SK articles**: [SecureKnowledge Sitemap](https://support.checkpoint.com/sitemaps/secureknowledge-sitemap-index.xml)
- **SK article URL pattern**: `https://support.checkpoint.com/results/sk/{skId}`
- **Markdown responses**: AI bot User-Agents automatically receive `text/markdown` content