> Source: [sk34295](https://support.checkpoint.com/results/sk/sk34295)
# sk34295 - How to configure DNS NAT
| Property | Value |
|----------|-------|
| Solution ID | sk34295 |
| Date Created | 2008-01-30 |
| Last Modified | 2026-09-02 |
| Technical Level | General |
| Products | Security Gateway |
| Versions | R82.10, R81.20, R81.10 (EOS), R81 (EOS) |
## Solution
In some topologies, it is required to NAT reply traffic from a DNS server, so that the querying host thinks that a certain DNS entry (for example, `smtp.company.com`) is resolvable to an IP address other than the one written in the database of the DNS server.
Procedure
---------
The feature has a global on/off switch, in the **`$FWDIR/conf/objects_5_0.C`** file on Security Management Server / Domain Management Server, called **`fw_dns_xlation`** (by default set to *false* ). When its value is set to *true*, the regular NAT rulebase is used to determine how to change the DNS packets.
The regular NAT rules used to translate the internal servers will suffice. There is no need to define special NAT rules in addition to the regular ones defined.
**Step 1:**
Enable IPS on the relevant Security Gateway(s) with these settings:
1. In the SmartConsole, go to the `Manage & Settings` \> `Blades` view
2. Go to Blades -\> inspection settings 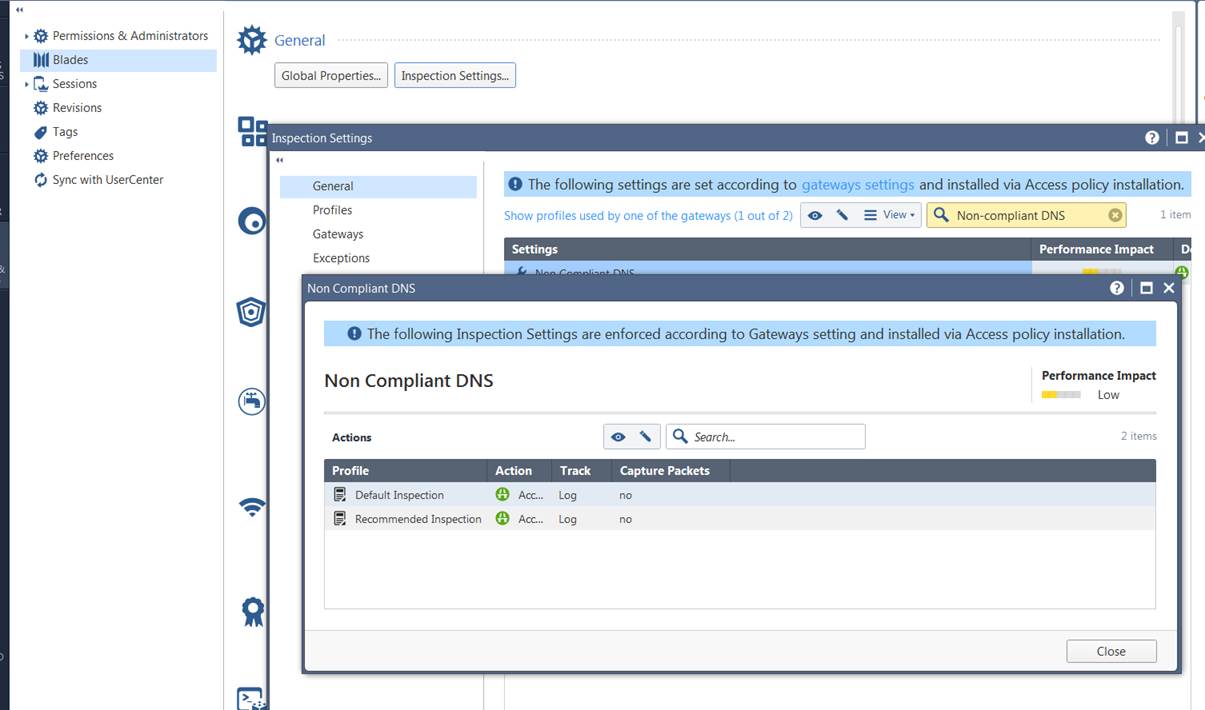
3. Change the action to Drop (and not prevent in the relevant profile).
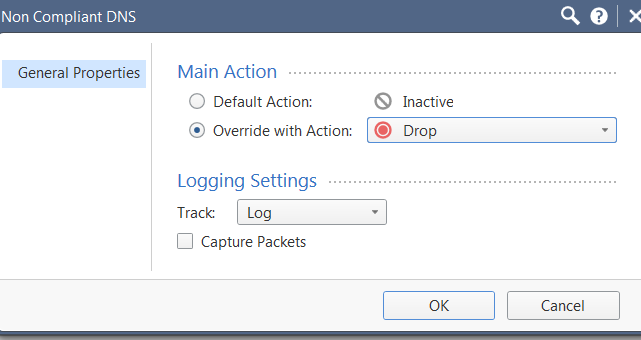
4. These IPS settings/protection/Inspection settings do not require an IPS Blade license/subscription. Using other features in the IPS Blade may require a license. If you do not want to run a full set of IPS protections, create a dedicated IPS profile with only the "`Non-compliant DNS`" protection activated.
5. **Step2:** Enable the **`fw_dns_xlation`** property:
1. Close all SmartConsole windows.
2. Connect with the GuiDBedit Tool to the Security Management Server / Domain Management Server.
3. In the left upper pane, go to '**`Table`** ' - '**`Global Properties`** ' - '**`properties`** '.
4. In the right upper pane, select the '**`firewall_properties`**'.
5. Press CTRL+F (or go to '`Search`' menu - '`Find`') - paste **`fw_dns_xlation`** - click on '`Find Next`'.
6. In the lower pane, right-click on the **`fw_dns_xlation`** - '`Edit...`' - choose "**`true`** " - click on '`OK`'.
7. Save the changes: go to '`File`' menu - click on '`Save All`'.
8. Close the GuiDBedit Tool.
9. Connect with SmartDashboard to the Security Management Server / Domain Management Server.
10. Install the policy on the relevant Security Gateway/Cluster object.
6. From this point on, the Security Gateway will apply NAT to the DNS data, according to the NAT rules.
Limitations
-----------
* IPv6 is *not* supported (refer to [sk39374 - IPv6 Support FAQ](https://supportcenter.checkpoint.com/supportcenter/portal?eventSubmit_doGoviewsolutiondetails=&solutionid=sk39374) - question "What are the most common unsupported features/products with IPv6 in releases prior to R76?").
* The Manual NAT rules for network objects or Automatic NAT Static rules for Host objects must be used. This feature does not work with Automatic NAT Static rules of Network objects.
* DNS traffic (DNS Requests) will be translated based on the Destination address in the NAT rules without considering the Source of the traffic. The NAT DNS payload requires static NAT rules in which the DNS response that needs to be translated is set as the original destination, and the requested translation for it is the translated destination.
* The feature does not work for a DNS Zone Transfer (used to synchronize DNS databases between to internal DNS servers).
* The feature does not work for DNS Queries over TCP.
* Security Gateway must be between the querying host and the DNS server.
* Since this IPS protection is enabled, the UDP DNS traffic cannot be accelerated by SecureXL. This traffic will be processed by the Medium path or the Firewall path (CoreXL), depending on the configuration of the Security Gateway(s).
* DNS NAT does not work on R82 Security Gateways. Refer to [sk181128](https://support.checkpoint.com/results/sk/sk181128 "Check Point Quantum R82 Release Known Limitations")
7. **Note**:
8. If the "`NAT for DNS payload`" option is enabled, and the IPS protection "`Non-compliant DNS`" is disabled in at least one of IPS profiles, the Security Policy installation will succeed, but the following warning will appear:
9. "`You enabled NAT on DNS payload, please make sure that DNS UDP protocol enforcement defense is enabled on the desired gateway.`"
NAT matching is performed in both directions, original \> translated and translated \> original
---
# Agent Instructions
This content is from the Check Point Support Center (https://support.checkpoint.com), the official knowledge base for Check Point cybersecurity products.
## Navigating This Knowledge Base
- **Complete index**: [llms.txt](https://support.checkpoint.com/llms.txt)
- **All SK articles**: [SecureKnowledge Sitemap](https://support.checkpoint.com/sitemaps/secureknowledge-sitemap-index.xml)
- **SK article URL pattern**: `https://support.checkpoint.com/results/sk/{skId}`
- **Markdown responses**: AI bot User-Agents automatically receive `text/markdown` content