> Source: [sk182336](https://support.checkpoint.com/results/sk/sk182336)
# sk182336 - Preventative Hotfix for CVE-2024-24919 - Quantum Gateway Information Disclosure
| Property | Value |
|----------|-------|
| Solution ID | sk182336 |
| Date Created | 2024-05-26 |
| Last Modified | 2025-09-01 |
| Technical Level | General |
| Products | Security Gateway, Spark Firewall (Locally Managed), Scalable Platforms, Cloud Firewall |
| Versions | R81.20, R81.10 (EOS), R81.10.X, R81 (EOS), R81.20, R81.10 (EOS), R81 (EOS), R81 (EOS), R81.10 (EOS), R81.20 |
| OS | Gaia |
## Solution
**This article refers to Quantum Security Gateways running Gaia OS and CloudGuard Network Security.
For Quantum Spark Gateways that run a Gaia Embedded OS, see [sk182357](https://support.checkpoint.com/results/sk/sk182357).**
Following our security update on May 27, 2024, Check Point's dedicated task force continues investigating attempts to gain unauthorized access to VPN products used by our customers. On May 28, 2024 we discovered a vulnerability in Security Gateways with IPsec VPN in Remote Access VPN community and the Mobile Access software blade (CVE-2024-24919). Exploiting this vulnerability can result in accessing sensitive information on the Security Gateway.
This, in certain scenarios, can potentially lead the attacker to move laterally and gain domain admin privileges.
If you need any additional assistance, [contact Check Point Support](https://www.checkpoint.com/support-services/contact-support/) or your local Check Point representative.
**Table of Contents**
* **Recommended step - Install Jumbo Hotfix Accumulator to fix CVE-2024-24919**
* Security Gateway Hotfix to prevent exploit of CVE-2024-24919
* Important extra measures
* Additional Frequently Asked Questions
* Article Revision History
Note: You are protected from CVE-2024-24919 if your Security Gateway already runs one of these versions:
* R81.20 Jumbo Hotfix Accumulator Recommended Take 65
* R81.10 Jumbo Hotfix Accumulator Recommended Take 150
* R81 Jumbo Hotfix Accumulator Recommended Take 99
For any other version, proceed to the below steps.
Recommended step - Install Jumbo Hotfix Accumulator to fix CVE-2024-24919 {#Content_0}
--------------------------------------------------------------------------------------
The fix is included in these Jumbo Hotfix Accumulators
**Note that Check Point Recommended version for all deployments is [R82](https://support.checkpoint.com/results/sk/sk181127) with its [Recommended Jumbo Hotfix Accumulator](https://sc1.checkpoint.com/documents/Jumbo_HFA/R82/Default.htm) Take.**
|-------------------------------------|--------------------------------------------------------------------------------------------------------------|
| Version | Take # |
| **R81.20 Jumbo Hotfix Accumulator** | **[Recommended Take 65](https://sc1.checkpoint.com/documents/Jumbo_HFA/R81.20/R81.20/R81.20_Downloads.htm)** |
| **R81.10** Jumbo Hotfix Accumulator | [Recommended Take 150](https://sc1.checkpoint.com/documents/Jumbo_HFA/R81.10/R81.10/R81.10_Downloads.htm) |
| **R81** Jumbo Hotfix Accumulator | [Recommended Take 99](https://sc1.checkpoint.com/documents/Jumbo_HFA/R81/R81.00/R81.00_Downloads.htm) |
{#Unique_ID_HotfixesTable}
?o verify that you are up to date, go to the Gateways and Servers tab in SmartConsole and verify that all your Security Gateways show "Up to date," as shown in the screenshot below. If not, install the Recommended Jumbo Hotfix.

**If you wish not to install the Jumbo Hotfix Accumulator, the following hotfix is available:**
Security Gateway Hotfix to prevent exploit of CVE-2024-24919 {#Content_1}
-------------------------------------------------------------------------
Perform this step on ANY Security Gateway and Cluster that has EITHER of the following setups:
* The IPSec VPN Software Blade is enabled, but ONLY when included in the Remote Access VPN community.
* The Mobile Access Software Software Blade is enabled.
For **online** Security Gateways and Cluster Members, the Hotfix is available for you in CPUSE. To obtain the Hotfix:
1. In a web browser, connect to Gaia Portal on the Security Gateway / each Cluster Member.
2. Install the hotfix package:
|----------------|------------------------------------------------------------------------------------------------------------------------------------------------------------------------------------------------------------------------------------------------------------------------------------------------------------------------------------------------------------|
| CPUSE View | Instructions |
| Default | 1. Go to **Upgrades (CPUSE)** \> **Status and Actions**. 2. In the top right corner, click **Check For Updates**. 3. In the **Hotfixes** section, right-click the hotfix package "**Hotfix for CVE-2024-24919** " and click **Install Update** . 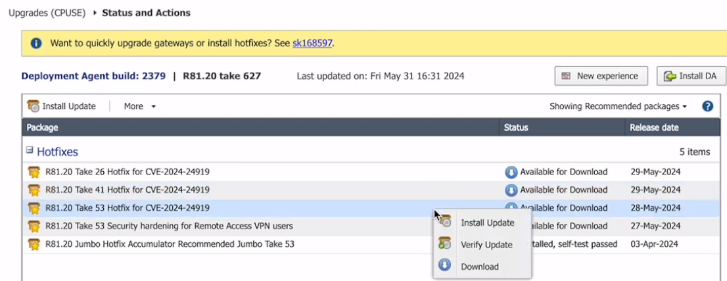 |
| New Experience | 1. Go to **Software Updates** \> **Available Updates**. 2. In the top right corner, click **Check for updates**. 3. In the **Hotfix Updates** section, in the "**Hotfix for CVE-2024-24919** " row, click **Install** . 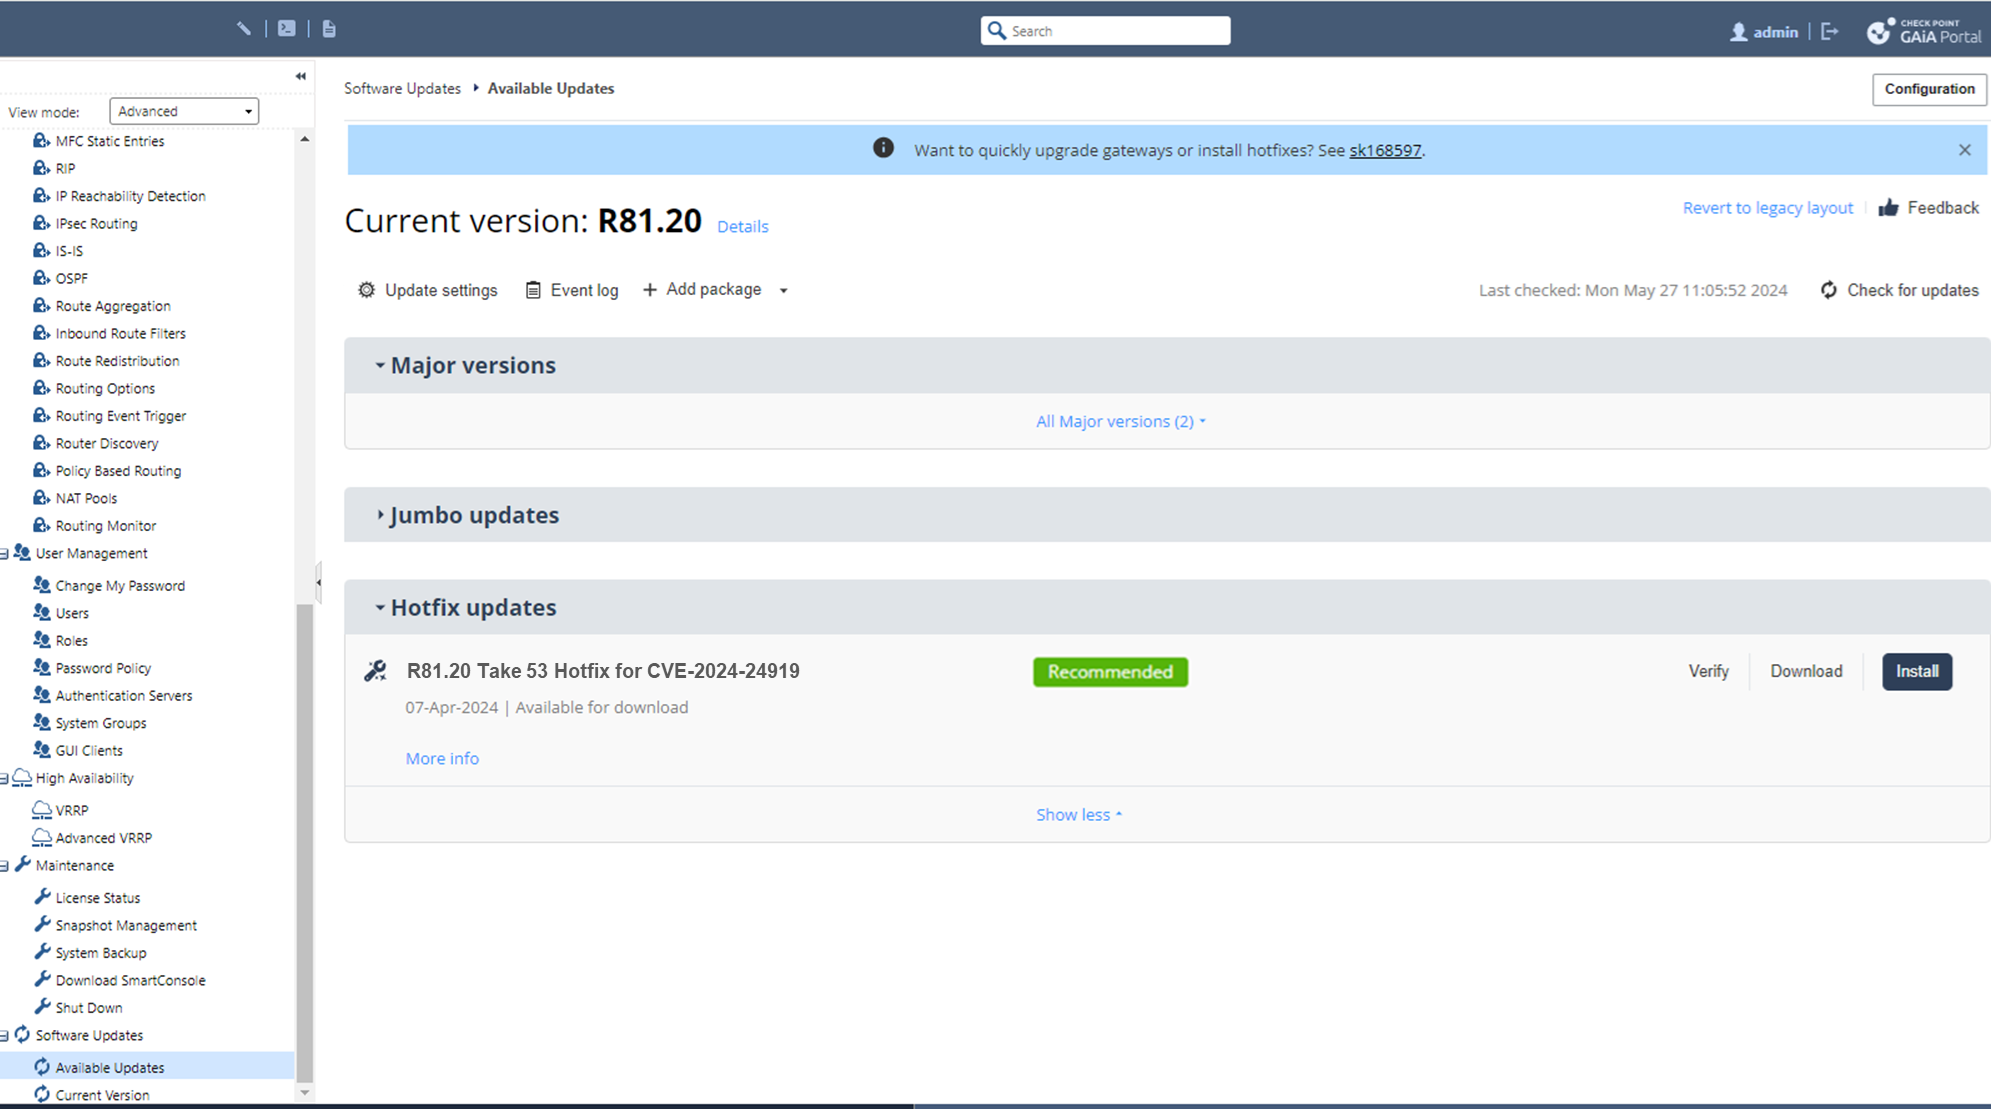 |
The process should take 5 to 10 minutes to complete and the confirmation window appears.
3. Reboot the Security Gateway / Cluster Member.
### Procedure for customers using CCCD - an Advanced VPN feature in R81.10 / R81.20
In R81.10, a new feature was introduced to improve VPN performance: CCCD.
**This feature is disabled by default, and is used by a very small number of Security Gateways globally.**
**Customers who use CCCD must disable this functionality for the Hotfix to be effective.**
Follow these steps to check the current CCCD state and disable it:
1. Log in to the command line (Expert mode) on the Security Gateway / each Cluster Member.
2. Run the command: `vpn cccd status`
The expected output is: `vpn: 'cccd' is disabled`.
If the output differs, permanently disable the `CCCD` process by running the `vpn cccd disable` command.
Note: This change survives a Security Gateway reboot.
### Procedure to identify vulnerable Security Gateways
Use this procedure to run the script that scans all the Security Gateways and Cluster Members configured in your Security Management Server or Domain Management Server. The script shows a list of Security Gateways / Clusters that have Remote Access VPN or Mobile Access blade enabled. The recommended action is to install the Security Gateway Hotfix. **The updated script checks if the Hotfix is installed**.
Click to Show / Hide this Section
|----------------------------------------------------------------------------------------------------------------------------------------------------------------------------------------------------------------------------------------------------------------|
| **Important Note:** To run a script from SmartConsole, the **permission profile** of a Management administrator must have these permissions on the **Gateways** page in the **Scripts** section: 1. **Run Repository Script** 2. **Manage Repository Scripts** |
**Procedure:**
1. Download the archive **[check-for-CVE-2024-24919-v3.zip](https://support.checkpoint.com/results/download/133115)** to your computer.
2. Extract the **check-for-CVE-2024-24919.sh** script file from the archive to a local directory.
3. Connect with SmartConsole to your Security Management Server (on a Multi-Domain Server, connect to any Domain Management Server).
4. From the left navigation panel, go to **Gateways \& Servers** view.
5. Click the **Security Management Server** object (and not a Security Gateway).
6. From the the top toolbar, click **Scripts** \> **Scripts Repository**.
The **Script Repository** window opens.
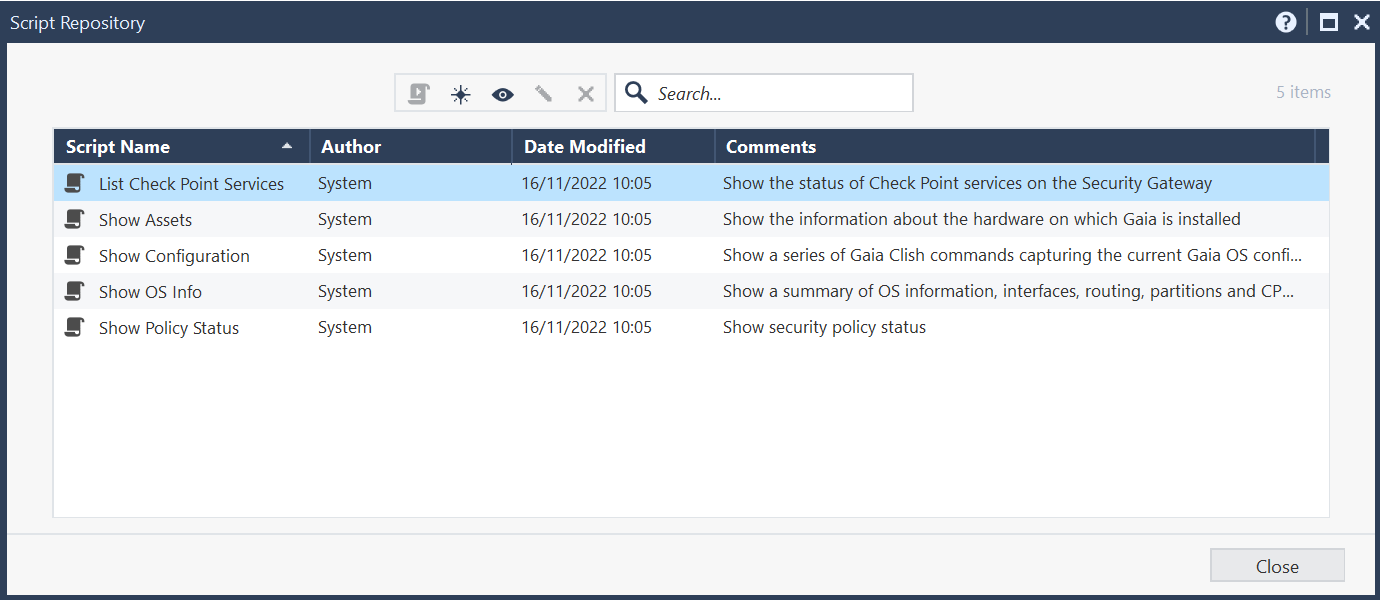
7. **Add the downloaded script to the repository**:
1. From the top toolbar, click **New**.
2. In the **Name** field, paste: **Check for CVE-2024-24919**
3. **Optional:** In the **Comment** field, paste: **Check my gateways for CVE-2024-24919 (sk182336)**
4. Click **Load from file** \> select the script file (**check-for-CVE-2024-24919.sh**).
5. Wait for the script content to appear.
6. Click **OK**.
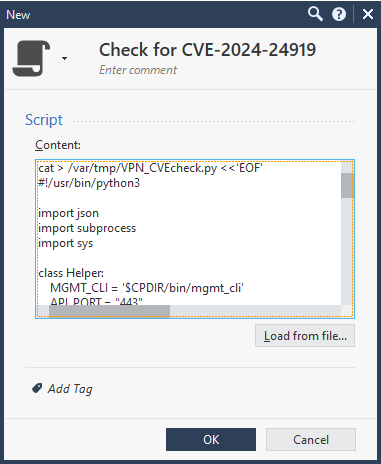
8. **Run the script:**
1. In the **Script Repository** window, select the newly added script.
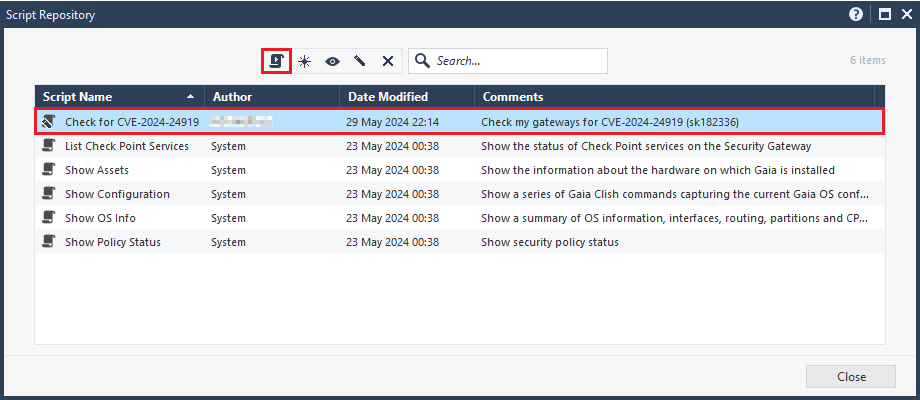
2. From the top toolbar, click **Run**.
3. The **Run 'Check for CVE-2024-24919' On '\'** window opens.
**Note for Multi-Domain Management:** By default, the script scans all Domain Management Servers (Domains) on the current Multi-Domain Server (MDS), both Active and Standby. In case some Domain Management Servers do not exist on the current Multi-Domain Server, make sure to run the script on additional Multi-Domain Servers as well.
The ability to scan multiple Domains, regardless to which Domain the administrator is currently connected, leverages the strong Run-Script permissions of an administrator that can access all Domains. It is meant to simplify the scanning all Domains on the Multi-Domain Server. To restrict the script to scan only a specific Domain, enter the Domain Name in the **Arguments** field.
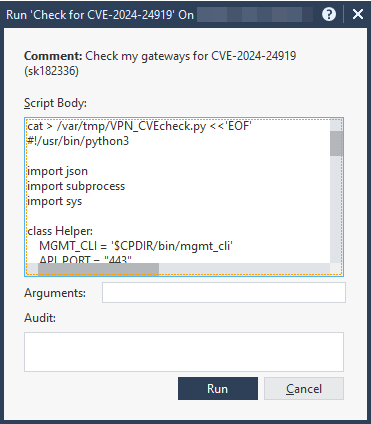
4. Click **Run**.
5. Close the **Script Repository** window.
6. Wait a few seconds for the script to complete - see the SmartConsole bottom left corner.
9. **Get the script results:**
1. In the SmartConsole bottom-left corner, click the **Task Monitoring** pane \> in the completed script task **Run Repository Script** , click **Details**.
2. The **Run Repository Script** window opens.
If the result is long, then in the **Results** section, click the **Show results** link.
Example result:
> `ALERT: The script identified vulnerable or potentially vulnerable gateways. Review sk182336 and details below for recommended actions.`
> `
> Number of vulnerable Remote Access gateway(s) identified: 1`
> `
> Recommendation: Install Hotfix to mitigate CVE-2024-24919.`
> `
> - gw8110`
> `Number of gateway(s) that are potentially vulnerable and need to be checked manually for hotfix installation: 1`
> `- cluster8110`
> `Number of gateway(s) that have a Hotfix but require further remediation of disabling cccd: 1`
> `- gw_with_hotfix`

**Manual Check specifications**
* On Quantum Maestro, script checks for Hotfix installation only on the main member. Other members should be checked manually.
* The script does not currently check for Hotfix installation on the below gateway types, but gives an indication that those gateways should be checked manually:
* each Quantum Spark Appliance
* Full HA cluster (a cluster of two Standalone gateways)
* each VS (no need to check the VSX gateway/cluster)
10. **Install the recommended hotfix on the vulnerable Security Gateways and Cluster Members:**
* **On online Security Gateways / Cluster Members, the hotfix appears in Gaia Portal and Gaia Clish.**
* **For offline Security Gateways / Cluster Members, refer to the summary table with manual downloads.**
The Security Gateway Hotfix is also available for **manual download** from this table:
Enter the string to filter this table:
|----------------------------------------------------------|----------------------------------------------------------------------------------------------------------------------------------------|
| Hotfix on top | Download link |
| Quantum Security Gateway ||
| **R81.20** Jumbo Hotfix Accumulator Take 54 | [](https://support.checkpoint.com/results/download/133032) (TAR) |
| **R81.20** Jumbo Hotfix Accumulator Take 53 | [](https://support.checkpoint.com/results/download/132956) (TAR) |
| **R81.20** Jumbo Hotfix Accumulator Take 41 | [](https://support.checkpoint.com/results/download/133035) (TAR) |
| **R81.20** Jumbo Hotfix Accumulator Take 26 | [](https://support.checkpoint.com/results/download/133038) (TAR) |
| **R81.10** Jumbo Hotfix Accumulator Take 141 | [](https://support.checkpoint.com/results/download/133041) (TAR) |
| **R81.10** Jumbo Hotfix Accumulator Take 139 | [](https://support.checkpoint.com/results/download/132959) (TAR) |
| **R81.10** Jumbo Hotfix Accumulator Take 130 | [](https://support.checkpoint.com/results/download/133044) (TAR) |
| **R81.10** Jumbo Hotfix Accumulator Take 110 | [](https://support.checkpoint.com/results/download/133047) (TAR) |
| **R81** Jumbo Hotfix Accumulator Take 92 | [](https://support.checkpoint.com/results/download/132962) (TAR) |
| **R80.40** Jumbo Hotfix Accumulator Take 211 | [](https://support.checkpoint.com/results/download/132964) (TGZ) |
| **R80.40** Jumbo Hotfix Accumulator Take 206 | [](https://support.checkpoint.com/results/download/133049) (TGZ) |
| **R80.40** Jumbo Hotfix Accumulator Take 198 | [](https://support.checkpoint.com/results/download/133051) (TGZ) |
| **R80.40** Jumbo Hotfix Accumulator Take 197 | [](https://support.checkpoint.com/results/download/133053) (TGZ) |
| **R80.30** Kernel 2.6 Jumbo Hotfix Accumulator Take 255 | [](https://support.checkpoint.com/results/download/133126) (TGZ) |
| **R80.30** Kernel 3.10 Jumbo Hotfix Accumulator Take 255 | [](https://support.checkpoint.com/results/download/133175) (TGZ) |
| **R80.20** Jumbo Hotfix Accumulator Take 230 | [](https://support.checkpoint.com/results/download/133168) (TGZ) |
| **R80.10** Jumbo Hotfix Accumulator Take 298 | [](https://support.checkpoint.com/results/download/133170) (TGZ) |
| **R77.30** Jumbo Hotfix Accumulator Take 351 | [](https://support.checkpoint.com/results/download/133349) (TGZ) |
| **R77.30** Jumbo Hotfix Accumulator Take 338 | [](https://support.checkpoint.com/results/download/133418) (TGZ) |
| Quantum Maestro and Quantum Scalable Chassis ||
| **R80.30SP** Jumbo Hotfix Accumulator Take 97 | [](https://support.checkpoint.com/results/download/132974) (TGZ) |
| **R80.20SP** Jumbo Hotfix Accumulator Take 336 | [](https://support.checkpoint.com/results/download/132972) (TGZ) |
| Quantum Spark Appliances ||
| See [sk182357: Preventative Hotfix for CVE-2024-24919 - Quantum Spark Gateways](https://support.checkpoint.com/results/sk/sk182357) ||
{#Unique_ID_HotfixesTable}
For manual hotfix installation instructions on Quantum Security Gateways, see: [sk168597 - How to install a Hotfix](https://support.checkpoint.com/results/sk/sk168597).
Automatic interim preventative measure deployed through AutoUpdater utility
---------------------------------------------------------------------------
Security Gateways that were configured to the Check Point's Auto Update process are gradually receiving an update (as of June 2, 2024), which helps protect them from various attempts to exploit the CVE. This is an interim preventative measure until the Hotfix is fully installed on customers' Security Gateways. It is important to emphasize that installing the Hotfix is the best way to stay protected from this vulnerability.
**How to configure Auto Update on your Security Gateways:**
Auto Update is enabled by default on all Security Gateways. To verify that it is enabled:
* For versions R81.20 and higher:
1. In SmartConsole top-left corner, click the **Menu** button.
2. Click **Global properties**.
3. In the **Data Access Control** pane, select these checkboxes:
* **Automatically download and install Software Blade Contracts, security updates, and other important data (highly recommended)**
* **Automatically download software updates and new features (highly recommended)**
4. Click **OK**
5. Install the Access Control policy
* For versions R81.10 and lower:
1. In SmartConsole top left-corner, click the **Menu** button.
2. Click **Global properties**.
3. In the **Security Management** pane, select the "**Automatically download and install Blade Contracts, new software, and other important data (highly recommended)**" checkbox.
4. Click **OK**
5. Install the Access Control policy
For more information, refer to:
* [sk175504: How to configure Check Point software to upload data to Check Point / download data from Check Point in versions R81.20 and higher](https://support.checkpoint.com/results/sk/sk175504)
* [sk111080: How to configure Check Point software to upload data to Check Point / download data from Check Point in versions R81.10 and lower](https://support.checkpoint.com/results/sk/sk111080)
**Note: If Automatic Update is not possible, you can download and install the interim mitigation fix (VPNF) from [sk182376](https://support.checkpoint.com/results/sk/sk182376). This SK article also contains all details about this Update.**
Important extra measures {#Content_2}
-------------------------------------
Follow [this link](https://www.youtube.com/playlist?list=PLMAKXIJBvfAiD8JbRZJGb2Bnrr7qkI5Fb) to see video tutorials for some of the below procedures.
Click each item to see the content or click here to see the Entire Section
1. Change the password of the LDAP Account Unit
If a Security Gateway / Cluster is configured to use an LDAP Account Unit, we recommend changing the password of the LDAP account.
**Instructions:**
1. Change Security Gateway's account in the Active Directory. To do so, refer to [this Microsoft article](https://learn.microsoft.com/en-us/troubleshoot/windows-server/active-directory/change-windows-active-directory-user-password).
2. In **SmartConsole** , open the **Object Explorer** (press the CTRL+E keys) \> **Users/Identities** \> **LDAP Account Units**
3. Right-click the **LDAP Account Unit** and click **Edit**.
4. The **LDAP Account Unit Properties** window opens. In the **Servers** tab, click **Edit** :
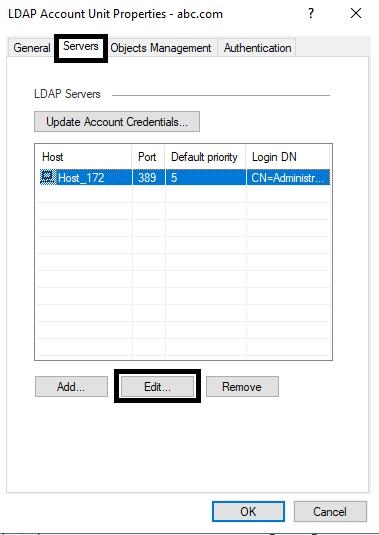
5. The **LDAP Server Properties** window opens:
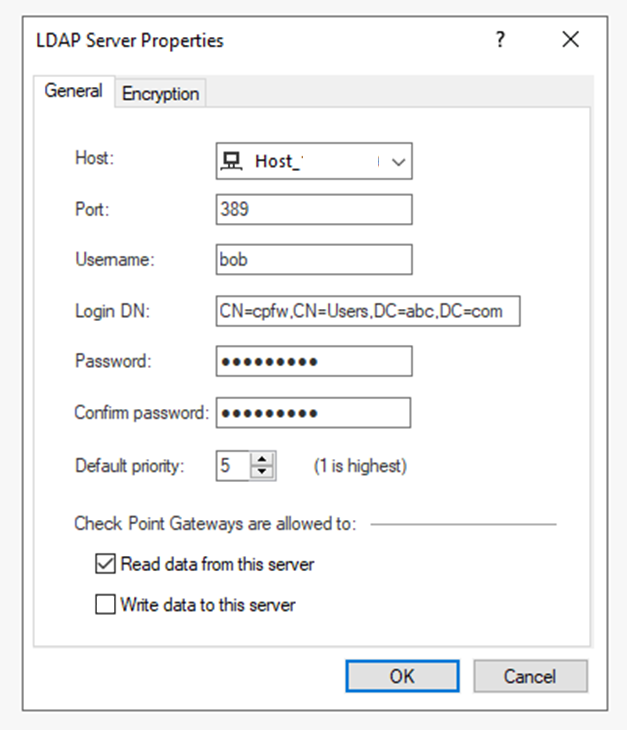
6. Change the password and click **OK**.
7. Install the Access Control policy.
2. Reset password of local accounts connecting to Remote Access VPN with password-only authentication
1. In **SmartConsole** , open the **Object Explorer** (press the CTRL+E keys) \> **VPN Communities** \> **Remote Access** .
2. In **Participant User Group** pane, select the relevant User group.
3. In the **User Group** properties, edit the relevant User.
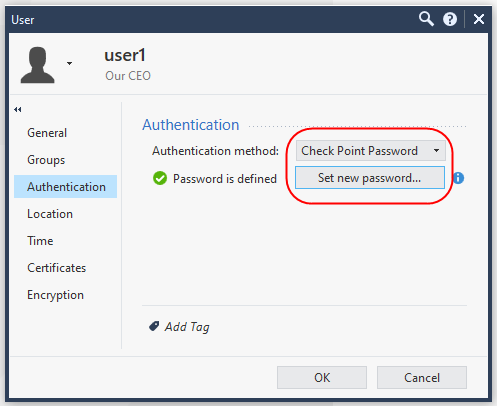
4. In the **User** properties window, go to the **Authentication** page and for **Check Point Password** click **Set new password** .
5. Click **OK** .
6. **Repeat this procedure for EVERY User with the 'Check Point Password' authentication in ALL User Groups in ALL Remote Access VPN Communities**.
3. Prevent Local Accounts from connecting to VPN with Password-Only Authentication
We recommend **not** to use local accounts that authenticate the Remote Access VPN users with password-only authentication. This section provides mitigation steps to discover and prevent such accounts from logging into the VPN.
|----------------------------------------------------------------------------------------------------------------------------------------------------------------------------------------------------------------------------------------------------------------|
| **Important Note:** To run a script from SmartConsole, the **permission profile** of a Management administrator must have these permissions on the **Gateways** page in the **Scripts** section: 1. **Run Repository Script** 2. **Manage Repository Scripts** |
**Procedure:**
1. Download the archive **[check-for-local-users-with-password-only-authentication-v5.zip](https://support.checkpoint.com/results/download/132862)** to your computer.
2. Extract the **check-for-local-users-with-password-only-authentication.sh** script file from the archive to a local directory.
3. Connect with SmartConsole to your Security Management Server (on a Multi-Domain Server, connect to any Domain Management Server).
4. From the left navigation panel, go to **Gateways \& Servers** view.
5. Click the **Security Management Server** object.
6. From the the top toolbar, click **Scripts** \> **Scripts Repository**.
The **Script Repository** window opens.

7. **Add the downloaded script to the repository:**
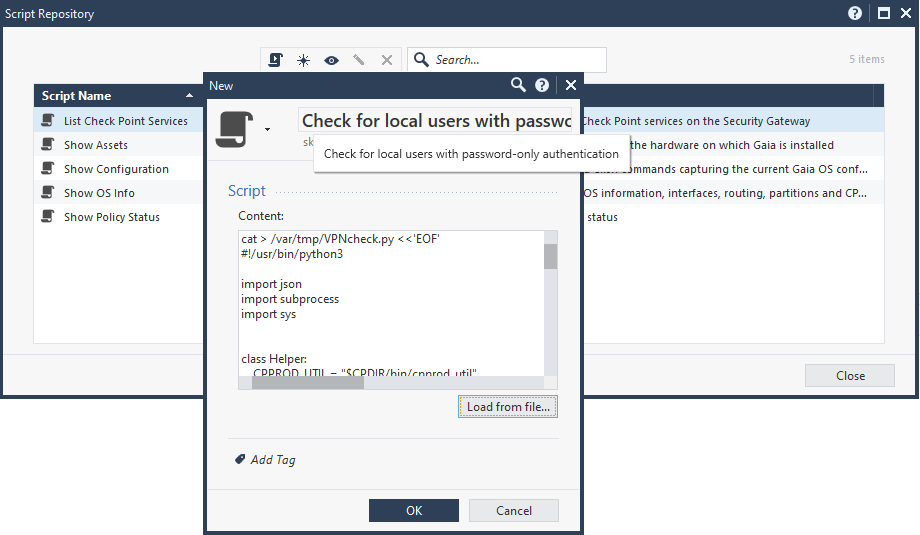
1. From the top toolbar, click **New**.
2. In the **Name** field, paste: **Check for local users with password-only authentication**
3. **Optional:** In the **Comment** field, paste: **sk182336**
4. Click **Load from file** \> select the script file **check-for-local-users-with-password-only-authentication.sh**.
5. Wait for the script content to appear.
6. Click **OK**.
8. **Run the script:**
1. In the **Script Repository** window, select the newly added script.
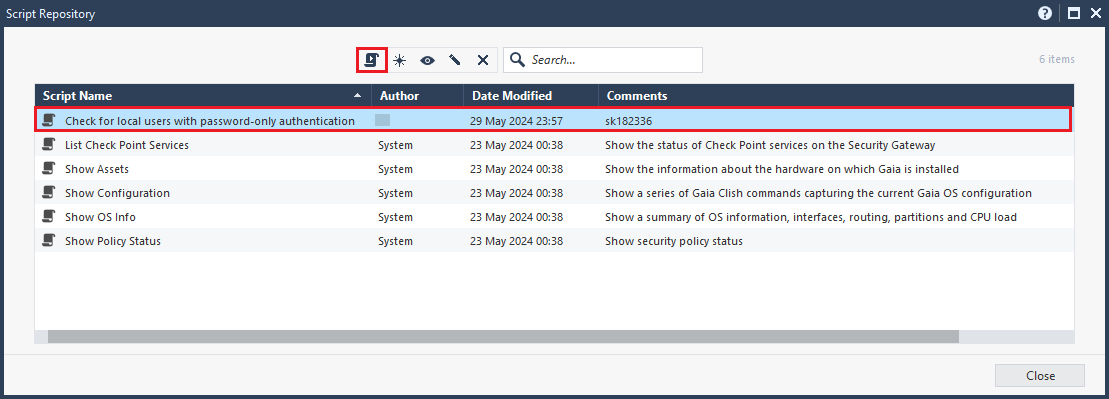
2. From the top toolbar, click **Run**.
3. The **Run 'Check for local users with password-only authentication' On '\'** window opens.
**Note for Multi-Domain Management:** By default, the script scans all Domain Management Servers (Domains) on the current Multi-Domain Server (MDS), both Active and Standby. In case some Domain Management Servers do not exist on the current Multi-Domain Server, make sure to run the script on additional Multi-Domain Servers as well.
The ability to scan multiple Domains, regardless to which Domain the administrator is currently connected, leverages the strong Run-Script permissions of an administrator that can access all Domains. It is meant to simplify the scanning all Domains on the Multi-Domain Server. To restrict the script to scan only a specific Domain, enter the Domain Name in the **Arguments** field.
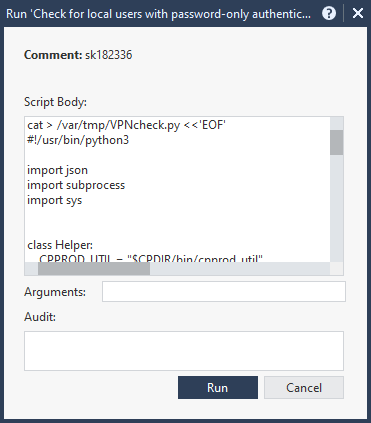
4. Click **Run**.
5. Close the **Script Repository** window.
6. Wait a few seconds for the script to complete - see the SmartConsole bottom left corner.
9. **Get the script result**:
1. In the SmartConsole bottom-left corner, click the **Task Monitoring** pane \> in the completed script task **Run Repository Script** , click **Details**.
2. The **Run Repository Script** window opens.
3. In the **Results** section, click the **Show results** link.
10. **Analyze the script result.**
* If the result is **"No Local accounts with Password Authentication method found. No further action required"** - then no further action is required.
* If the result is **"ALERT: the script identified Local Accounts with Password Authentication method.**
**Install Security Gateway Hotfix to prevent from such accounts to log-in, delete accounts or strengthen their authentication method"** - then proceed to the next step to install the recommended Security Gateway Hotfix.
11. **Install the Hotfix to block Local Accounts with Password-Only Authentication**
Do this step if the above script result shows the **"ALERT: the script identified Local Accounts with Password Authentication method"** message.
The update is delivered as a Security Gateway Hotfix to enhance the overall security of the product by blocking local accounts that use "Check Point Password" as the only authentication method.
**After the hotfix installation, local user accounts configured with the password-only authentication method will no longer be able to authenticate to Remote Access VPN.**
**Available Hotfixes**
On online Security Gateways and Cluster Members, the Hotfix is available for you in CPUSE. To obtain the Hotfix, go to **Gaia Portal** on the Security Gateway and each Cluster Member \> **Software Updates** \> **Available Updates** \> **Hotfix Updates** \> click **Install** \> reboot.
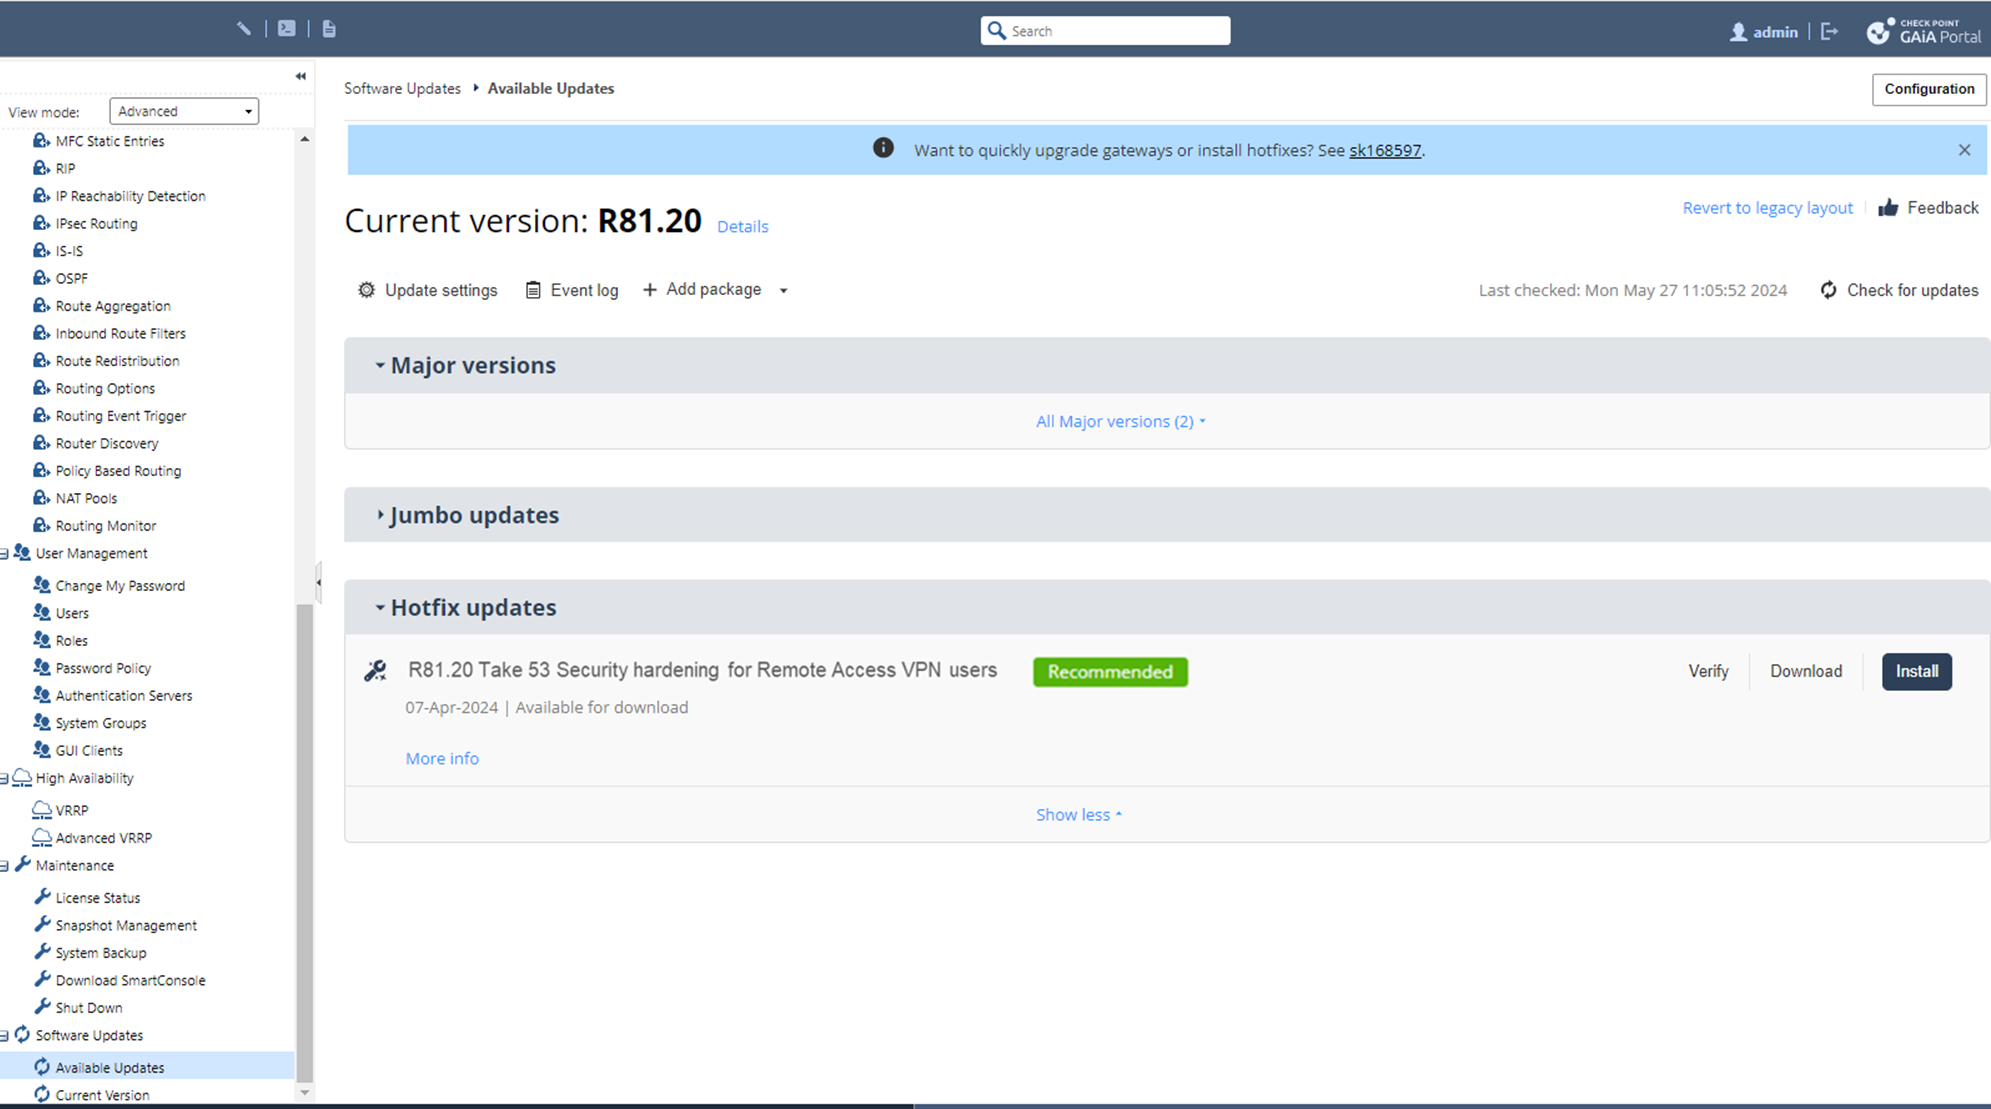
This Hotfix is also available for **manual download** from this table:
|-----------------------------------------------|----------------------------------------------------------------------------------------------------------------------------------------|
| Hotfix on top | Download link |
| R81.20 with Jumbo Hotfix Accumulator Take 53 | [](https://support.checkpoint.com/results/download/132860) (TAR) |
| R81.10 with Jumbo Hotfix Accumulator Take 139 | [](https://support.checkpoint.com/results/download/132861) (TAR) |
| R81 with Jumbo Hotfix Accumulator Take 92 | [Contact Check Point Support](https://www.checkpoint.com/support-services/contact-support/) |
| R80.40 with Jumbo Hotfix Accumulator Take 211 | [Contact Check Point Support](https://www.checkpoint.com/support-services/contact-support/) |
For the hotfix manual installation instructions, see: [sk168597 - How to install a Hotfix](https://support.checkpoint.com/results/sk/sk168597).
**Usage**
This Hotfix adds a new command `blockSFAInternalUsers` on the Security Gateway that allows to block or grant access to internal users with password-only authentication.
Default value: "`-b`" (block internal users from connecting with password-only authentication).
Syntax: `blockSFAInternalUsers [flags]`
* `-s` - show current status
* `-a` - allow internal users to connect with password-only authentication
* `-b` - block internal users from connecting with password-only authentication
Note: In a Cluster / Maestro / Chassis environment, you must run the command on each member separately.
**Verification Test**
After installing this Hotfix, users who attempt to connect using the password-only authentication method will receive this security log:
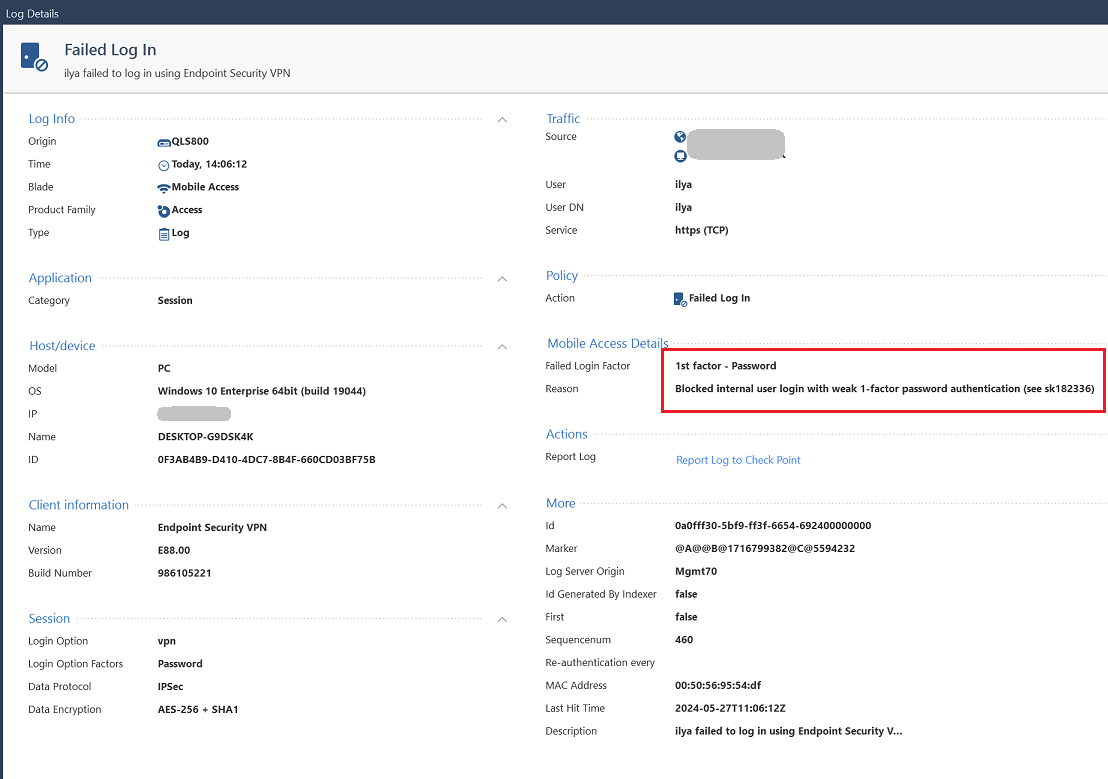
If you need a Hotfix for another Jumbo Hotfix Accumulator Take, [contact Check Point Support](https://www.checkpoint.com/support-services/contact-support/).
4. Renew the server certificates for the Inbound HTTPS Inspection on the Security Gateway
**Motivation:** Certificates used for Inbound HTTPS Inspection are stored on the Security Gateway, including the private key. See the [R81.20 Threat Prevention Administration Guide](https://sc1.checkpoint.com/documents/R81.20/WebAdminGuides/EN/CP_R81.20_ThreatPrevention_AdminGuide/Content/Topics-TPG/Using_Threat_Prevention_with_HTTPS_Traffic.htm) for more information.
**Note:** You should renew any certificate stored on the Security Gateway. "Renew" in this context means: generating a new certificate with a new key pair and revoking the old certificate, making sure this old certificate is listed in the CRL.
**Procedure:**
1. Get the new server certificate in the P12 format.
2. Import the new server certificate:
1. Connect with SmartConsole to the Security Management Server / Domain Management Server.
2. From the left navigation panel, click **Manage \& Settings**.
3. In the top panel, click **Blades**.
4. In the **HTTPS Inspection** section, click **Configure in SmartDashboard**.
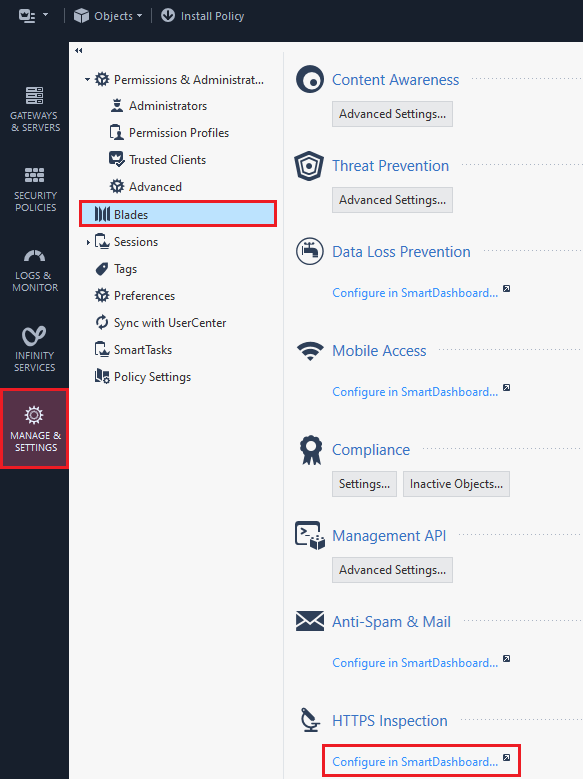
5. In the top left panel, click **Server Certificates**.
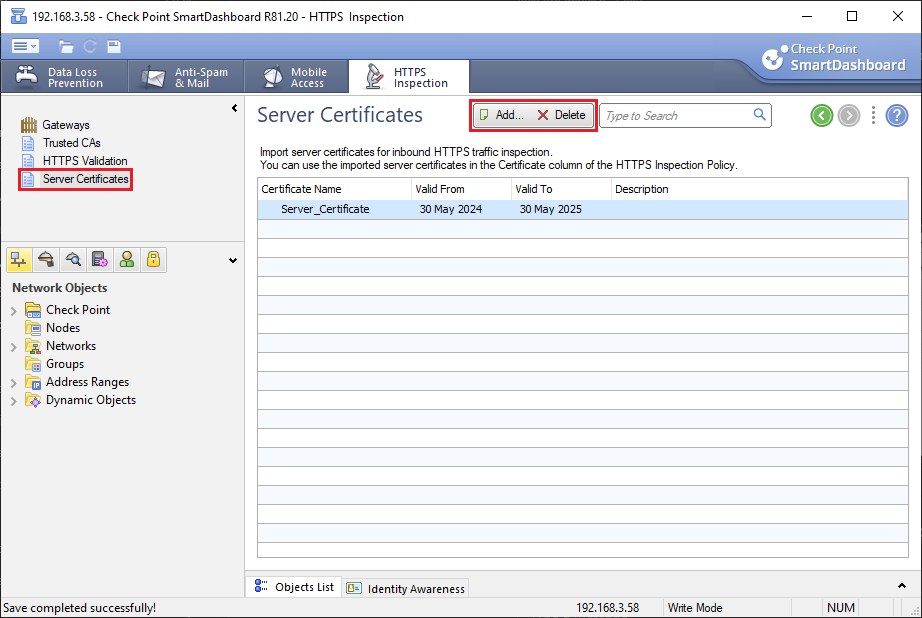
6. Select the new server certificate file.
7. From the top toolbar, click **Add** \> enter the required information \> select the server certificate file \> click **OK**.
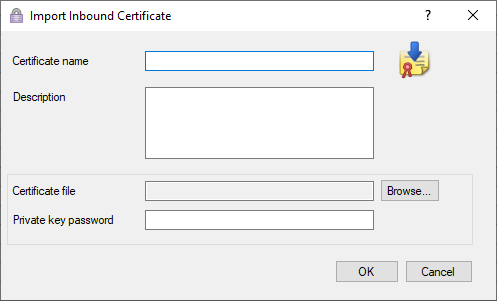
8. Save the changes - in the top left corner, click the diskette icon (or press CTRL + S).
9. Close SmartDashboard.
3. In the HTTPS Inspection policy (used for the inbound inspection), replace the old inbound certificate with the new certificate (the one you just imported).
4. Install the Access Control policy.
5. **Delete the old certificate that is potentially compromised:**
1. From the left navigation panel, click **Manage \& Settings**.
2. In the top panel, click **Blades**.
3. In the **HTTPS Inspection** section, click **Configure in SmartDashboard**.
4. In the top left panel, click **Server Certificates**.
5. Select and delete each old certificate file.
6. Save the changes - in the top left corner, click the diskette icon (or press CTRL + S).
7. Close SmartDashboard.
6. Install the Access Control policy again.
5. Renew the certificate for the Outbound HTTPS Inspection on the Security Gateway
**Motivation:** Outbound inspection of TLS traffic is based on a certificate stored on the Security Gateway. The certificate and related keying material might have been compromised in the context of CVE-2024-24919. Client computers sending traffic through the Security Gateway trust this certificate (it is imported into their operating system's Trusted Certificate Store).
**Note:** All Security Gateways configured for outbound HTTPS Inspection managed by the same Security Management Server / Domain Management Server share the same certificate and key pair.
If you use an outbound certificate generated on the Management Server (in the [R81.20 Threat Prevention Administration Guide](https://sc1.checkpoint.com/documents/R81.20/WebAdminGuides/EN/CP_R81.20_ThreatPrevention_AdminGuide/Content/Topics-TPG/Using_Threat_Prevention_with_HTTPS_Traffic.htm), see the "Creating an Outbound CA Certificate" section), follow the steps below to renew this certificate.
**Procedure:**
1. Connect with SmartConsole to the Security Management Server / Domain Management Server.
2. From the left navigation panel, click **Manage \& Settings**.
3. In the top panel, click **Blades**.
4. In the **HTTPS Inspection** section, click **Configure in SmartDashboard**.

5. In the top left panel, click **Gateways**.
6. At the bottom, in the CA **Certificate** section, click **Renew Certificate**.
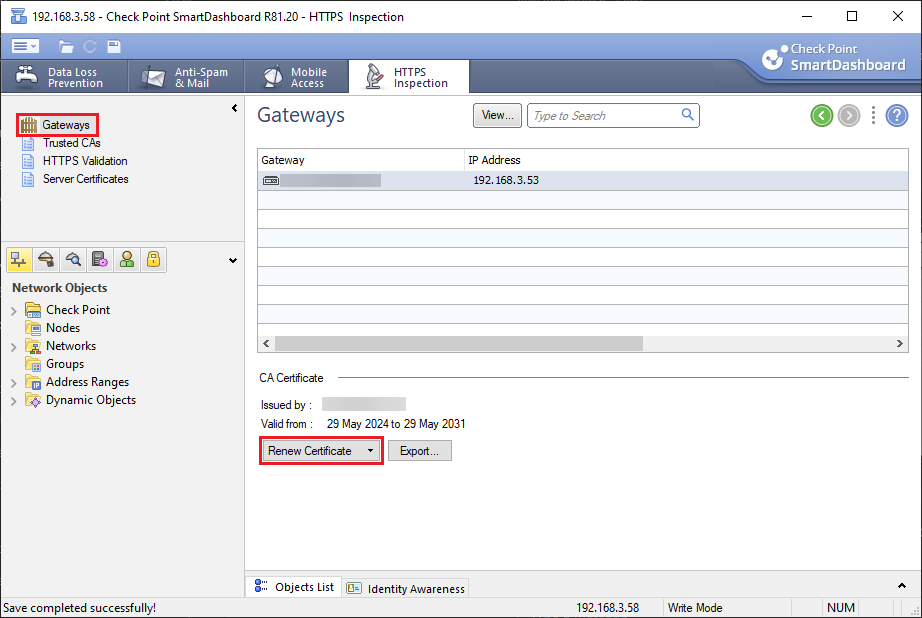
7. Configure the new settings \> click **OK**.
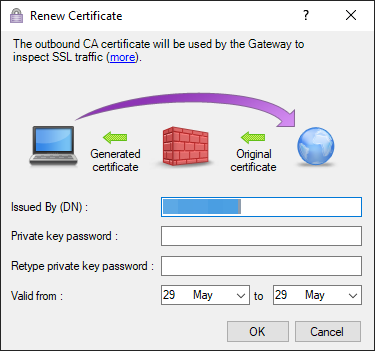
8. Close SmartDashboard.
9. Install the Access Control policy.
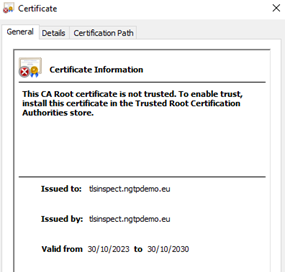
10. Distribute this new certificate to all client computers using the Security Gateway for their outbound traffic. This step is required, as the certificate generated on the Management Server is a "self-signed" certificate (as you can see below, "*Issued to* " and "*issued by* " fields are identical).
11. **Configure client computers to remove the old HTTPS outbound certificate from their Trusted Certificate Store.**
12. **If you use an Enterprise CA for generating an outbound HTTPS certificate** (in the [R81.20 Threat Prevention Administration Guide](https://sc1.checkpoint.com/documents/R81.20/WebAdminGuides/EN/CP_R81.20_ThreatPrevention_AdminGuide/Content/Topics-TPG/Using_Threat_Prevention_with_HTTPS_Traffic.htm), see the "Importing an Outbound CA Certificate" section), follow the steps indicated in the Administration Guide to renew the outbound CA certificate with a new key pair.
**After you install the new Outbound CA certificate, revoke the old certificate.**
6. Reset Gaia OS passwords for all local users
1. **Reset the passwords for Gaia OS local users**
You can reset a local user password in Gaia Portal or in Gaia Clish.
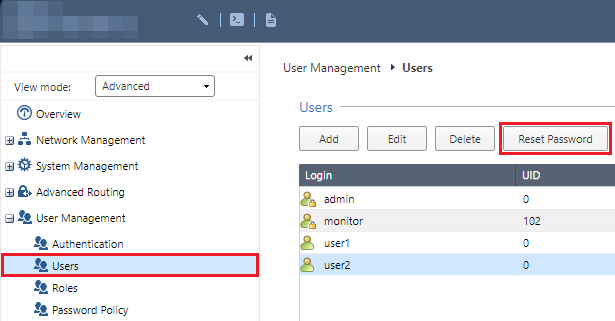
> **To reset the password for a Gaia OS local user in Gaia Portal:**
> 1. In a web browser, connect to Gaia Portal on the Security Gateway / each Cluster Member.
>
> 2. In the **User Management** section, click the **Users** page.
>
> 3. For each user:
>
> 1. Click the user.
>
> 2. From the top toolbar, click **Reset Password**.
>
> 
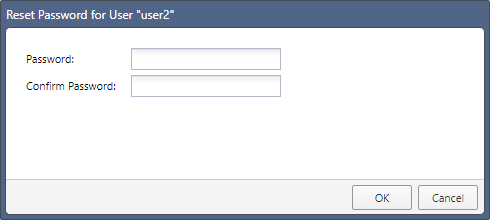
> 3. Enter a new password.
>
> 
> 4. Click **OK**.
>
> **To reset the password for a Gaia OS local user in Gaia Clish:**
> 1. Connect to the command line on the Security Gateway / each Cluster Member.
>
> 2. If your default shell is the Expert mode, then go to Gaia Clish: `clish`
>
> 3. For each user:
>
> 1. Run: `set user password`
>
> 2. Enter the new password.
>
> 4. Save the changes: `save config`
2. **Reset the Expert mode password for Gaia OS**
You can reset the Expert mode password in Gaia Portal or in Gaia Clish.
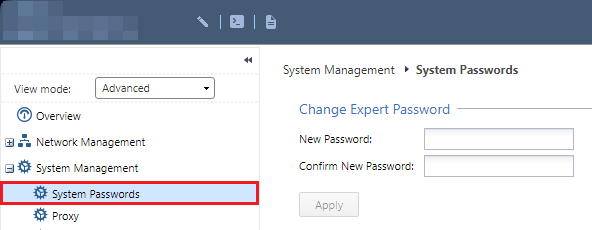
> **To reset the Expert mode password in Gaia Portal:**
> 1. In a web browser, connect to Gaia Portal on the Security Gateway / each Cluster Member.
>
> 2. In the **System Management** section, click the **System Passwords** page.
>
> 3. In the **Change Expert Password** section, enter the new password.
>
> 4. Click **Apply**.
>
> 
>
> **To reset the Expert mode password in Gaia Clish:**
> 1. Connect to the command line on the Security Gateway / each Cluster Member.
>
> 2. If your default shell is the Expert mode, then go to Gaia Clish: `clish`
>
> 3. Run: `set expert-password`
>
> 4. Enter the new password.
>
> 5. Save the changes: `save config`
7. Regenerate the SSH local user certificate on the Security Gateway in the following case:
1. Based on the **check-for-CVE-2024-24919.sh** script results, your Security Gateway is vulnerable.
2. On the Security Gateway, the SSH is configured to allow all source IP addresses, including the Internet (not recommended).
3. Authentication of SSH users is based on certificates.
4. You did not delete the user's private key from the Security Gateway (not recommended).
* You can find the user's private keys in the `/home//.ssh` file.
Use the command in the Expert mode: `find /home/*/.ssh -print`
In the command output, you should see a file called "`id_rsa`" (this is the private SSH key).
For each of these keys, use the "`ssh-keygen`" command (in the Expert mode) to regenerate the SSH key for the relevant user.
8. Renew the certificate for the SSH Inspection
**If you configured [transparent inspected SSH severs](https://sc1.checkpoint.com/documents/R81.20/WebAdminGuides/EN/CP_R81.20_ThreatPrevention_AdminGuide/Content/Topics-TPG/Using-SSH-Inspection-Autonomous.htm?Highlight="to%20add%20a%20transparent%20inspected%20SSH%20sever") (imported the private key and the public key of an SSH server), the follow these steps for each SSH sever:**
1. Get the new RSA keys from the SSH server - private key and public key.
2. Copy the new two key files to the Security Gateway / each Cluster Member.
3. Connect to the command line on the Security Gateway / each Cluster Member.
4. Log in to the Expert mode.
5. Delete the current private key for the SSH server: `rm -i `
6. Delete the current public key for the SSH server: `rm -i .pub`
7. Import the new keys: `cpssh_config -s -a -e .pub -i `
8. Install the Access Control policy - either with the command "`fw fetch local`" or in SmartConsole.
**If you configured [non-transparent inspected SSH severs](https://sc1.checkpoint.com/documents/R81.20/WebAdminGuides/EN/CP_R81.20_ThreatPrevention_AdminGuide/Content/Topics-TPG/Using-SSH-Inspection-Autonomous.htm?Highlight="to%20add%20a%20non-transparent%20inspected%20SSH%20sever") (imported only the public key of an SSH server), the follow these steps for each SSH sever:**
1. Get the new public RSA key (`*.pub`) from the SSH server.
2. Copy the new public key to the Security Gateway / each Cluster Member.
3. Connect to the command line on the Security Gateway / each Cluster Member.
4. Log in to the Expert mode.
5. Delete the current public key for the SSH server: `rm -i .pub`
6. Import the new public key: `cpssh_config -s -g -e .pub`
7. Install the Access Control policy - either with the command "`fw fetch local`" or in SmartConsole.
9. Update Azure HA Credentials
This procedure describes how to update the service principal credentials for your Azure High Availability (HA) setup. You can use this procedure if you have opted to create your service principal rather than using the system-assigned managed identity.
**Validating Azure HA Service Principal Usage**
On each Cluster Members, inspect the HA configuration file by running this command in the Expert Mode:
`cat $FWDIR/conf/azure-ha.json`
If the "***credentials*** " section shows **IAM** , then you are not using a Service Principal, and this procedure is not relevant to you.

Otherwise, continue with the procedure.
**Updating the Service Principal's Secret Key**
1. Log in Azure portal at: [portal.azure.com](https://portal.azure.com/)
2. Locate "**app registrations** " via the Azure search bar:

3. Find and select the existing Service Principal, using the `client_id` from the HA configuration (`$FWDIR/conf/azure-ha.json`)

4. In **Dashboard** \> **Old Service Principa** l, from the menu on the right, go to **Manage** \> **Certificates \& secrets**
5. Click **+ New client secret** to generate a new client secret
6. Securely store the new secret key, as it is visible only once

7. **On each Cluster Member:**
1. Test the HA setup to ensure functionality. In the Expert mode, run:
`$FWDIR/scripts/azure_ha_test.py`
Th expected result is: `All tests were successful!`
2. Apply the new configuration. In the Expert mode, run:
`azure-ha-conf --client-id '' --client-secret '' --force`
Example:
`azure-ha-conf --client-id '5c1896fe-26b6-4a5b-8c81-34ae07c09a24' --client-secret '2G6E_|]Y&|@Il(L}-O>g' --force`
(No output)
3. Make sure the file syntax is correct. In the Expert mode, run:
`python3 -m json.tool $FWDIR/conf/azure-ha.json`

4. Reload the Cluster Azure configuration. In the Expert mode, run:
`$FWDIR/scripts/azure_ha_cli.py reconf`
(No output)
5. Run the HA tester and make sure everything works as expected after the key replacement:
`$FWDIR/scripts/azure_ha_test.py`
If all tests were successful, this message appears:
`All tests were successful!`
8. Remove the old secret key:

For detailed guidance on HA clusters and Azure Service Principals, see:
* [CloudGuard Network for Azure High Availability Cluster Deployment Guide](https://sc1.checkpoint.com/documents/IaaS/WebAdminGuides/EN/CP_CloudGuard_Network_for_Azure_HA_Cluster/Default.htm)
* [Create a Microsoft Entra application and service principal that can access resources.](https://docs.microsoft.com/en-us/azure/active-directory/develop/howto-create-service-principal-portal)
10. Change the shared secret in the RADIUS Server settings
1. In a web browser, connect to Gaia Portal on the Security Gateway / each Cluster Member.
2. In the navigation tree, click **User Management** \> **Authentication Servers**.

3. In the section **RADIUS Servers**, reset the shared secret for each server:
1. Select the server and click **Edit**.
2. In the field **Shared Secret**, enter a new secret:

3. Click **OK**.
11. Change the shared secret in the TACACS+ Server settings
1. In a web browser, connect to Gaia Portal on the Security Gateway / each Cluster Member.
2. In the navigation tree, click **User Management** \> **Authentication Servers**.

3. In the section **TACACS+ Servers**, reset the shared key for each server:
1. Select the server and click **Edit**.
2. In the **Shared Key** field, enter a new key.

3. Click **OK**.
12. Change the password for Gaia OS scheduled snapshots
1. In a web browser, connect to Gaia Portal on the Security Gateway / each Cluster Member.
2. In the navigation tree, click **Maintenance** \> **Snapshot Management**.
3. In the **Scheduled Snapshot** section, click **Scheduled Snapshot Settings**.
4. In the **Destination** section, click **SCP server**.
If this destination is configured, then examine the IP address, change the credentials on the SCP server, and change the credentials in Gaia Portal.
5. In the **Destination** section, click **FTP server**.
If this destination is configured, then examine the IP address, change the credentials on the FTP server, and change the credentials in Gaia Portal.
6. Click **Apply**.
13. Change the password for Gaia OS scheduled backups
1. In a web browser, connect to Gaia Portal on the Security Gateway / each Cluster Member.
2. In the navigation tree, click **Maintenance** \> **Snapshot Backup**.
3. In the **Scheduled Backup** section, click **Scheduled Backup Settings**.
4. For each scheduled backup with a destination of an **SCP** server:
1. Delete each scheduled backup with a destination of an SCP server.
2. Change the credentials on the SCP server.
3. Configure a new scheduled backup with a destination of the SCP server.
5. For each scheduled backup with a destination of an **FTP** server:
1. Delete each scheduled backup with a destination of an FTP server.
2. Change the credentials on the FTP server.
3. Configure a new scheduled backup with a destination of the FTP server.
14. Change the SNMP authentication settings
1. In a web browser, connect to Gaia Portal on the Security Gateway / each Cluster Member.
2. In the navigation tree, click **System Management** \> **SNMP**.
3. If in the section **SNMP General Settings** in the **Version** field you selected **1/v2/v3 (any)** , then in the section **V1 / V2 Settings** in the **Read-Write Community String** field, enter a different string and click **Apply**.
4. If in the section **V3 - User-Based Security Model (USM)** there are configured USM users, then for each USM user:
1. Edit the USM user.
2. Change the **Authentication Pass Phrase**.
3. Change the **Privacy Pass Phrase**.
4. Click **Save**.
15. On a Standalone server, change the destination certificates for Log Exporter
> If you configured Log Exporter to use the TLS protocol, then change the destination certificates.
>
> See the [R81.20 Logging and Monitoring Administration Guide](https://sc1.checkpoint.com/documents/R81.20/WebAdminGuides/EN/CP_R81.20_LoggingAndMonitoring_AdminGuide/Content/Topics-LMG/Log-Exporter-TLS-configuration.htm) \> Chapter "Log Exporter" \> Section "Log Exporter TLS Configuration".
16. Change the certificates for Identity Broker on the PDP Gateway
> Change the certificates in the `$FWDIR/conf/identity_broker.C` file.
>
> See the [R81.20 Identity Awareness Administration Guide](https://sc1.checkpoint.com/documents/R81.20/WebAdminGuides/EN/CP_R81.20_IdentityAwareness_AdminGuide/Content/Topics-IDAG/Identity-Broker-Configuration.htm) \> Chapter "Identity Awareness Environment" \> Section "Identity Broker".
17. Renew the default VPN (IKE) certificate / default Multi-Portal certificate on the Security Gateway
> Check Point Security Gateways and Traditional VSX Virtual Systems use certificates that are signed by Internal CA for these features:
>
> * IKE certificate for Site-to-Site VPN.
> * TLS server certificate and/or IKE certificate for Remote Access VPN.
> * Multi-Portal (web portals for various Software Blades).
>
> Procedure:
>
> 1. Connect with SmartConsole to the Security Management Server / Domain Management Server that manages the Security Gateway / Cluster.
>
> 2. From the left navigation panel, click **Gateways \& Servers**.
>
> 3. Open the Security Gateway / Cluster object.
>
> 4. From the left tree, click the **IPSec VPN** page.
>
> **Note** - If you do not see this page, then:
> 1. From the left tree, click the **General Properties** page.
>
> 2. On the **Network Security** tab, select **IPSec VPN**. You will disable it later.
>
> 5. Renew **each** certificate:
>
> * Renew steps for certificates that are signed by the Internal CA of the Management Server:
>
> 1. In the section **Repository of Certificates Available on the Gateway**, select the certificate.
>
> 2. Click the "**Renew**" button.
>
> 3. Click the "**Yes**" button to confirm.
>
> 4. In the "**Generate Keys and Get Internal CA Certificate** " window, click "**OK**".
>
> * Renew steps for certificates that are signed by a 3rd-party CA:
>
> 1. Remove the current certificates signed by your 3rd-party CA.
>
> 2. Generate the relevant certificates using your 3rd-party CA.
>
> 3. Add the new certificates. Refer to the [Site to Site VPN Administration Guide](https://support.checkpoint.com/product/446#f-commonsource=C.%20Documentation) for your version.
>
> 6. If previously, on the **General Properties** page, you enabled **IPSec VPN** and you do not use this Software Blade, then disable it.
>
> 7. Click "**OK**" to close the Security Gateway / Cluster object.
>
> 8. Install the Access Control Policy on the Security Gateway / Cluster object.
18. Renew the 3rd-party certificates for Multi-Portal of each applicable Software Blade on the Security Gateway
> **Note** - This procedure applies only if you use 3rd-party certificates for the web portals of Software Blades.
>
> 1. Connect with SmartConsole to the Security Management Server / Domain Management Server that manages the Security Gateway / Cluster.
>
> 2. From the left navigation panel, click **Gateways \& Servers**.
>
> 3. Open the Security Gateway / Cluster object.
>
> 4. Using your 3rd-party CA, generate the relevant certificate for the required Software Blade Portal - one of these:
>
> * Platform Portal
>
> * Identity Awareness
>
> * UserCheck
>
> * Mobile Access
>
> * Data Loss Prevention
>
> 5. From the left tree, click the **Platform Portal** page.
>
> 1. In the **Certificate** section, click **Import**.
>
> 2. Select the 3rd-party certificate file.
>
> 3. Follow the instructions on the screen.
>
> 6. From the left tree, click the **Identity Awareness** page.
>
> 1. If you selected **Browser-Based Authentication** , then click **Settings**.
>
> 2. In the **Portal Settings** window, in the **Access Settings** section, click **Edit**.
>
> 3. In the **Portal Access Settings** window, in the **Certificate** section, click **Import**.
>
> 4. Select the 3rd-party certificate file.
>
> 5. Follow the instructions on the screen.
>
> 6. Click **OK** to close the **Portal Access Settings** window.
>
> 7. Click **OK** to close the **Portal Settings** window.
>
> 7. From the left tree, click the **UserCheck** page.
>
> 1. If you selected **Enable UserCheck for active blades** , then in the **Certificate** section, click **Import**.
>
> 2. Follow the instructions on the screen.
>
> 8. From the left tree, click the **Mobile Access** page.
>
> 1. Expand **Mobile Access** and click the **Portal Settings** page.
>
> 2. In the **Certificate** section, click **Import**.
>
> 3. Follow the instructions on the screen.
>
> 9. From the left tree, click the **Data Loss Prevention** page.
>
> 1. If you selected **Activate DLP Portal for Self Incident Handling** , then in the **Certificate** section, click **Import**.
>
> 2. Follow the instructions on the screen.
>
> 10. Click "**OK**" to close the Security Gateway / Cluster object.
>
> 11. Install the Access Control Policy on the Security Gateway / Cluster object.
Additional Frequently Asked Questions {#Content_3}
--------------------------------------------------
Click each item to see the content or click here to see the Entire Section
1. What are the suspect IP addresses used by threat actors to exploit the vulnerability?
> Enter the string to filter this table:
>
> |------------------|
> | 5.188.218.0/23 |
> | 23.227.196.88 |
> | 23.227.203.36 |
> | 31.134.0.0/20 |
> | 37.9.40.0/21 |
> | 37.19.205.180 |
> | 38.180.54.104 |
> | 38.180.54.168 |
> | 45.135.1.0/24 |
> | 45.135.2.0/23 |
> | 45.155.166.0/23 |
> | 46.59.10.72 |
> | 46.183.221.194 |
> | 46.183.221.197 |
> | 61.92.2.219 |
> | 64.176.196.84 |
> | 68.183.56.130 |
> | 82.180.133.120 |
> | 85.239.42.0/23 |
> | 87.206.110.89 |
> | 88.218.44.0/24 |
> | 91.132.198.0/24 |
> | 91.218.122.0/23 |
> | 91.245.236.0/24 |
> | 103.61.139.226 |
> | 104.207.149.95 |
> | 109.134.69.241 |
> | 112.163.100.151 |
> | 132.147.86.201 |
> | 146.70.205.62 |
> | 146.70.205.188 |
> | 146.185.207.0/24 |
> | 149.88.22.67 |
> | 154.47.23.111 |
> | 156.146.56.136 |
> | 158.62.16.45 |
> | 162.158.162.254 |
> | 167.61.244.201 |
> | 167.99.112.236 |
> | 178.236.234.123 |
> | 183.96.10.14 |
> | 185.213.20.20 |
> | 185.217.0.242 |
> | 192.71.26.106 |
> | 193.233.128.0/22 |
> | 193.233.216.0/21 |
> | 195.14.123.132 |
> | 198.44.211.76 |
> | 203.160.68.12 |
> | 217.145.225.0/24 |
> | 221.154.174.74 |
> {#Unique_ID_Suspect_IPsTable}
2. When were exploitation attempts for this vulnerability first seen?
> Our retrospective telemetry analysis shows exploitation attempts starting on 30 April 2024.
>
> Further investigation (as of 31 May 2024) revealed that the first exploitation attempts started on 07 April 2024.
>
> We are actively investigating further.
3. What is the current CVSS score of this vulnerability?
> As of 30 May 2024, the CVSS score is 8.6 (High), with the vector string - CVSS:3.1/AV:N/AC:L/PR:N/UI:N/S:C/C:H/I:N/A:N
>
> |-------------------------|---------|------------------------------------------------------------------------------------------------------------------------------------------------------------------------------------------------------------------------------------|
> | Parameter | Value | Explanation |
> | Attack Vector (AV) | Network | This vulnerability is exploited only through the Network. |
> | Attack Complexity (AC) | Low | An attacker can expect repeatable success when attacking the vulnerable component. There are no special conditions or circumstances required for exploit success, assuming the component (VPN) is enabled on the Security Gateway. |
> | Privilege Required (PR) | None | The attacker is unauthorized. |
> | User Interaction (UI) | None | The vulnerability can be exploited without any user interaction. |
> | Scope (S) | Changed | An exploited vulnerability can affect Security Gateway components besides the VPN. |
> | Confidentiality (C) | High | All resources within the Security Gateway are potentially accessible to the attacker and are therefore considered compromised. |
> | Integrity (I) | None | There is no loss of Security Gateway integrity. |
> | Availability (A) | None | There is no impact on the Security Gateway availability. |
4. What is the recommendation for a Gateway running an End-of-Support version (R80.30 and lower)?
> If you run a version that is already End-of-Support, we recommend one of these options:
>
> * Upgrade to a supported version and install the provided Hotfix.
>
> * Disable the Remote Access and Mobile Access functionalities:
>
> 1. **Remove the Mobile Access functionality:**
>
> 1. In **SmartConsole** , go to **Gateways \& Servers**
> 2. Double-click the **Security Gateway** object.
> 3. On the **General Properties** page, \> clear the **Mobile Access** checkbox.
> 4. Click **OK**.
> 2. **Remove the Security Gateway from the Remote Access VPN Communities:**
>
> 1. In **SmartConsole** , in the top right corner, click the **Objects** panel.
> 2. Click **VPN Communities**.
> 3. Double-click the relevant **Remote Access VPN** community.
> 4. On the **Participating Gateways** page, remove the applicable Security Gateway from the list.
> 5. Click **OK**.
> 3. **Install the Access Control policy.**
5. Is there an IPS Signature that can prevent attempts to exploit CVE-2024-24919?
> Yes.
>
> The IPS Signature "[Check Point VPN Information Disclosure (CVE-2024-24919)](https://advisories.checkpoint.com/defense/advisories/public/2024/cpai-2024-0353.html)" detects and blocks attempts to exploit this CVE.
> This signature is automatically available in the "**Optimized**" IPS profile.
>
> To prevent any attempt to exploit this vulnerability, you must protect the vulnerable Remote Access VPN gateway **behind** a Security Gateway with both IPS and HTTPS Inspection enabled.
6. If I suspect unauthorized access attempts, what should I do?
> To investigate for suspicious activity, we recommend taking these steps:
>
> 1. Analyze all Remote Access connections of local accounts with password-only authentication.
>
> Monitor your connection logs from the past 3 months:
> 1. In **SmartConsole** , go to the **Logs \& Monitor** \> **Logs** tab.
>
> 2. In the top Search field, enter this query:
>
> `blade:"Mobile Access" AND action:"Log In" AND auth_method:Password`
> 2. For each connection, verify that the user, time, source IP address, client name, OS name, and application are familiar, based on the configured users and business needs.
>
> 3. In case one of the connections or users are not validated, we recommend invoking an incident response playbook, or to [contact Check Point Support](https://www.checkpoint.com/support-services/contact-support/) or your local Check Point representative.
7. I have installed the hotfix "Hardening Remote Access for VPN users". Are the Security Gateways still vulnerable to CVE-2024-24919?
> As an initial step, deploy the hotfix for CVE-2024-24919 to address the vulnerability.
>
> Implement the additional protection measures if you have Remote Access VPN users who authenticate to the Security Gateway using only a password (see "Important extra measures"):
>
> * Reset Gaia OS passwords for all local users.
>
> * Prevent Local Accounts from connecting to VPN with Password-Only Authentication.
Article Revision History {#Content_4}
-------------------------------------
Show / Hide revision history
|--------------|---------------------------------------------------------------------------------------------------------------------------------------------------------------------------------------------------------------------------------------------------------------------------------------------------------------------------------------------|
| Date | Description |
| 15 May 2025 | Updated Important extra measures: * Added the procedure "Renew the VPN default certificate / Multi-Portal certificate on the Security Gateway" * Added the procedure "Renew the 3rd-party certificates for Multi-Portal of each applicable Software Blade on the Security Gateway" |
| 25 June 2024 | Updated Important extra measures: 1. Change the password for Gaia OS scheduled snapshots 2. Change the password for Gaia OS scheduled backups 3. Change the SNMP authentication settings 4. On a Standalone server, change the destination certificates for Log Exporter 5. Change the certificates for Identity Broker on the PDP Gateway |
| 16 Jun 2024 | * R81 Jumbo Hotfix Accumulator Take 99 was declared as Recommended |
| 13 June 2024 | Updated Important extra measures: 1. Change the shared secret in the RADIUS Server settings 2. Change the shared secret in the TACACS+ Server settings |
| 10 June 2024 | 1. Added Hotfix for R77.30 Jumbo Hotfix Accumulator Take 338 2. R81.20 Jumbo Hotfix Accumulator Take 65 and R81.10 Jumbo Hotfix Accumulator Take 150 were declared as Recommended |
| 06 June 2024 | * Added "Update Azure HA Credentials" to the "Important extra measures" section |
| 05 June 2024 | 1. Added R81 Jumbo Hotfix Accumulator Take 99 2. Updated the Procedure to identify vulnerable Security Gateways \> Get the script results \> Manual Check specifications section 3. Added Hotfix for R77.30 Jumbo Hotfix Accumulator Take 351 4. Added a note and link to sk182376 - Interim preventative measure (VPNF) for CVE-2024-24919 |
| 04 June 2024 | * Updated the "Procedure to identify vulnerable Security Gateways" section |
| 03 June 2024 | 1. Added instruction "How to configure Auto Update on your Security Gateways" 2. Added R81.20 Jumbo Hotfix Accumulator Take 65 |
| 02 June 2024 | 1. Added the "Automatic interim preventative measure deployed through AutoUpdater utility section 2. Added the "Install Jumbo Hotfix Accumulator to fix CVE-2024-24919" section and R81.10 Jumbo Hotfix Accumulator Take 150 |
| 01 June 2024 | 1. Added caution for customers using CCCD in R81.10 / R81.20 2. Added the "Article Revision History" section |
---
# Agent Instructions
This content is from the Check Point Support Center (https://support.checkpoint.com), the official knowledge base for Check Point cybersecurity products.
## Navigating This Knowledge Base
- **Complete index**: [llms.txt](https://support.checkpoint.com/llms.txt)
- **All SK articles**: [SecureKnowledge Sitemap](https://support.checkpoint.com/sitemaps/secureknowledge-sitemap-index.xml)
- **SK article URL pattern**: `https://support.checkpoint.com/results/sk/{skId}`
- **Markdown responses**: AI bot User-Agents automatically receive `text/markdown` content