> Source: [sk181701](https://support.checkpoint.com/results/sk/sk181701)
# sk181701 - Multi-Domain Management Server (MDS) NAT configuration for public clouds
| Property | Value |
|----------|-------|
| Solution ID | sk181701 |
| Date Created | 2023-11-29 |
| Last Modified | 2024-10-21 |
| Technical Level | General |
| Products | Multi-Domain Security Management Server |
| Versions | R81 (EOS), R81.10 (EOS), R81.20, R82 |
| Platform | AWS, Azure, GCP |
## Solution
This article explains how to configure Primary MDS, Secondary MDS, and MLM behind Public/Elastic IP addresses in public cloud platforms (AWS, Azure, and GCP).
### Background:
Public cloud providers do NAT when a Virtual Machine communicates with its Public/Elastic IP address.
When MDS in a public cloud communicates with a Security Gateway with its Public/Elastic IP address, it is required to configure static NAT configuration for each CMA/CLM object that is behind a Public/Elastic IP address.
**Example environment:**

1. Domain_A_Server is the active CMA.
2. Domain_A_SEC_Server is the standby (backup) CMA.
3. Domain_A_CLM_Server is the main Log Server.
4. Domain_A_Server and Domain_A_SEC_Server are the backup Log Servers.
### For MDS version R82 and higher
**Show / Hide the section**
For each CMA/CLM object that is behind a Public/Elastic IP address, configure a static NAT based on the **Quantum Security Management Administration Guide** for your version ([R82](https://sc1.checkpoint.com/documents/R82/WebAdminGuides/EN/CP_R82_SecurityManagement_AdminGuide/Default.htm)) \> Creating an Access Control Policy \> Configuring the NAT Policy \> Advanced NAT Settings \> Security Management behind NAT section.
### For MDS version R81.20 and lower
**Show / Hide the section**
#### Dummy objects configuration in SmartConsole {#R81.20}
1. Log in to the active CMA.
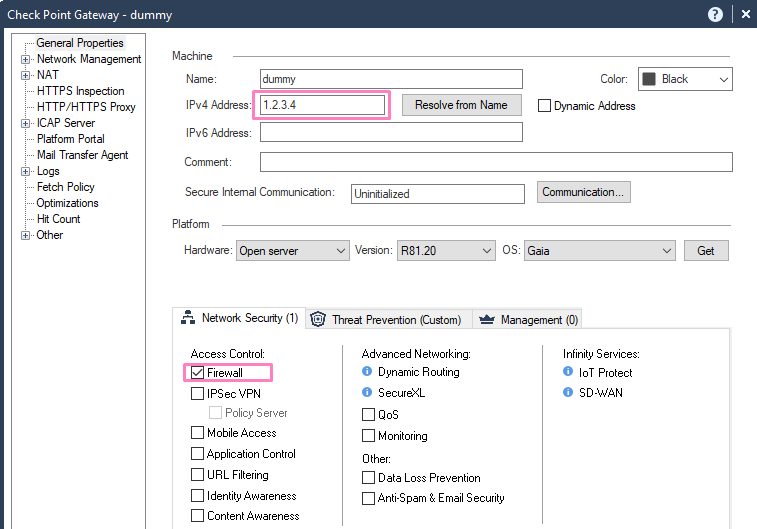
2. Create a new dummy Gateway object:
1. In the Gateway's general properties, set a dummy IPv4 address (for example 1.2.3.4).
2. Make sure that only the Firewall blade is enabled.
3. Navigate to the **Network Management** tab.
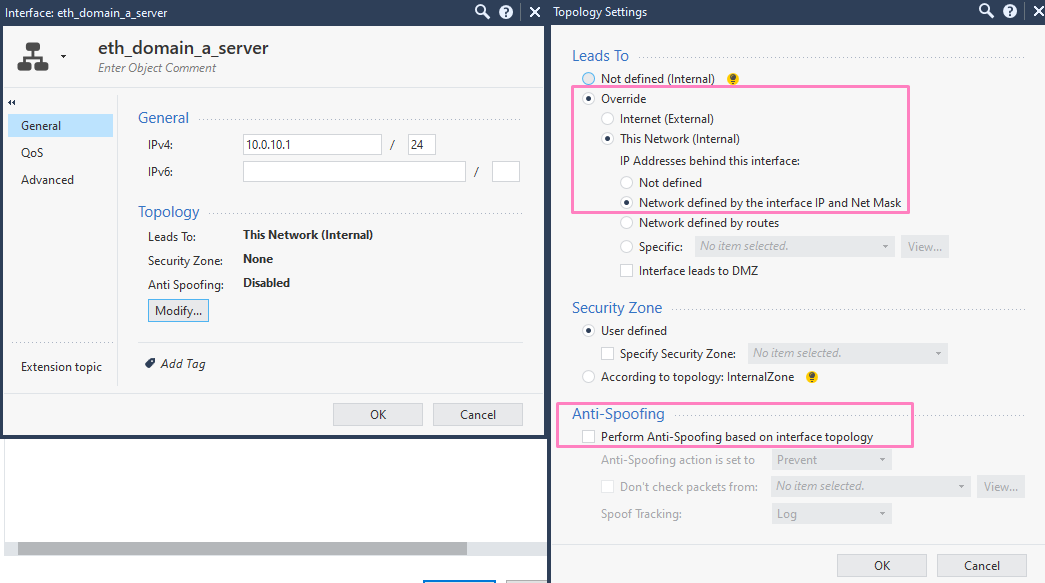
4. Click **Action** and create an interface in the subnet range for each relevant object requiring NAT configuration.
5. Network interface configuration:
1. From the General tab, click **Modify**.
2. Below Lead to, select:
1. Override.
2. This Network (internal).
3. Network defined by the interface IP and Net Mask.
3. Below Anti-Spoofing, disable Perform Anti-Spoofing based on interface topology.
4. Click **OK**.
6. Publish the changes.
Example:

#### Configure Active, Standby CMAs and CLMs in SmartConsole
1. Log in to the active CMA.
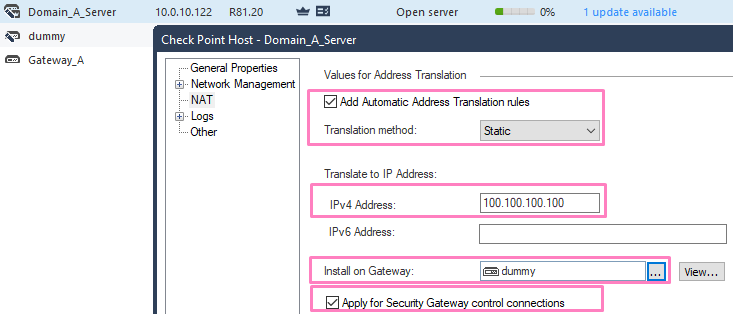
2. Edit the relevant Check Point Host objects.
3. Navigate to the **NAT** tab:
1. Click on **Add Automatic Translation rules**.
2. Select Translated method - **Static**.
3. Enter the Public CMA/CLM address in the IPv4 Address field.
4. In **Install on Gateway** select the dummy gateway.
5. Click on **Apply for Security Gateway control connections**.
4. Publish the changes.
5. Install database-relevant Check Point Host objects.
Example:

#### Enforcing the Security Gateway to use the NATed IP (based on [sk171055](https://support.checkpoint.com/results/sk/sk171055)):
1. Connect to the Security Gateway with SSH and enter Expert mode.
2. Run these commands:
1. `ckp_regedit -a SOFTWARE\\CheckPoint\\FW1 FORCE_NATTED_IP -n 1 fw fetch -f`
2. `cpwd_admin stop -name FWD -path "$FWDIR/bin/fw" -command "fw kill fwd"`
3. `cpwd_admin start -name FWD -path "$FWDIR/bin/fw" -command "fwd"`
3. From the active CMA, install the policy on the Security Gateway.
Follow these instructions for each Security Gateway that must communicate with the CMA/CLM with its public/elastic IP address.
**Note:** The configuration can be done automatically for Auto Scale Instances (Gateways) managed by Cloud Management Extension (CME). You can do this by configuring a custom gateway script that runs the command above on each provisioned Gateway. To Configure a custom gateway script, refer to [Cloud Management Extension Administration Guide](https://sc1.checkpoint.com/documents/IaaS/WebAdminGuides/EN/CP_CME/Default.htm) \> CME Structure and Configurations \> Configuration Templates (gateway-configurations) \> Supported Configuration Template parameters \> General Parameters \> CUSTOM_GATEWAY_SCRIPT.
#### Logs and fetch policy (optional)
Follow these steps if you want to override the default values:
1. Log in to the active CMA.
2. Edit the Security Gateway object.
3. Navigate to the **Logs**tab.
4. Update the tables with the relevant Check Point Host objects.
5. Navigate to **Fetch Policy** tab.
6. Update the tables with the relevant Check Point Host objects.
7. Click **OK**.
8. Publish the changes.
Example:


**Note:** Logs configuration can be done automatically for Auto Scale Instances (Gateways) managed by Cloud Management Extension (CME). To configure Log Server settings, refer to [Cloud Management Extension Administration Guide](https://sc1.checkpoint.com/documents/IaaS/WebAdminGuides/EN/CP_CME/Default.htm) \> CME Structure and Configurations \> Configuration Templates (gateway-configurations) \> Log Server parameters
---
# Agent Instructions
This content is from the Check Point Support Center (https://support.checkpoint.com), the official knowledge base for Check Point cybersecurity products.
## Navigating This Knowledge Base
- **Complete index**: [llms.txt](https://support.checkpoint.com/llms.txt)
- **All SK articles**: [SecureKnowledge Sitemap](https://support.checkpoint.com/sitemaps/secureknowledge-sitemap-index.xml)
- **SK article URL pattern**: `https://support.checkpoint.com/results/sk/{skId}`
- **Markdown responses**: AI bot User-Agents automatically receive `text/markdown` content