> Source: [sk175207](https://support.checkpoint.com/results/sk/sk175207)
# sk175207 - Check Point Reference Architecture for AWS
| Property | Value |
|----------|-------|
| Solution ID | sk175207 |
| Date Created | 2021-09-06 |
| Last Modified | 2026-02-08 |
| Technical Level | General |
| Products | Cloud Firewall |
| Versions | R82.10, R81.20, R82 |
## Cause
## Solution
**Table of Contents**
* (1) Introduction
* (2) Overview
* (3) Management
* (4) Licensing
* (5) Create SSH Key Pair
* (6) Create VPC Internet Gateway
* (7) Assign Elastic IP Address
* (8) Deploy the Security Gateway via CloudFormation template
* Parameters for Deploying a Transit Gateway into a New VPC
* (9) Connecting to the Security Gateway instance
* (10) Enabling IPv6 on existing IPv4 Security Gateway
* (11) Setting up VPN tunnel between AWS Check Point Gateway and Check Point (on-premises) Gateway
* (12) Inspecting inbound traffic
* (13) Inspecting outbound traffic
* (14) Known Limitations
(1) Introduction {#Introduction}
--------------------------------
This article provides a reference architecture for the deployment of [Check Point CloudGuard Network Security Gateways](https://www.checkpoint.com/cloudguard/cloud-network-security/iaas-public-cloud-security/) in AWS Cloud Platform.
The article assumes that you have a basic expertise with:
* The AWS Cloud Computing Services.
* Check Point CloudGuard Network Security Gateway and Security Management Server.
(2) Overview {#Overview}
------------------------
A common use case involves a web application environment deployed in a VPC (Virtual Private Cloud).
The web application can consist of multiple tiers, such as a Web tier and an Application tier.
The traffic flows in this environment normally consist of:
* Traffic arriving from the Internet to the Web tier.
* Traffic between the Web tier and the Application tier.
* Traffic between the environment and an on-premises network for administration and backend services.
* Outgoing connections from the environment to the Internet for software updates and access to external web services.
* Roaming users' remote access connections to the environment.
From a security perspective, these traffic flows should all be inspected and governed by the same security policy enforced elsewhere by the organization.
These security controls should include:
* Access Control (Firewall).
* Logging.
* Application Control.
* Intrusion Prevention (IPS).
* Advanced Threat Prevention.
* Network Address Translation (NAT) - Traffic from the web and application subnets is routed through the Check Point gateway through the use of User Defined Routes (UDR). The gateway uses NAT to hide this type of traffic behind its external private address. As the traffic leaves the virtual network, AWS replaces this private address with the gateway's public address.
* Site-to-Site VPN (for communication with the on-premises network) - Encrypted IPsec traffic is sent to the gateway's public IP address. The gateway decrypts the traffic and sends it into the virtual network. Outgoing traffic that needs to be encrypted is routed to the Check Point gateway through the use of User Defined Routes (UDR). The gateway encrypts this traffic and sends it over a site to site VPN tunnel to a Check Point gateway on the perimeter of the on-premises network.
* Remote Access VPN (for communication with roaming users) - Remote access users connect to the Security Gateway using its public IP address. The gateway decrypts the traffic and sends it into the virtual network. Returning packets are routed back to the gateway through the use of User Defined Routes (UDR).
(3) Management {#Management}
----------------------------
The Security Gateway can be managed in several ways including:
* A standalone configuration in which the gateway acts as its own management.
* Centrally managed where the management server is located on-premises outside the virtual network.
* Centrally managed where the management server is located in the same virtual network.
(4) Licensing {#Licensing}
--------------------------
The Security Gateway can be licensed in two ways:
* Bring-Your-Own-License (BYOL) - using the CloudGuard Network license.
* Pay-As-You-Go (PAYG) - the Security Gateway is pre-licensed.
(5) Create SSH Key Pair {#Create SSH Key Pair}
----------------------------------------------
To set up the Security Gateway and connect to it remotely, you must have an SSH key pair to make this connection secure.
To create the SSH Key Pair, follow these steps:
1. Open the [Amazon EC2 console](https://console.aws.amazon.com/ec2/home).
2. In the left navigation pane, select **Key Pairs**.
3. Click on **Create key pair**.
(6) Create VPC Internet Gateway {#Create VPC Internet Gateway}
--------------------------------------------------------------
An internet gateway serves two purposes: to provide a target in your VPC route tables for internet-routable traffic, and to perform network address translation (NAT) for instances that have been assigned public IPv4 addresses.
To create the Internet Gateway, follow these steps:
1. Open the [Amazon VPC console](https://console.aws.amazon.com/vpc/home).
2. In the left navigation pane, select **Internet Gateways**.
3. Click on **Create internet gateways**.
4. Enter **Name tag**.
5. Click on **Create internet gateway**.
6. Select the newly created internet gateway -\> click **Actions** -\> **Attach to VPC** and select your VPC.
7. Click on **Attach internet gateway**.
(7) Assign Elastic IP Address {#Assign Elastic IP Address}
----------------------------------------------------------
An Amazon VPC elastic IP address is a public IP address. Every Security Gateway has a private IP address and must also have an elastic IP address. The Amazon VPC Internet Gateway translates the elastic IP address of the Security Gateway to its private IP address.
To assign an elastic IP address to the Security Gateway, follow these steps:
1. Open the [Amazon EC2 console](https://console.aws.amazon.com/ec2/home).
2. In the left navigation pane, select **Elastic IPs**.
3. Click on **Allocate Elastic IP address** and click **Allocate**.
4. Select the newly created Elastic IP-\> click **Actions** -\> **Associate Elastic IP address**.
5. Select the Security Gateway instance and its private ip and click **Associate**.
To release an Elastic IP from existing instance, follow these steps:
1. Select new desired Elastic IP.
2. Click **Actions** -\> **Release Elastic IP addresses** -\> **Release**.
(8) Deploy the Security Gateway via CloudFormation template {#Deploy the Security Gateway}
------------------------------------------------------------------------------------------
To deploy the Security Gateway template into your AWS account, click [here](https://supportcenter.checkpoint.com/supportcenter/portal?eventSubmit_doGoviewsolutiondetails=&solutionid=sk111013#Security%20Gateway).
### Deployment minimum permissions
For a successful deployment, the relevant IAM policy must have minimum permissions set configured below.
In the AWS VPC Console navigate to IAM service, select the relevant IAM policy and copy/paste this text:
* For AWS Security Gateway in a new VPC:
**Show / Hide the section**
|-------------------------------------------------------------------------------------------------------------------------------------------------------------------------------------------------------------------------------------------------------------------------------------------------------------------------------------------------------------------------------------------------------------------------------------------------------------------------------------------------------------------------------------------------------------------------------------------------------------------------------------------------------------------------------------------------------------------------------------------------------------------------------------------------------------------------------------------------------------------------------------------------------------------------------------------------------------------------------------------------------------------------------------------------------------------------------------------------------------------------------------------------------------------------------------------------------------------------------------------------------------------------------------------------------------------------------------------------------------------------------------------------------------------------------------------------------------------------------------------------------------------------------------------------------------------------------------------------------------------------------------------------------------------------------------------------------------------------------------------------------------------------------------------------------------------------------------------------------------------------------------------------------------------------------------------------------------------------------------------------------------------------------------------------------------------------------|
| ``` { "Version": "2012-10-17", "Statement": [ { "Sid": "Permissions", "Effect": "Allow", "Action": [ "cloudformation:CreateStack", "cloudformation:DeleteStack", "cloudformation:DescribeStacks", "cloudformation:ListStackResources", "cloudformation:ValidateTemplate", "ec2:AllocateAddress", "ec2:AssociateAddress", "ec2:AssociateRouteTable", "ec2:AttachInternetGateway", "ec2:AttachNetworkInterface", "ec2:AuthorizeSecurityGroupEgress", "ec2:AuthorizeSecurityGroupIngress", "ec2:CreateInternetGateway", "ec2:CreateLocalGatewayRouteTable", "ec2:CreateNetworkInterface", "ec2:CreateRoute", "ec2:CreateRouteTable", "ec2:CreateSecurityGroup", "ec2:CreateSubnet", "ec2:CreateTags", "ec2:CreateVpc", "ec2:DeleteInternetGateway", "ec2:DeleteNetworkInterface", "ec2:DeleteRoute", "ec2:DeleteRouteTable", "ec2:DeleteSecurityGroup", "ec2:DeleteSubnet", "ec2:DeleteVolume", "ec2:DeleteVpc", "ec2:DescribeAccountAttributes", "ec2:DescribeAddresses", "ec2:DescribeAvailabilityZones", "ec2:DescribeInstanceAttribute", "ec2:DescribeInstanceTypes", "ec2:DescribeInstances", "ec2:DescribeInternetGateways", "ec2:DescribeKeyPairs", "ec2:DescribeNetworkAcls", "ec2:DescribeNetworkInterfaces", "ec2:DescribeRegions", "ec2:DescribeRouteTables", "ec2:DescribeSecurityGroups", "ec2:DescribeSubnets", "ec2:DescribeTags", "ec2:DescribeVolumes", "ec2:DescribeVpcAttribute", "ec2:DescribeVpcClassicLink", "ec2:DescribeVpcClassicLinkDnsSupport", "ec2:DescribeVpcs", "ec2:DetachInternetGateway", "ec2:DetachNetworkInterface", "ec2:DisassociateAddress", "ec2:DisassociateRouteTable", "ec2:ModifyNetworkInterfaceAttribute", "ec2:ModifySubnetAttribute", "ec2:ModifyVpcAttribute", "ec2:ReleaseAddress", "ec2:RevokeSecurityGroupEgress", "ec2:RunInstances", "ec2:TerminateInstances", "iam:AddRoleToInstanceProfile", "iam:CreateInstanceProfile", "iam:CreateRole", "iam:DeleteInstanceProfile", "iam:DeleteRole", "iam:DeleteRolePolicy", "iam:GetRole", "iam:PutRolePolicy", "iam:RemoveRoleFromInstanceProfile" ], "Resource": "*" } ] } ``` |
* For AWS Security Gateway in an existing VPC:
**Show / Hide the section**
|------------------------------------------------------------------------------------------------------------------------------------------------------------------------------------------------------------------------------------------------------------------------------------------------------------------------------------------------------------------------------------------------------------------------------------------------------------------------------------------------------------------------------------------------------------------------------------------------------------------------------------------------------------------------------------------------------------------------------------------------------------------------------------------------------------------------------------------------------------------------------------------------------------------------------------------------------------------------------------------------------------------------------------------------------------------------------------------------------------------------------------------------------------------------------------------------------------------------------------------------------------------------------------------------------------------------------------------------------|
| ``` { "Version": "2012-10-17", "Statement": [ { "Sid": "Permissions", "Effect": "Allow", "Action": [ "cloudformation:CreateStack", "cloudformation:DeleteStack", "cloudformation:DescribeStacks", "cloudformation:ListStackResources", "cloudformation:ValidateTemplate", "ec2:AllocateAddress", "ec2:AssociateAddress", "ec2:AuthorizeSecurityGroupEgress", "ec2:AuthorizeSecurityGroupIngress", "ec2:CreateNetworkInterface", "ec2:CreateRoute", "ec2:CreateSecurityGroup", "ec2:CreateTags", "ec2:DeleteNetworkInterface", "ec2:DeleteRoute", "ec2:DeleteSecurityGroup", "ec2:DescribeAddresses", "ec2:DescribeInstanceAttribute", "ec2:DescribeInstanceTypes", "ec2:DescribeInstances", "ec2:DescribeKeyPairs", "ec2:DescribeNetworkInterfaces", "ec2:DescribeRouteTables", "ec2:DescribeSecurityGroups", "ec2:DescribeSubnets", "ec2:DescribeTags", "ec2:DescribeVolumes", "ec2:DescribeVpcs", "ec2:DetachNetworkInterface", "ec2:DisassociateAddress", "ec2:ModifyNetworkInterfaceAttribute", "ec2:ReleaseAddress", "ec2:RevokeSecurityGroupEgress", "ec2:RunInstances", "ec2:TerminateInstances", "iam:AddRoleToInstanceProfile", "iam:CreateInstanceProfile", "iam:CreateRole", "iam:DeleteInstanceProfile", "iam:DeleteRole", "iam:DeleteRolePolicy", "iam:PutRolePolicy", "iam:RemoveRoleFromInstanceProfile" ], "Resource": "*" } ] } ``` |
### Parameters for Deploying a Security Gateway into a New VPC: {#Parameters for Deploying a Transit Gateway}
**VPC Network Configuration:**
|-----------------------|--------------------|--------------------------------------------------------|
| Parameter Name | Default Value | Description |
| `VPC CIDR` | 10.0.0.0/16 | The CIDR block for the VPC. |
| `Availability Zone` | **Requires Input** | The availability zone in which to deploy the instance. |
| `Public subnet CIDR` | 10.0.10.0/24 | The public subnet of the Security Gateway. |
| `Private subnet CIDR` | 10.0.11.0/24 | The private subnet of the Security Gateway. |
**EC2 Instance Configuration:**
|----------------------------------------|---------------------|---------------------------------------------------------------------------------------------------------------------------------------------------------------------------------|
| Parameter Name | Default Value | Description |
| `Gateway Name` | Check-Point-Gateway | The name tag of the Security Gateway instance (optional). |
| `Gateways Instance type` | c5.xlarge | The instance type of the Security Gateway. |
| `Key name` | **Requires input** | The EC2 Key Pair to allow SSH access to the instance. |
| `IP Mode` | IPv4 | Specifies the IP mode for the Security Gateway and other AWS resources (IPv4 \| DualStack). |
| `Allocate an Elastic IP` | True | Allocate an Elastic IP for the Security Gateway. |
| `Root volume size` (GB) | 100 |
|
| `Volume encryption KMS key identifier` | alias/aws/ebs | KMS or CMK key Identifier - Use key ID, alias or ARN. Key alias should be prefixed with 'alias/' (e.g. for KMS default alias 'aws/ebs' - insert 'alias/aws/ebs'). |
| `Enable AWS Instance Connect` | False | Enable SSH connection over AWS web console, see [sk163494](https://supportcenter.checkpoint.com/supportcenter/portal?eventSubmit_doGoviewsolutiondetails=&solutionid=sk163494). |
**Check Point Settings:**
|-----------------------------|--------------------|----------------------------------------------------------------------------------------------------------------------------------------------------------------------------|
| Parameter Name | Default Value | Description |
| `Gateway Version & license` | R81-BYOL | The license to use for the Security Gateway. |
| `Admin shell` | /etc/cli.sh | Change the admin shell to enable advanced command line configuration. |
| `Gateway Password hash` | Optional | The administrator password hash. Run this command to get the password hash: `openssl passwd -6 ` |
| `Gateway SIC key` | **Requires input** | The Secure Internal Communication key creates trusted connections between Check Point components. Choose a random string consisting of at least 8 alphanumeric characters. |
**Advanced Settings:**
|----------------------------|----------------------------|-----------------------------------------------------------------------------------------------------------------------------|
| Parameter Name | Default Value | Description |
| `Resources prefix tag` | Optional | Name tag prefix of the resources. |
| `Gateway Hostname` | Optional | The host name of the Security Gateway. |
| `Allow upload & download ` | True | Automatically download Blade Contracts and other important data. Improve product experience by sending data to Check Point. |
| `Bootstrap Script` | Optional | An optional script with semicolon (;) separated commands to run on the initial boot. |
| `Primary NTP server` | 169.254.169.123 (Optional) | Option to input a different Primary NTP server. |
| `Secondary NTP server` | 0.pool.ntp.org (Optional) | Option to input a different Secondary NTP server. |
**Automatic Provisioning with Security Management Server Settings (optional):**
|--------------------------|---------------|------------------------------------------------------------------------------------------------------|
| Parameter Name | Default Value | Description |
| `Gateway address` | private | Determines if the Security Gateway is provisioned using its private or public address. |
| `Management Server` | Optional | The name that represents the Security Management Server in the automatic provisioning configuration. |
| `Configuration template` | Optional | A name of a Security Gateway configuration template in the automatic provisioning configuration. |
**Note:** To deploy a Security Gateway that will be automatically provisioned, refer to [sk131434](https://supportcenter.checkpoint.com/supportcenter/portal?eventSubmit_doGoviewsolutiondetails=&solutionid=sk131434).
(9) Connecting to the Security Gateway instance {#Connecting to the Security Gateway instance}
----------------------------------------------------------------------------------------------
After deployment, you can connect to the instance using the following methods:
* **SSH** : You can connect to the instance using SSH as explained in
Notes:
* The username is 'admin'.
* SSH using passwords is disabled by default. Instead you should use SSH public keys.
* **Gaia Portal** : You can connect to the Gaia Portal over HTTPS using a web browser. https://\
Notes:
* The username is 'admin'.
* If you didn't enter Gateway Password hash in the cloudformation template, then you need first to connect over SSH to the machine and set the user 'admin' password: run set user admin password.
* When you connect to the Gaia Portal, you will be presented with an SSL warning similar to the following:
*Your connection is not private*
*NET::CERT_AUTHORITY_INVALID
Example:
* This is due to the fact that the certificate presented by the Gaia Portal is*self-signed.* You can validate the certificate by comparing its fingerprint to the fingerprint of the certificate found on the CloudGuard IaaS Gateway.
To retrieve the CloudGuard IaaS Gateway's certificate fingerprint, connect to the CloudGuard IaaS Gateway over SSH and run the following command:
`[Expert@HostName:0]# cpopenssl x509 -in`
`/web/conf/server.crt -fingerprint`
Alternatively, you can install your own SSL certificate. Refer to the following articles:
* [sk97648 - How to create and set certificate for Gaia Portal](https://supportcenter.checkpoint.com/supportcenter/portal?eventSubmit_doGoviewsolutiondetails=&solutionid=sk97648)
* [sk108252 - How to change Gaia Portal's certificate from SHA-1 to SHA-256](https://supportcenter.checkpoint.com/supportcenter/portal?eventSubmit_doGoviewsolutiondetails=&solutionid=sk108252)
* [sk109593 - How to configure Gaia Portal to use a 3rd party CA-issued Wildcard certificate](https://supportcenter.checkpoint.com/supportcenter/portal?eventSubmit_doGoviewsolutiondetails=&solutionid=sk109593)
* [sk103129 - Not able to connect to Gaia Portal due to issues with SSL certificate](https://supportcenter.checkpoint.com/supportcenter/portal?eventSubmit_doGoviewsolutiondetails=&solutionid=sk103129)
* Serial Console: follow the instructions in
Notes:
* The username is 'admin'.
* If you didn't enter **Gateway Password hash** in the CloudFormation template, then you need first to connect over SSH to the machine and set the user 'admin' password:
run *set user admin password*
* To connect with maintenance mode, see [sk170732](https://supportcenter.checkpoint.com/supportcenter/portal?eventSubmit_doGoviewsolutiondetails=&solutionid=sk170732&partition=Basic&product=CloudGuard)
(10) Enabling IPv6 on existing IPv4 Security Gateway {#Enabling IPv6 on existing IPv4 Security Gateway}
-------------------------------------------------------------------------------------------------------
Follow these instruction to configure IPv6 on a CloudGuard Network Security Gateway deployed in AWS:
**Step 1 - AWS Console configurations:**
1. Open the Amazon VPC console at
2. Select your VPC, and choose **Actions -\>** **Edit CIDRs** .

3. Add new IPv6 CIDR.

4. From the VPC console, select **Subnets**.
5. Select the subnet from your VPC that is attached to the relevant network interface and select **Actions -\>** **Edit IPv6 CIDRs** .

6. Add Subnet IPv6 CIDR block.

7. From the VPC console, select **Route Tables**.
8. Select external route table from your VPC and select **Actions -\>** **Edit Routes** .
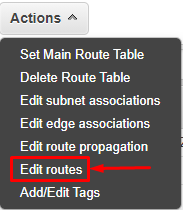
9. Add routes for IPv6 network.

10. From the VPC console, select **Network ACLs** or **Security Groups**.
11. Select Network ACL or Security Group attached to your VPC and select **Actions -\>** **Edit inbound/outbound rules** .

12. Update Network ACL or Security Group with inbound/outbound rules for IPv6 subnets.

13. Open the Amazon EC2 console at
14. In the navigation pane, select **Instances**.
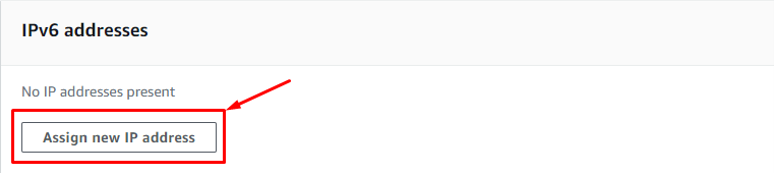
15. Select your instance, and select **Actions -\>** **Networking -\>** **Manage IP Addresses** .

16. Assign IPv6 address to a network interface.
**Step 2 - Check Point CloudGuard IaaS Gateway configurations:**
Login to the Security Gateway using SSH, from CLISH run the following commands:
1. Enable IPv6: *set ipv6-state on*
2. Add IPv6 address to the relevant interface (in this case eth0 is used):*set interface eth0 ipv6-address \ mask-length \* For example:*set interface eth0 ipv6-address 2001:0ba0::1 mask-length 64*
3. Save the changes:*save config*
4. Reboot the VM:*reboot*
5. Calculate and set the IPv6 default gateway:
1. Find the IPv4 default gateway: *netstat -nr \|grep "\^0.0.0.0"* Expected output:*\[Expert@aws-sgw:0\]# netstat -nr \|grep "\^0.0.0.0"
0.0.0.0 **1.2.3.1** 0.0.0.0 UG 0 0 0 eth0*
2. Find the MAC address of the default gateway interface:*arp -n **1.2.3.1*** Expected output:*\[Expert@romanka-sgw-2:0\]# arp -n **1.2.3.1**
Address HWtype HWaddress Flags Mask Iface
**1.2.3.1** ether **01:23:45:67:89:01** C eth0*
3. Copy HWaddress and browse to any eui64 calculator (for example: ).
4. In the eui64 calculator define start of IPv6 address.
**Note** : The IPv6 address must start with **fe80:**
5. Calculate the IPv6 address.
For example:*IPv6 address for the MAC: **01:23:45:67:89:01** is fe80::32345ff:fe67:8901*
6. Add the IPv6 default route:
*set ipv6 static-route default nexthop gateway fe80::32345ff:fe67:8901 interface eth0 on*
**Notes:**
* IPv6 can be only used in addition to the IPv4 addresses on EC2 instances.
* Cloud Management Extension (CME) does not support IPv6 objects.
* Check Point IPv6 Support FAQ [sk39374](https://supportcenter.checkpoint.com/supportcenter/portal?eventSubmit_doGoviewsolutiondetails=&solutionid=sk39374).
* See [AWS documentation for assigning IPv6 address to an instances](https://docs.aws.amazon.com/vpc/latest/userguide/vpc-migrate-ipv6.html#vpc-migrate-assign-ipv6-address).
(11) Setting up VPN tunnel between AWS Check Point Gateway and Check Point (on-premises) Management {#Setting up VPN tunnel between AWS Check Point Gateway}
------------------------------------------------------------------------------------------------------------------------------------------------------------
It is assumed that both gateways are managed by the same (on-premises) Security Management Server.
You can encrypt the data going between the company's on-premises and the company's private subnets in AWS by creating a VPN tunnel.
**Follow these steps to configure the VPN tunnel:**
1. Open SmartConsole.
2. Create a Network Group object for the encryption domain behind the CloudGuard Network Security Gateway.
Add the AWS subnets (**web-subnet** Network object) to this Network Group.

3. Edit the CloudGuard Network Security Gateway object:
1. On the **General Properties** pane, check the **IPSec VPN** box.
2. In the left tree, click on the **\[+\]** sign to expand the **Network Management**pane.
3. Click on the **VPN Domain** pane - select the option **User defined** .
Select the Group network object you created in Step 2.

4. In the left tree, click on the **\[+\]** sign to expand the **IPSec VPN** - go to the **Link Selection** pane.
5. Select the option **Always Use this IP Address**.
6. Select the option **Statically NATed IP**.
7. Enter the CloudGuard Network Security Gateway public IP address.
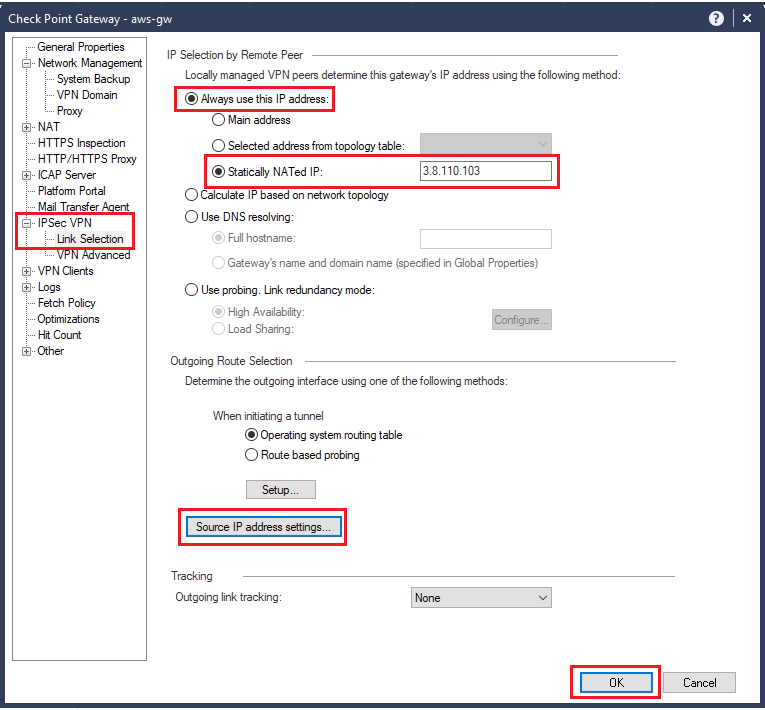
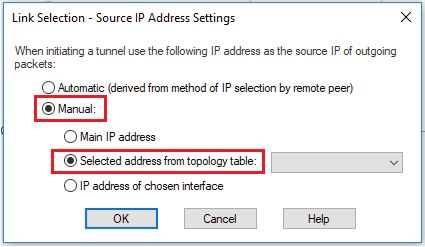
8. Click on the **Source IP address settings...**button.
9. Select the option **Manual** -\> **Selected address from topology table** - select the private IP address of the external interface.
4. Ensure that the encryption domain of the on-premises gateway is configured correctly.
5. Add the two gateways to a VPN community (such as "MyIntranet").
6. Optional - disable NAT inside the VPN tunnel, in the VPN community object:
1. On SmartConsole Navigation Toolbar, click on the **GATEWAYS \& SERVERS** app.
2. On the right pane, click on the **Objects**tab.
3. Click on the **VPN Communities** .

4. Edit the relevant VPN community:
1. Go to the **Advanced**pane.
2. Check the box **Disable NAT inside the VPN community**.
3. Click OK.

7. Install the Access Policy on the two Security Gateways.
For more information, refer to:
* [How to set up a VPN between a Check Point Security Gateway and Amazon VPC using dynamic routes](https://supportcenter.checkpoint.com/supportcenter/portal?eventSubmit_doGoviewsolutiondetails=&solutionid=sk108958)
* [How to configure IPsec VPN tunnel between Check Point Security Gateway and Amazon Web Services VPC using static routes](https://supportcenter.checkpoint.com/supportcenter/portal?eventSubmit_doGoviewsolutiondetails=&solutionid=sk100726)
(12) Inspecting inbound traffic {#Inspecting inbound traffic}
-------------------------------------------------------------
To inspect traffic from the internet to the web subnet, you can use the [AWS VPC ingress routing](https://aws.amazon.com/blogs/aws/new-vpc-ingress-routing-simplifying-integration-of-third-party-appliances/).
Follow the procedure described in [How to Deploy a VPC Ingress Routing Enhancement.](https://supportcenter.checkpoint.com/supportcenter/portal?eventSubmit_doGoviewsolutiondetails=&solutionid=sk166575)
**Important:**
When Ingress Routing is configured in the environment, it is not necessary to use NAT rules to route traffic through the CloudGuard Network Security Gateway. This is done through the native AWS Ingress Routing configuration.
**Supporting external Elastic Load Balancers (ELB):**
Elastic Load Balancers (ELBs) operate either as Internet facing or internal ELBs.
An external ELB is normally accessible from the Internet and distributes traffic as it enters a VPC.
You can use an external ELB with the Security Gateway as its target group, and then the destination for inbound traffic will be the ELB's DNS name.
**Supporting internal Elastic Load Balancers (ELB):**
An internal ELB has similar capabilities as the external ELB, but is only accessible within a VPC.
The Check Point Security Gateway will:
* Receive incoming traffic
* Screen the traffic based on its Security Policy
* Forward the traffic to an internal ELB
The internal ELB would then forward the traffic to actual instances, such as web servers.
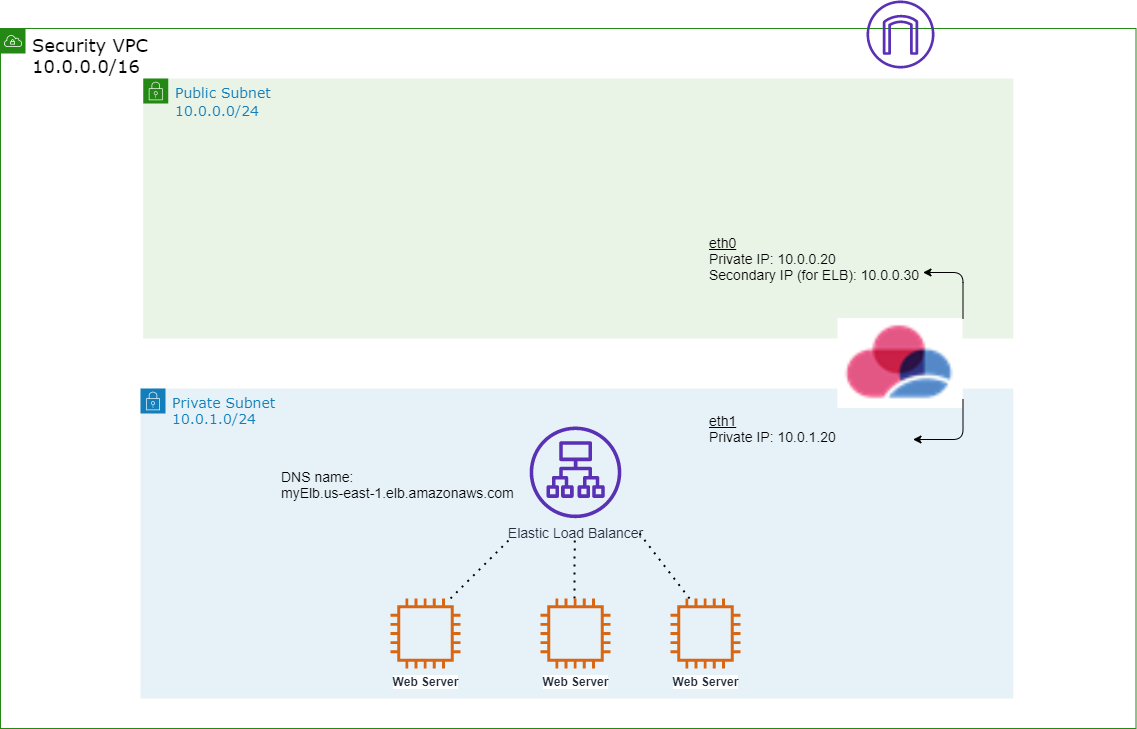
Amazon Web Services (AWS) assigns each ELB with a DNS Name. According to AWS, the set of IP addresses associated with this DNS Name can change over time.
To forward the traffic to the internal ELB, we will be using a logical server object.
In a regular Check Point environment, a logical server is a special Check Point object tying together an IP address with a group of predefined physical servers behind the firewall.
Traffic arriving on the gateway matching a rule with the logical server in the rule's destination cell, would be distributed among the group of physical servers.
When the Check Point Security gateway is running in AWS the semantics of this logical server is changed.
Instead of distributing traffic to a static list of IP addresses, the gateway will periodically resolve this list using DNS and would use a round robin algorithm to distribute the traffic between the set of IP addresses associated with the DNS Name of the ELB.
**Note** : The internal ELB name as defined in AWS, must follow certain restrictions to ensure that the Security gateway for AWS will be able to resolve it properly. For more details, refer to [sk116653 - Restrictions for Internal ELB names in Amazon Web Services (AWS).](https://supportcenter.checkpoint.com/supportcenter/portal?eventSubmit_doGoviewsolutiondetails=&solutionid=sk116653)
Create an internal ELB and note the DNS Name provided by AWS for this internal ELB:

**Configuration:**
1. Open SmartConsole.
2. In the right pane, click **New** and select **Host...**
3. Enter **dummyHost** as name.
4. For **IPv4 Address**, enter any private IP address, such as 192.168.1.1.
5. Click **OK** .

6. In the right pane, click **New** and select **Network Group...**
7. Enter **dummyGroup**as name.
8. Add the **dummyHost**to the group.
9. Click **OK** .

10. In the right pane, click **New** -\> **More** -\> **Network Object** -\> **More** and select **Logical Server...**
11. Enter the internal load balancer's DNS name provided by AWS.
12. For **IPv4 Address**, enter a private IP address associated with the gateway instance.
13. For **Server type** , select **Other**(even if you are working with HTTP traffic).
14. For **Server group** field, select the **dummyGroup**object.
15. Check the**Use persistent server mode** and leave the default option **Persistency by service**.
16. For **Balance** method, select **Domain**.
17. Click **OK** .

18. Go the **SECURITY POLICIES**.
19. In the Access Control Policy, add the following rule:
1. Source: any
2. Destination: the Logical Server object created in the previous steps.
3. Service: any service or services that are provided by this ELB (e.g., HTTP).
4. Install On: the Check Point Security Gateway in AWS.
20. If the Check Point Security Gateway is not designated as the default route in the relevant VPC subnets, you should follow the steps below to set up a NAT (Network Address Translation) to source-NAT these connections:
1. Create **Host** object with the following attributes:
* Name: gateway-elb-external (or any other descriptive name).
* IPv4 Address: The private IP address attached to the external interface of the gateway.
2. Create **Host** object with the following attributes:
* Name: gateway-internal (or any other descriptive name).
* IPv4 Address: The private IP address attached to the internal interface of the gateway.
3. Add NAT (Network Address Translation) rule with the following attributes:
|--------------|----------------------|----------------------------------------------------------------------|-----------------------------------|-------------|------------|----------------|
| Original Packet ||| Translated Packet ||| Install On |
| Source | Destination | Service | Source | Destination | Service | Policy Targets |
| All_Internet | gateway-elb-external | Any service, or services that are provided by this ELB (e.g., HTTP)) | gateway-internal (Hiding Address) | = Original | = Original | Policy Targets |
21. Install policy on the Security Gateway.
**Note:** If you need to forward traffic arriving at different private IP addresses to the same ELB, create multiple Logical Server objects. Since two objects cannot have the same name (in this case, the DNS name of the ELB), make the Logical Server name unique by appending the underscore character "_" to the name.
(13) Inspecting outbound traffic {#Inspecting outbound traffic}
---------------------------------------------------------------
Outbound traffic can be inspected by the Security Gateway using route destination 0.0.0.0/0 through the Security Gateway's eth0.
The Security Gateway uses NAT to hide the outbound traffic behind its external private address.
As the traffic leaves the VPC through the Internet Gateway, the Internet Gateway perform network address translation (NAT) and replaces this private address with the gateway's public address.
(14) Known Limitations {#Known Limitations}
-------------------------------------------
**Important**: This article provides reference architecture only for the deployment of Check Point CloudGuard Security Gateways version R80.20 and higher.
* VSX mode is not supported.
* For supported versions of Jumbo Hotfix Accumulator refer to [sk109141](https://supportcenter.checkpoint.com/supportcenter/portal?eventSubmit_doGoviewsolutiondetails=&solutionid=sk109141).
* The CloudGuard Auto Scaling solution does not support Check Point blades portals (for example, User Check portal, Identity Awareness Captive portal, DLP portal).
---
# Agent Instructions
This content is from the Check Point Support Center (https://support.checkpoint.com), the official knowledge base for Check Point cybersecurity products.
## Navigating This Knowledge Base
- **Complete index**: [llms.txt](https://support.checkpoint.com/llms.txt)
- **All SK articles**: [SecureKnowledge Sitemap](https://support.checkpoint.com/sitemaps/secureknowledge-sitemap-index.xml)
- **SK article URL pattern**: `https://support.checkpoint.com/results/sk/{skId}`
- **Markdown responses**: AI bot User-Agents automatically receive `text/markdown` content