> Source: [sk167073](https://support.checkpoint.com/results/sk/sk167073)
# sk167073 - Support for Secondary IP Address (Alias) in Scalable Platforms
| Property | Value |
|----------|-------|
| Solution ID | sk167073 |
| Date Created | 2020-05-25 |
| Last Modified | 2026-07-09 |
| Technical Level | General |
| Products | Scalable Platforms |
| Versions | R82.10, R82, R81.20, R81.10 (EOS), R81 (EOS) |
| OS | Gaia |
## Solution
**Table of Contents:**
* Introduction
* Controlling the Feature
* Configuration
* Create an Alias Interface
* Show Currently Configured Aliases
* Delete an Alias Interface
* SmartConsole Topology Configuration
* Example of Topology Settings
* Limitations
* Troubleshooting
Introduction {#Introduction}
----------------------------
Configuration of secondary IPv4 addresses (aliases) on the data ports of a Scalable Chassis and Maestro Security Group is supported in:
* [R81.10 for Scalable Platforms](https://supportcenter.checkpoint.com/supportcenter/portal?eventSubmit_doGoviewsolutiondetails=&solutionid=sk173363)
* [R81 for Scalable Platforms](https://supportcenter.checkpoint.com/supportcenter/portal?eventSubmit_doGoviewsolutiondetails=&solutionid=sk169954)
* [R80.30SP Jumbo Hotfix Accumulator](https://supportcenter.checkpoint.com/supportcenter/portal?eventSubmit_doGoviewsolutiondetails=&solutionid=sk165312) - Take 73 and higher
* [R80.20SP Jumbo Hotfix Accumulator](https://supportcenter.checkpoint.com/supportcenter/portal?eventSubmit_doGoviewsolutiondetails=&solutionid=sk155832) - Take 279 and higher
**Important Note** - The feature is *not* supported in the VSX mode.
Controlling the feature {#Controlling}
--------------------------------------
Show / Hide this section
To control this feature, a new kernel parameter was added - ***fwha_arp_support_aliases** .*
| Value of Kernel Parameter | Behavior |
|----------------------------|------------------------------------------------------------------------------------------|
| fwha_arp_support_aliases=0 | This is the default. Support of aliases is disabled. |
| fwha_arp_support_aliases=1 | Support of aliases is enabled. Gaia OS sends GARP packets from alias interfaces as well. |
* To change the value of this kernel parameter temporarily (does not survive reboot), run in the Expert mode:
`g_fw ctl set int fwha_arp_support_aliases `
* To change the value of this kernel parameter permanently (survives reboot), run in the Expert mode:
`g_update_conf_file $FWDIR/boot/modules/fwkern.conf fwha_arp_support_aliases=`
* To check the current value of this kernel parameter, run in the Expert mode:
`g_fw ctl get int fwha_arp_support_aliases`
Configuration {#Configuration}
------------------------------
### Create an Alias Interface {#Create}
Show / Hide this section
1. Connect to the command line on the Security Group.
2. Log in to the Expert mode.
3. Set the value of the kernel parameter **fwha_arp_support_aliases** to **1**:
1. Configure the value temporarily (does not survive reboot):
`g_fw ctl set int fwha_arp_support_aliases 1`
2. Make sure the new value is set:
`g_fw ctl get int fwha_arp_support_aliases`
3. Configure the value permanently (requires reboot - you can reboot later at any time):
`g_update_conf_file $FWDIR/boot/modules/fwkern.conf fwha_arp_support_aliases=1`
4. In Gaia gClish of the applicable Security Group, add the applicable interface alias:
1. Connect to the command line on the Security Group.
2. Log in to Gaia Clish.
3. Go to Gaia gClish: enter `gclish` and press Enter.
4. Add the applicable interface alias:
`add interface alias /`
**Note**: A new alias interface name is automatically created by adding a sequence number to the original interface name. For example, the name of first alias added to eth1 is eth1:1. The second alias added is eth1:2, and so on.
Examples:
*add interface eth1-05 alias 1.1.1.1/24*
*add interface bond3 alias 2.2.2.2/24*
*add interface bond0.12 alias 3.3.3.3/24*
5. Update the topology of the Security Gateway object in SmartConsole:
1. Connect with SmartConsole to the Management Server that manages this Security Group.
2. Open the applicable Security Gateway object.
3. From the left tree, click **Network Management**.
4. Click **Get Interfaces** \> **Get Interfaces with Topology**.
5. Make sure the information is correct and click **Accept**.
6. Click **OK**.
6. Install the Access Control Policy on this Security Gateway object.
7. Make sure the configuration is consistent on all Security Group members:
1. Connect to the command line on the Security Group.
2. Log in to the Expert mode.
3. Run:
`config_verify -v`
### Show Currently Configured Aliases {#Show}
Show / Hide this section
1. Connect to the command line on the Security Group.
2. Log in to Gaia Clish.
3. Go to Gaia gClish: enter `gclish` and press Enter.
4. Show the configured interface alias:
`show interface aliases`
To make sure the configuration is consistent on all Security Group members:
1. Connect to the command line on the Security Group.
2. Log in to the Expert mode.
3. Run:
`config_verify -v`
### Delete an Alias Interface {#Delete}
Show / Hide this section
1. In Gaia gClish of the applicable Security Group, delete the applicable interface alias:
1. Connect to the command line on the Security Group.
2. Log in to Gaia Clish.
3. Go to Gaia gClish: enter `gclish` and press Enter.
4. Delete the applicable interface alias:
`delete interface alias `
Example:
*delete interface eth1-05 alias eth1-05:1*
2. Update the topology of the Security Gateway object in SmartConsole:
1. Connect with SmartConsole to the Management Server that manages this Security Group.
2. Open the applicable Security Gateway object.
3. From the left tree, click **Network Management**.
4. Click **Get Interfaces** \> **Get Interfaces with Topology**.
5. Make sure the information is correct and click **Accept**.
6. Click **OK**.
3. Install the Access Control Policy on this Security Gateway object.
4. Make sure the configuration is consistent on all Security Group members:
1. Connect to the command line on the Security Group.
2. Log in to the Expert mode.
3. Run:
`config_verify -v`
### SmartConsole Topology Configuration {#SC}
Show / Hide this section
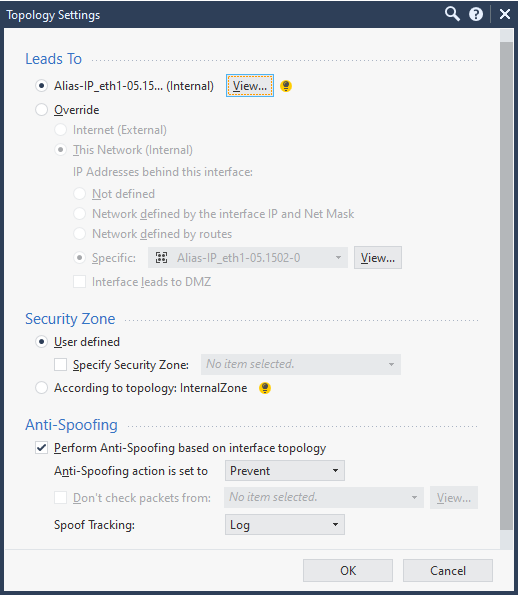
To update the topology, it is recommended to click **Get Interfaces** \> **Get interfaces with topology** to ensure that the alias networks are associated with their parent interface.
Furthermore, for each interface, it is recommended to use the default topology settings, and not the **Override**. Otherwise, it is not possible to link alias networks to the correct interface.
*Example of Topology Settings:*
**Note:** Click **View...** to see the networks behind the interface.
Limitations {#Limitations}
--------------------------
* Dynamic Routing is not supported with aliases configured.
* Configuration of interface aliases is supported only in Gaia gClish (regular Gaia Clish is not supported).
* Alias interfaces are related to their parent interface, and do not have their own statistics or settings.
* It is supported to configure an alias only to an interface with a main IPv4 address configure.
* The interface alias feature is not supported in VSX mode.
* Alias interfaces are not supported with VPN
Troubleshooting {#Troubleshooting}
----------------------------------
Show / Hide this section
1. If there are traffic issues related to the alias networks, verify that *fwha_arp_support_aliases* is set to 1 and check layer 2 connectivity.
2. If there are topology or spoofing issues:
1. Connect with SmartConsole to the Management Server.
2. Verify the topology of the relevant interface. Go to **Network Management** -\> double-click the relevant interface -\> **General** -\> **Modify**.
3. Verify that **Override** option is *not* selected. Otherwise, when a new alias is added, it will not be considered as part of the networks behind this interface.
1. The recommended configuration is the first. Then click **Get Interfaces** \> **Get interfaces with topology**.
2. The other option is to manually update the network groups of the interface, and add the alias network to it.
4. After changing the relevant configuration, install policy and check if the issue is resolved.
3. Make sure that the configuration is consistent between all Security Group members with the "*config_verify -v*" command.
If the configuration is not consistent on some Security Group members, reboot the "out-of-sync" member, to sync its database.
4. You will see the following error in *debug/log*:
"`fwha_notify_interface: there are more than 4 ips on interface notifying only the first ones`"
This happens because the value of the kernel parameter *fwha_arp_support_aliases* is set to 0. Change it to 1 to suppress this message.
---
# Agent Instructions
This content is from the Check Point Support Center (https://support.checkpoint.com), the official knowledge base for Check Point cybersecurity products.
## Navigating This Knowledge Base
- **Complete index**: [llms.txt](https://support.checkpoint.com/llms.txt)
- **All SK articles**: [SecureKnowledge Sitemap](https://support.checkpoint.com/sitemaps/secureknowledge-sitemap-index.xml)
- **SK article URL pattern**: `https://support.checkpoint.com/results/sk/{skId}`
- **Markdown responses**: AI bot User-Agents automatically receive `text/markdown` content