> Source: [sk165481](https://support.checkpoint.com/results/sk/sk165481)
# sk165481 - CloudGuard IaaS for Yandex Cloud
| Property | Value |
|----------|-------|
| Solution ID | sk165481 |
| Date Created | 2020-05-05 |
| Last Modified | 2022-10-29 |
| Technical Level | General |
| Products | Security Management Server, Cloud Firewall |
| Versions | R82.10, R82, R81.20, R82.10, R82.20, R81.20, R82 |
| OS | Gaia |
| Platform | Yandex Cloud |
## Solution
Overview {#overview}
--------------------
[Yandex.Cloud](https://cloud.yandex.com) is a public cloud platform that offers many categories of cloud resources such as virtual machines, container orchestration, block storage, databases and more.
Check Point CloudGuard IaaS delivers advanced, multi-layered threat prevention to protect your assets in Yandex.Cloud from malware and sophisticated threats. CloudGuard for Yandex.Cloud enables you to easily and seamlessly secure your workloads while providing secure connectivity across your cloud and on-premises environments.
A CloudGuard Security Gateway can be managed in several ways, including the following:
* A standalone configuration in which the Security Gateway acts as its own Security Management Server.
* Centrally managed, in which the Security Management Server is located on-premise or in a peered VPC outside the Gateway's local virtual network.
* Centrally managed, in which the Security Management Server is located in the same virtual network.
* Centrally managed by Check Point Management as a Service (MaaS)
This article will show you how to deploy a Check Point CloudGuard IaaS Gateway and/or Security Management Server in Yandex Compute Cloud service.
**Table of Contents:**
----------------------
1. Prerequisites
2. CloudGuard Images for Yandex.Cloud Downloads
3. Solution Topology
4. CloudGuard IaaS Gateway/Security Management Deployment
5. Automation
6. Known Limitations
7. Related Documentation
8. Related Solutions
(1) Prerequisites {#Prerequisites}
----------------------------------
This article assumes that you are familiar with the Check Point and Yandex.Cloud concepts and services listed below:
* [Compute Cloud](https://cloud.yandex.com/docs/compute/)
* [Object Storage](https://cloud.yandex.com/docs/storage/)
* [Virtual Private Cloud](https://cloud.yandex.com/docs/vpc/)
* [Identity and Access Management](https://cloud.yandex.com/docs/iam/)
* [CLI](https://cloud.yandex.com/docs/cli/)
* Bootstrap options detailed in [sk165476: CloudGuard IaaS Automation for KVM Based Platforms](https://supportcenter.checkpoint.com/supportcenter/portal?eventSubmit_doGoviewsolutiondetails=&solutionid=sk165476)
(2) Current Yandex.Cloud Marketplace Listings {#CloudGuard Images for Yandex.Cloud Downloads}
---------------------------------------------------------------------------------------------
*As of 22 December 2020*
**BYOL (R80.40)**
[Check Point CloudGuard IaaS - Firewall \& Threat Prevention BYOL](https://cloud.yandex.ru/marketplace/products/checkpoint/cloudguard-iaas-firewall-tp-byol-m)
[Check Point CloudGuard IaaS - Security Management BYOL](https://cloud.yandex.ru/marketplace/products/checkpoint/cloudguard-iaas-security-management-byol-m)
**PAYG (R80.40)**
[Check Point CloudGuard IaaS - Firewall \& Threat Prevention PAYG](https://cloud.yandex.ru/marketplace/products/checkpoint/cloudguard-iaas-firewall-tp-payg-m)
[Check Point CloudGuard IaaS - Firewall \& Threat Prevention with SandBlast PAYG](https://cloud.yandex.ru/marketplace/products/checkpoint/cloudguard-iaas-firewall-tp-with-sb-payg-m)
(3) Solution Topology {#Solution Topology}
------------------------------------------
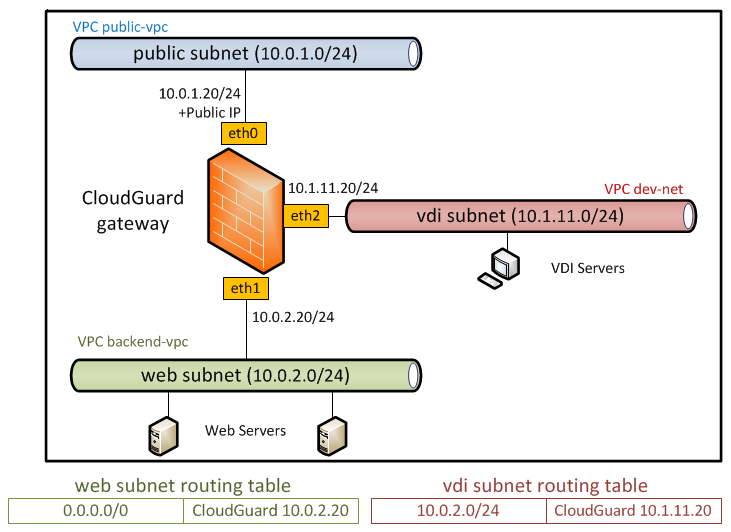
Below is an example topology depicting the protection of multiple VPC. Replace the IP addresses in the example to reflect your environment.
(4) CloudGuard IaaS Gateway/Security Management Deployment {#CloudGuard IaaS Gateway/Security Management Deployment}
--------------------------------------------------------------------------------------------------------------------
The following instructions detail how to deploy a Check Point CloudGuard IaaS Gateway and/or Security Management Server solution in Yandex Cloud Compute service.
**Platform Note**: At the time of this writing, some features within Yandex.Clound, such as virtual machine support for multiple NIC and network load balancing, require support enablement. Should you encounter this situation, contact Yandex support.
1. Navigate to **Virtual Private Cloud** service and create a new network (or use an existing one).
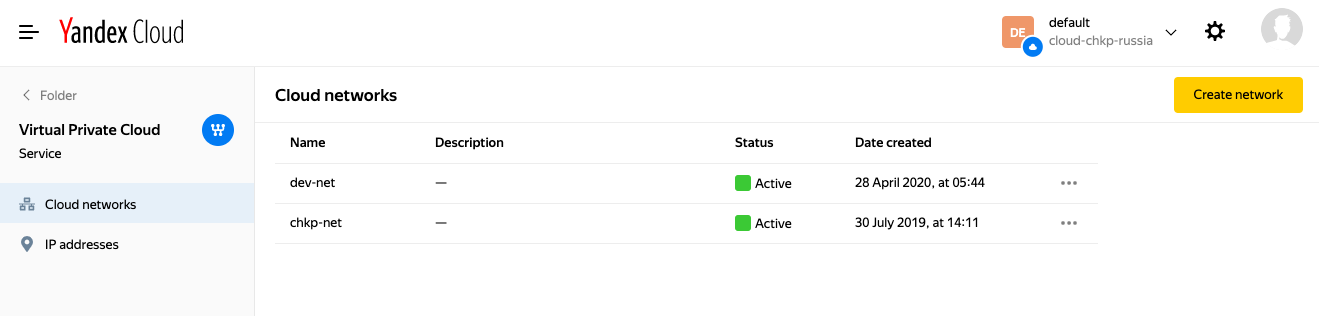
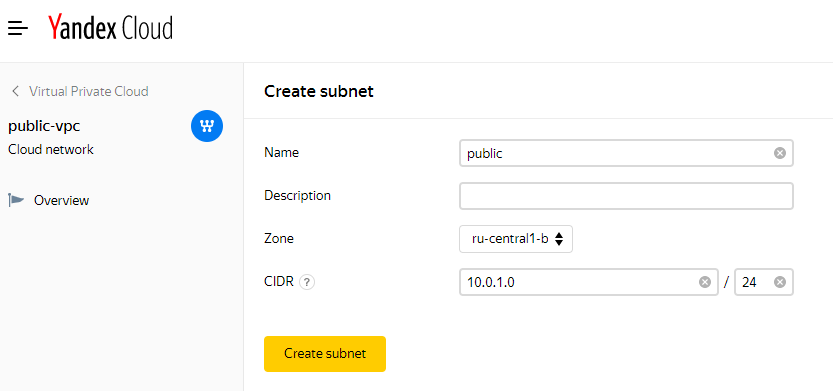
2. Open the VPC and add subnets. In this example, we are using three subnets:
*
* public (10.0.1.0/24) located in public-vpc VPC
* web (10.0.2.0/24) located in backend-vpc VPC
* vdi (10.1.11.0/24) located in dev-net VPC
**Note** : If a pre-existing topology exists in your VPC, it is possible to re-use existing subnets, as it is not strictly necessary to create dedicated subnets for the CloudGuard IaaS Gateway. However, creating a dedicated T**ransit Hub** can simplify security operations.
3. To create a new VM, navigate to **Compute Cloud** \> **Virtual Machines** .
4. Press the **Create VM** button.
5. Enter the basic parameters:
*
* Virtual Machine Name
* Virtual Machine Description
* Virtual Machine Region
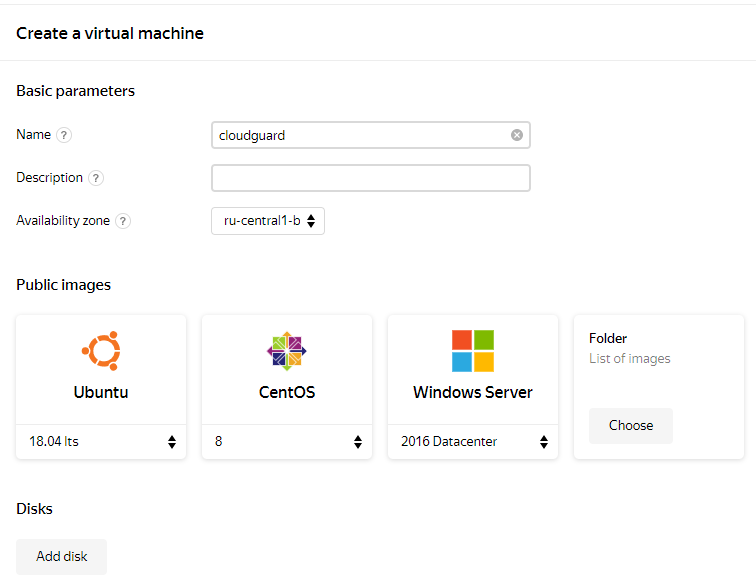
6. Open **Cloud Marketplace** and choose preferred CloudGuard IaaS Gateway or Management image.
7. Scroll down to the **Computing Resources** section and choose Disk, vCPU type, number of vCPU and RAM according to your performance requirements.
**Note**: For minimum hardware requirements, refer to the software version release notes.
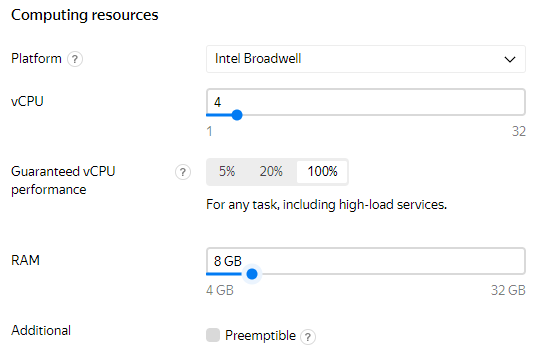
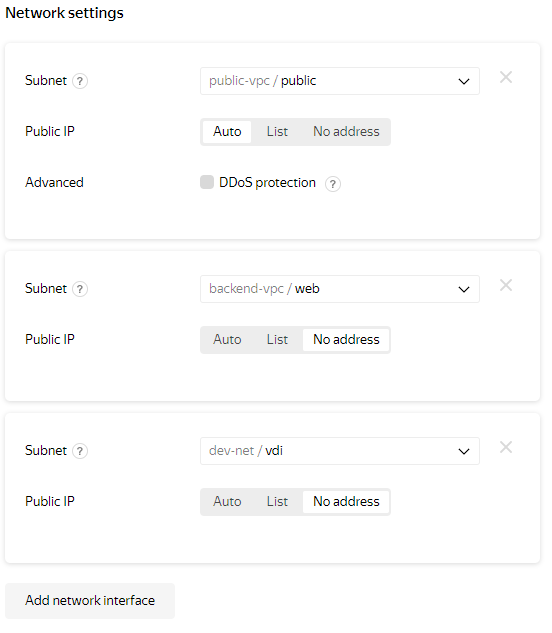
8. Scroll down to the **Network settings** section. Then add and configure the necessary amount of network interfaces on the subnets that require protection.
In this example, we will use three interfaces: a public-vpc/public nic (eth0), a backend-vpc/web nic (eth1) and a nic on vdi subnet (eth2) located in dev-net VPC. An automatically assigned Public IP is attached to the internet facing interface (eth0).
9. In the new VM **Access** section, enter the Login name **admin** and paste the admin SSH Public key for this VM into the form. After you press the **Create VM** button wait a few minutes for the VM to load.
**Note**: The Yandex.Cloud image has password authentication disabled by default as the expectation is customers will be implementing automation.
10. To connect the WebUI and run the First Time Wizard, connect with an SSH client to the virtual machine's Public IP using the SSH private key matched with the public key that was entered when you created the instance. Set the admin password by running one of the following commands:
>
>
> # Method one - Manual password entry
>
> clishPrompt> set user admin password
> clishPrompt> - insert your password -
> clishPrompt> save config
> clishPrompt> exit
>
> # Method two - Generate a password hash on Gaia, MacOS or Linux and pass it to clish non-interactivly
>
> bashPrompt> echo 'newpassed' | openssl passwd -1 -stdin
> $1$f2lxInWW$n/W.0r9JC4F8PyUXEXHp70
>
> SSH to VM and Pass this information to Clish:
> clishPrompt> set user admin password-hash '$1$f2lxInWW$n/W.0r9JC4F8PyUXEXHp70'
> clishPrompt> save config
> clishPrompt> exit
>
11, Connect to the instance using a web browser at the public IP. Log in as admin and complete the FTW.
12. Create the Gateway object in SmartConsole and establish SIC.
13. To route traffic of private subnets, navigate to the **Virtual Private Cloud** service, open your VPC and set the following:
*
* Press the **Create routing table** button.
* Add any other needed routes. Example: to inspect cross VPC traffic.
* Next hop: the internal private IP address of Check Point Gateway.
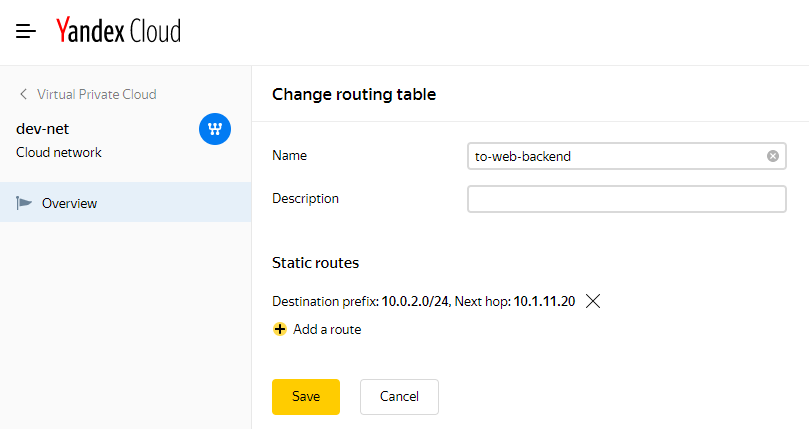
14. On the network subnets page press the ellipsis (**...** ) button on the right of a private subnet and choose **Link routing table**. Attach the routing table.

15. Traffic from VMs in backend subnet is now routed via CloudGuard private subnet IP. You can validate this with the route monitor.

(5) Automation {#Automation}
----------------------------
You can automate the creation of VMs with the [Yandex.Cloud CLI](https://cloud.yandex.com/docs/cli/).
This is an example of creating machine with same parameters as in previous section:
yc compute instance create --name cloudguard --zone ru-central1-b --create-boot-disk image-folder-id=standard-images,image-id=fd82veq4nae9huj26jm2 --network-interface subnet-name=public,nat-ip-version=ipv4 --network-interface subnet-name=web --network-interface subnet-name=vdi --memory 8 --cores 4 --metadata-from-file user-data=user-data.yaml
The **--metadata-from-file user-data=user-data.yaml** key enables the use of the metadata service to configure the VM from an attached user-data file at instantiation time.
For details and examples, refer to [sk165476 - CloudGuard IaaS Automation for KVM Based Platforms](http://supportcontent.checkpoint.com/solutions?id=sk165476).
To automatically distribute CloudGuard IaaS BYOL-type licenses, use the CloudGuard Central Licensing tool. For details, refer to the [R80.40 CloudGuard Controller Administration Guide](https://sc1.checkpoint.com/documents/R80.40/WebAdminGuides/EN/CP_R80.40_CloudGuard_Controller_AdminGuide/Content/Topics-CGRDG/CloudGuard_Central_Licensing.htm?TocPath=_____8).
(6) Known Limitations {#Known Limitations}
------------------------------------------
* Importing Data Center objects is not supported for Yandex.Cloud.
(7) Related Documentation {#Related Documentation}
--------------------------------------------------
* [R80.40 Release Notes](https://sc1.checkpoint.com/documents/R80.40/WebAdminGuides/EN/CP_R80.40_RN/Default.htm)
* [R80.40 CloudGuard Controller Administration Guide](https://sc1.checkpoint.com/documents/R80.40/WebAdminGuides/EN/CP_R80.40_CloudGuard_Controller_AdminGuide/Default.htm)
(8) Related Solutions {#Related Solutions}
------------------------------------------
* [sk160736 - Check Point R80.40](http://supportcontent.checkpoint.com/solutions?id=sk160736)
* [sk165476 - CloudGuard IaaS Automation for KVM Based Platforms](http://supportcontent.checkpoint.com/solutions?id=sk165476)
---
# Agent Instructions
This content is from the Check Point Support Center (https://support.checkpoint.com), the official knowledge base for Check Point cybersecurity products.
## Navigating This Knowledge Base
- **Complete index**: [llms.txt](https://support.checkpoint.com/llms.txt)
- **All SK articles**: [SecureKnowledge Sitemap](https://support.checkpoint.com/sitemaps/secureknowledge-sitemap-index.xml)
- **SK article URL pattern**: `https://support.checkpoint.com/results/sk/{skId}`
- **Markdown responses**: AI bot User-Agents automatically receive `text/markdown` content