> Source: [sk154712](https://support.checkpoint.com/results/sk/sk154712)
# sk154712 - How to submit a Support Ticket for Harmony Connect
| Property | Value |
|----------|-------|
| Solution ID | sk154712 |
| Date Created | 2019-05-28 |
| Last Modified | 2023-11-14 |
| Technical Level | General |
## Solution
### Step 1: Make sure you have a User Center account
Show / Hide this section
Anyone can open a Check Point User Center account, including users evaluating our product trials. With Check Point's User Center, you can access our [Support Center](https://support.checkpoint.com), open support tickets, evaluate products, and join discussions at the [CheckMates cybersecurity community](https://community.checkpoint.com/).
1. In the [User Center](https://usercenter.checkpoint.com), click **Sign Up Now** .

2. Fill out the form with your information and click **Submit**.

3. Log in to your mailbox and look for an email sent by **user_center@checkpoint.com** with the subject "`Check Point User Center`".
Click the activation link in the email.
Example:

4. Enter a password and click **Submit**.
You can see a confirmation message.
Click **Back** to get to the User Center login page.
5. Sign into your new User Center account.
6. From the top, click **ASSETS/INFO** \> click **My Accounts**.

7. In the page that opens, click **Create Account**.
Fill out the form and click **Submit**.
8. Wait for approximately an hour for the support system to process your new account.
### Step 2: Use your User Center account to create a Service Request (SR)
Show / Hide this section
1. From the top, click **SUPPORT/SERVICES** \> click **Create a Service Request** \> click **Create a new SR**.

2. In the **Service Request Type** , select **Technical Cloud Issue**.

3. Select your User Center account that you created in **Step 1: Make sure you have a valid User Center account**.

4. You should now be forwarded to the next step **Service Request Details**.
5. In **Cloud Service** , select **CloudGuard Connect** (this is the former name for Harmony Connect).

6. In **Subject** and **Description**, describe your issue.
You can also attach screenshots and files that are relevant to the issue.
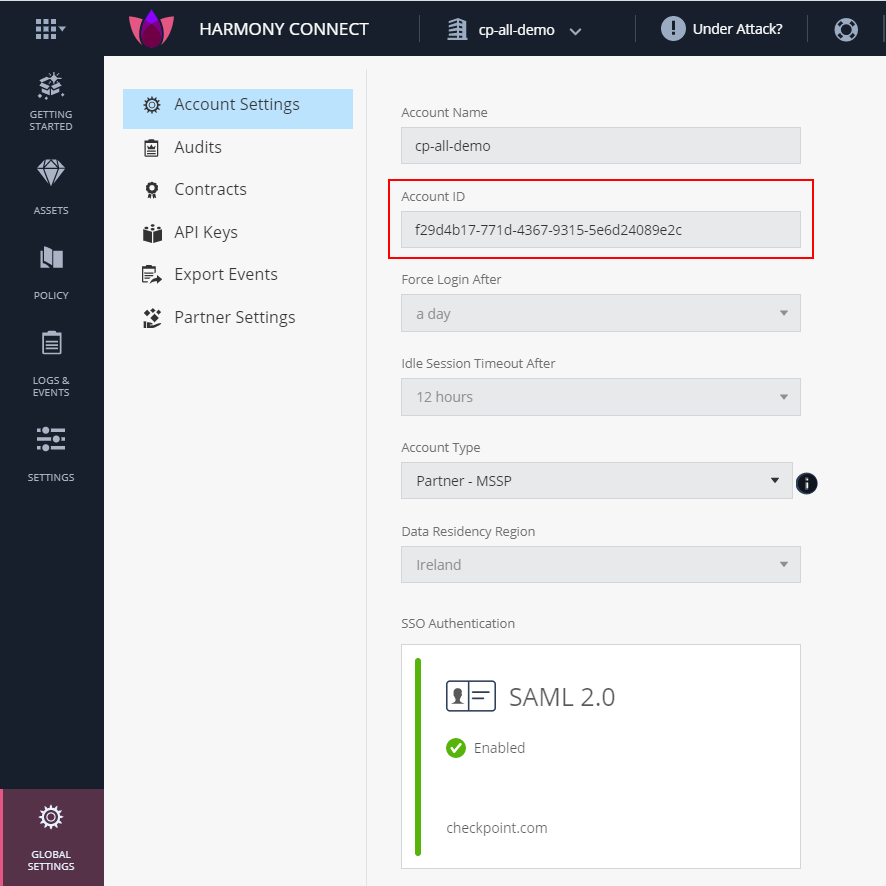
> Note - You can see your **Infinity Portal Account ID** in Infinity Portal \> **Global Settings** \> **Account Settings**.
>
> Example:
>
> 
If this issue happens to one of the administrators that use Infinity Portal, mention the **email address** that is used to access the portal.
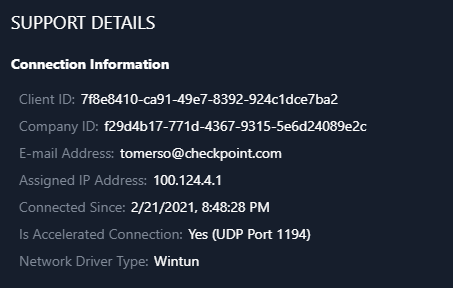
If the issue happens for remote users that use Harmony Connect App, mention the end user **Client ID** and **Company ID** from their computer:
1. Click the Harmony Connect App tray icon:

2. In the Harmony Connect app interface, click **Support** at the bottom:

3. Copy the **Client ID** string.
Example:
Check Point uses the information you enter in the **Severity** field to assign the right employee to your case:
* **Critical Severity** - Connectivity issues for existing sites, or no logs for specific user traffic.
* **High and below Severity** - Failure to create new sites or edit existing sites or policies.
Note - Check Point Support could lower the severity level of your ticket if it does not meet these criteria.
You can click **Add Contact Information (Optional)** to modify the ticket. This option is reserved for users with a valid paid support contract.
7. Click **Submit** or **Submit \& Chat.**
---
# Agent Instructions
This content is from the Check Point Support Center (https://support.checkpoint.com), the official knowledge base for Check Point cybersecurity products.
## Navigating This Knowledge Base
- **Complete index**: [llms.txt](https://support.checkpoint.com/llms.txt)
- **All SK articles**: [SecureKnowledge Sitemap](https://support.checkpoint.com/sitemaps/secureknowledge-sitemap-index.xml)
- **SK article URL pattern**: `https://support.checkpoint.com/results/sk/{skId}`
- **Markdown responses**: AI bot User-Agents automatically receive `text/markdown` content