> Source: [sk149692](https://support.checkpoint.com/results/sk/sk149692)
# sk149692 - Private ThreatCloud
| Property | Value |
|----------|-------|
| Solution ID | sk149692 |
| Date Created | 2019-03-28 |
| Last Modified | 2026-10-01 |
| Technical Level | General |
| Products | Private Threat Cloud |
| Versions | R81.10 |
| OS | Gaia |
## Solution
### **Table of Contents:**
* Introduction
* CVEs Information regarding Private Threat Cloud
* Deployment
* Managing the Private ThreatCloud
* Installation and Configuration
* Monitoring
* Logging
* Private ThreatCloud Diagnostics Tool
* Documentation
* Downloads
* Known Limitations
Click Here to Show the Entire Article
Introduction {#Introduction}
----------------------------
> **Note** - Check Point's ThreatCloud is **not** vulnerable to the Apache (CVE-2021-44228). For more information, see [sk176865](https://supportcenter.checkpoint.com/supportcenter/portal?eventSubmit_doGoviewsolutiondetails=&solutionid=sk176865).
>
> Check Point Software Blades (for example, Anti-Bot, Anti-Virus, IPS, Threat Emulation, Application Control, and URL Filtering) leverage the power of the Cloud. The Private ThreatCloud (PTC) provides a solution for customers whose Security Gateways or other Check Point devices do not connect directly to the Internet. With the Private ThreatCloud, customers receive continuous protection as cloud services are extended into offline or other compartmentalized environments.
>
> The Private ThreatCloud is a copy of the Check Point public ThreatCloud. Check Point devices use the Private ThreatCloud to get updates instead of connecting directly to the Internet through their Gateways.
>
> The Private ThreatCloud Download Agent downloads updates from the public ThreatCloud and pushes them to the Private ThreatCloud.
>
> **Important** - Only version R81.10 is supported.
> **Important -** R81.10 is marked
CVEs Information regarding Private Threat Cloud {#CVEs Information regarding Private Threat Cloud}
--------------------------------------------------------------------------------------------------
| CVE-Key | Severity | Reference SK |
|---------------|----------------------------|----------------------------------------------------------------|
| CVE-2022-4450 | not vulnerable - see below | [sk181427](https://support.checkpoint.com/results/sk/sk181427) |
| CVE-2023-2650 | not vulnerable - see below | [sk181427](https://support.checkpoint.com/results/sk/sk181427) |
| CVE-2022-4304 | not vulnerable - see below | [sk181427](https://support.checkpoint.com/results/sk/sk181427) |
| CVE-2024-2511 | not vulnerable - see below | [sk182320](https://support.checkpoint.com/results/sk/sk182320) |
**Risk Assessment on Private Threat Cloud (Air-Gapped)**
On PTC, these CVEs are even more negligible than the general Low-severity rating implies, because the attacker-controlled SSL sessions/certificates - simply does not exist in this environment:
PTC is fully air-gapped, with no internet or external network exposure.
All SSL sessions PTC establishes are internal-only, between trusted entities: the organization's own Security Gateways and the Download Agent.
The Download Agent communicates exclusively with known Check Point servers to fetch packages --- it never connects to arbitrary/random internet servers.
Because there is no untrusted peer capable of injecting malicious TLS sessions or certificates, there is no exploitable path for any of these CVEs on PTC.
Deployment {#Deployment}
------------------------
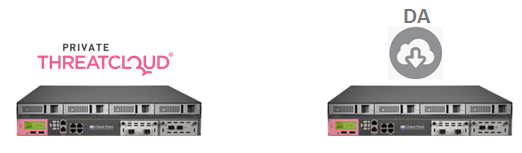
> You can deploy Private ThreatCloud in the following ways:
>
> * **Single Box** - Install the Private ThreatCloud and the Private ThreatCloud Download Agent on the same appliance.
>
> 
> * **Unidirectional** - Install the Download Agent on a different appliance or VM (not the Private ThreatCloud appliance).
>
> The Download Agent sends unidirectional updates to the Private ThreatCloud appliance.
>
> Select this deployment if you do not want the Private ThreatCloud appliance to access the Internet directly.
> 
Managing the Private ThreatCloud {#Managing the Private ThreatCloud}
--------------------------------------------------------------------
> The Private ThreatCloud is installed on a dedicated Management Server and manages **only the Private ThreatCloud** (Standalone). The Security Gateways that connect to the Private ThreatCloud as clients must be managed by a different Management Server.
>
> You can install the Download Agent on the Security Gateway or Management Server.
Installation and Configuration {#Installation and Configuration}
----------------------------------------------------------------
> ### **Understanding the Private ThreatCloud Environment**
>
> Show / Hide this section
> > Before you install the Private ThreatCloud, it is important to understand the different hosts you connect to as part of the installation.
> >
> > * The Private ThreatCloud: Replies to queries from Security Gateways or other Check Point devices for updates.
> > * The Download Agent: Downloads updates from the public ThreatCloud and pushes them to the Private ThreatCloud. In a single box deployment, the Download Agent is on the same appliance as the Private ThreatCloud. In a unidirectional deployment, the Download Agent is on a separate appliance or VM.
> > * The Security Management Server: A separate server that manages the Security Gateways in the Private ThreatCloud environment.
> > * Security Gateways or other Check Point devices: Receive updates from the Private ThreatCloud. They must be configured as a client to the Private ThreatCloud.
> >
> > The Download Agent must have HTTP or SSL access to these domains. Use Application Control rules to allow outgoing connections only to these domains:
> >
> > * `cws.checkpoint.com`
> > * `dl3.checkpoint.com`
> > * `downloads.checkpoint.com`
> > * `ptcd.checkpoint.com`
> > * `ptcs.checkpoint.com`
> > * `sc1.checkpoint.com`
> > * `secureupdates.checkpoint.com`
> > * `te.checkpoint.com`
> > * `threat-emulation.checkpoint.com`
> > * `updates.checkpoint.com`
>
> ### **Initial Configuration** {#Initial Configuration}
>
> Show / Hide this section
> > **Installation Procedure:**
> >
> > 1. **Install [R81.10 Management Server](https://supportcenter.checkpoint.com/supportcenter/portal/role/supportcenterUser/page/default.psml/media-type/html?action=portlets.DCFileAction&eventSubmit_doGetdcdetails=&fileid=115148) and complete the First Time Configuration Wizard (use only this image).**
> >
> > 2. Transfer the Private ThreatCloud package to the server (see the 'Downloads' section).
> >
> > 3. Connect to the command line on the server.
> >
> > 4. Log in to the Expert mode.
> >
> > 5. Go to the directory where you put the package:
> >
> > *cd /path_to/directory*
> > 6. Extract the package content:
> >
> > *tar -xvzf \*
> > 7. Run the installation script:
> >
> > *sh install_ptc.sh*
> > 8. Select the installation type:
> >
> > * Private ThreatCloud only
> > * Download Agent only
> > * Single Box (Private ThreatCloud and Download Agent)
> > 9. Reboot the server after the installation is complete.
> >
> > #### **Single Box Configuration:**
> >
> > In a Single Box deployment, the Private ThreatCloud and the Download Agent are installed on the same appliance.
> >
> > This section describes the procedure for this type of installation once the initial configuration is complete.
> >
> > 1. Add the Private ThreatCloud license on the server.
> > 2. Restart the server.
> > 3. Connect to the command line on the server.
> > 4. Log in to the Expert mode.
> > 5. Run the Private ThreatCloud Setup Wizard (one of these commands):
> > *ptc_cli mgmt*
> > **or**
> > *ptc_cli config*
> > 6. Select:
> > **Adding a new Private ThreatCloud**
> > 7. Follow the instructions in the wizard.
> >
> > #### **Private ThreatCloud-only Configuration:**
> >
> > In this type of installation, the Private ThreatCloud is installed on a different appliance than the Download Agent and receives continuous updates from it.
> >
> > This section describes the procedure for this type of installation once the initial configuration is complete.
> >
> > 1. Add the Private ThreatCloud license on the server.
> > 2. Restart the server.
> > 3. Connect to the command line on the server.
> > 4. Log in to the Expert mode.
> > 5. Run the Private ThreatCloud Setup Wizard:
> > *ptc_cli mgmt*
> > 6. Select:
> > **Adding a new Private ThreatCloud**
> > 7. Follow the instructions in the wizard.
> >
> > **Download Agent-only Configuration:**
> >
> > In this type of installation, the Download Agent is installed on a different appliance or VM than the Private ThreatCloud.
> >
> > The Download Agent connects to the Internet and sends unidirectional updates to the Private ThreatCloud.
> >
> > In this deployment, the Private ThreatCloud cannot access the Internet.
> >
> > This section describes the procedure for this type of installation once the initial configuration is complete.
> >
> > 1. Connect to the command line on the server.
> > 2. Log in to the Expert mode.
> > 3. Run the Download Agent Wizard:
> > *ptc_cli config*
> > 4. Follow the instructions in the wizard and add the applicable Private ThreatCloud that receives updates from this Download Agent.
> >
> > **To get the License Certificate Key:**
> >
> > Get the Certificate Key from your User Center account,or use the Private ThreatCloud:
> >
> > 1. Connect to the command line on your Private ThreatCloud in another shell.
> > 2. Log in to the Expert mode.
> > 3. Get the list of the currently installed licenses and their Certificate Keys:
> > *cplic print*
> > The Certificate Key is the last item in the line. It has one of these formats:
> > * CK-XX-XX-XX-XX-XX-XX
> > * CK-XXXX-XXXX-XXXX
> > * CK-XXXXXXXXXX
>
> ### Hardware Requirements
>
> Show / Hide this section
> > **Private ThreatCloud:**
> >
> > Smart-1 5000/6000 series
> >
> > **Download Agent:**
> >
> > Smart-1 Appliance / Open Server / VM
> >
> > Minimum of: 2 CPU cores, 8 GB RAM, 5 TB disk space allocated for the `/var/log/` partition
>
> ### Configuring Check Point Devices to Use the Private ThreatCloud {#Configuring Check Point Devices to Use the Private ThreatCloud}
>
> Show / Hide this section
> > You must establish trust between the Security Management/Domain Management Server and the Security Gateways that you want to connect to the Private ThreatCloud.
> >
> > To download updates directly from the Management Server/ Multi Domain Management server, you must configure it as a client to the Private ThreatCloud.
> >
> > **No need to add any configuration for Private ThreatCloud in SmartConsole.**
> >
> > #### Before you begin:
> >
> > 1. Disable the Internet proxy on the Security Gateways or other devices that use the Private ThreatCloud.
> >
> > This makes sure that they cannot bypass the Private ThreatCloud to the Internet.
> > 2. Transfer the **ptc_mgmt_addon.rpm** file to the Management Server that manages the Security Gateways or other Check Point devices.
> >
> > Transfer this RPM package to the Management Server to the */home/admin/* directory.
> >
> > You can extract this RPM package from the Private ThreatCloud in one of these ways:
> > * Copy the file from the */home/admin/* directory on the Private ThreatCloud.
> >
> > * Download the file from this URL:
> >
> > *http://\/client_cli/ptc_mgmt_addon.rpm*
> > 3. Connect to the command line on the Management Server.
> >
> > 4. Log in to the Expert mode.
> >
> > 5. Install the RPM:
> >
> > *rpm -ihv /home/admin/ptc_mgmt_addon.rpm*
> >
> > #### Adding a client to the Private ThreatCloud from a Security Management Server:
> >
> > 1. Connect to your Security Management with SSH.
> > 2. Run:
> > *ptc_cli mgmt*
> > 3. Select:
> > **Configure Security Gateways or other Check Point devices**
> > 4. Select:
> > **Add an externally managed Private ThreatCloud**
> > 5. Follow the instructions in the wizard.
> >
> > To configure the Security Management Server as a client to the Private ThreatCloud, enter **127.0.0.1** in the list of IP addresses that can connect to the Private ThreatCloud.
> >
> > #### Adding a client to the Private ThreatCloud from a Multi-Domain Server:
> >
> > 1. Connect to the command line on the Multi-Domain Security Management.
> > 2. Go to the context of the applicable Domain Management Server:
> > *mdsenv \*
> > 3. Run:
> > *ptc_cli mgmt*
> > 4. Select:
> > **Configure Security Gateways or other Check Point devices**
> > 5. Select:
> > **Add an externally managed Private ThreatCloud**
> > 6. Follow the instructions in the wizard.
> >
> > To configure the Multi-Domain Server / Domain Management Server as a client to the Private ThreatCloud, enter **127.0.0.1** in the list of IP addresses that can connect to the Private ThreatCloud.
> >
> > #### To revert the client configuration:
> >
> > 1. From the Management Server that has SIC with the client, run:
> > *ptc_cli mgmt*
> > 2. Select:
> > **Configuring the Security Gateways or other Check Point devices that use the Private ThreatCloud**
> > 3. Select:
> > **Revert Security Gateways or other Check Point Devices back to public ThreatCloud**
> > 4. Follow the instructions in the wizard.
> >
> > #### Administering the Private ThreatCloud
> >
> > This section describes how to administer and reconfigure the Private ThreatCloud and the Download Agent after you run the *ptc_cli mgmt* Setup Wizard.
> >
> > **General Notes**:
> >
> > * When configuring Cluster Members as clients to the Private ThreatCloud, use the real IP addresses of the Cluster Members, and not the Cluster VIP address.
> > * The Private ThreatCloud also receives software updates for the Private ThreatCloud itself.
> > Engine updates with security updates are downloaded by the Private ThreatCloud Download Agent when available, and are automatically updated on the Private ThreatCloud.
> > * The Private ThreatCloud software is updated by the automatic engine updates.
> > **Do not use CPUSE to update the Private ThreatCloud**, as this can break the Private ThreatCloud's functionality.
> > * In VSX environments, you must only add VS0 (the context of the VSX Gateway / VSX Cluster Member itself) as a Private ThreatCloud client.
>
> ### Changing the IP Address of the Private ThreatCloud
>
> Show / Hide this section
> > Use the Gaia Portal or Gaia Clish to change the Private ThreatCloud IP address (see the [Gaia Administration Guide](https://supportcenter.checkpoint.com/supportcenter/portal?eventSubmit_doShowproductpage&productTab=documents&product=184) for you version).
> >
> > Use the the Gaia Portal or Gaia Clish to remove existing licenses and install new licenses generated for the new IP address.
> >
> > **Note** : In your User Center account, generate the Private ThreatCloud license for the Private ThreatCloud IP address to select a Local license. Do **not** use the Management IP address to select a Central license.
> >
> > Procedure:
> >
> > 1. To change the Private ThreatCloud IP address in the Gaia Portal, go to **Network Management** \> **Network Interfaces**.
> > 2. Install the license for the Private ThreatCloud.
> > 3. Restart the appliance.
> > 4. Connect with SmartConsole to the new Private ThreatCloud IP address.
> > 5. From the left navigation panel, click **Gateways \& Servers**.
> > 6. Double-click the Private ThreatCloud object.
> > 7. Update the IP address in the object.
> > 8. Click **OK**.
> > 9. Install the database (in the top left corner, click **Menu** \> **Install database** \> select the Private ThreatCloud object \> click **Install**).
> >
> > On the Download Agent:
> >
> > 1. Connect to the command line on the Private ThreatCloud Download Agent.
> > 2. Log in to the Expert mode.
> > 3. Run:
> > *ptc_cli config*
> > 4. Select:
> > **Private ThreatCloud configuration**.
> > 5. Change the IP address of the Private ThreatCloud.
> >
> > Configure the Security Gateways or other Check Point devices that trust and are connected to the Private ThreatCloud to use the new IP address. For more information, read the section 'Configuring Check Point Devices to Use the Private ThreatCloud'.
>
> ### Scheduling Large Downloads
>
> Show / Hide this section
> > CPUSE and Threat Emulation require very large updates. With the Private ThreatCloud, you can configure the time at which the downloads for these updates start. You can configure a daily or weekly update, or you can set an interval (for example, 2 days).
> >
> > Using your download schedule, the Private ThreatCloud Download Agent requests new updates from the public ThreatCloud. Configure the time at which the Private ThreatCloud Download Agent starts to download the updates. When an update is found, the Private ThreatCloud Download Agent downloads until all parts get to the ThreatCloud. These downloads might take several hours.
> >
> > To configure the download schedule:
> >
> > 1. Connect to the command line on the Private ThreatCloud Download Agent.
> > 2. Log in to the Expert mode.
> > 3. Run:
> > *ptc_cli config*
> > 4. Select:
> > **Large file downloads scheduling**
> > 5. Select a schedule:
> > **Daily** , **Weekly** , or **Periodically**.
>
> ### Restoring Private ThreatCloud
>
> Show / Hide this section
> > The Private ThreatCloud automatically saves backups at 24-hour intervals. If necessary, you can restore the appliance settings from a backup.
> >
> > To restore the Private ThreatCloud:
> >
> > 1. Connect to the command line on the Private ThreatCloud.
> > 2. Log in to the Expert mode.
> > 3. Run:
> > *ptc_cli mgmt*
> > 4. Select:
> > **Restoring the Private ThreatCloud from a backup**
> > 5. Enter the number of the backup.
> > 6. On the Private ThreatCloud Download Agent, run:
> > *ptc_cli config*
> > 7. Select to restore updates after a backup version restore.
> >
> > **Note**: When you use a backup, you cannot restore it again. For example, if you have three backups and you restore number 2, the next time you see the backups, number 2 does not appear. When a restore begins, the database is locked and updates are disabled.
>
> ### Configuring a Private ThreatCloud Cluster
>
> Show / Hide this section
> > Private ThreatCloud supports High Availability using the 'keepalived' open source solution.
> >
> > 'Keepalived' is a routing software and its main goal is to provide simple and robust facilities for load balancing and high-availability to Linux system and Linux based infrastructures.
> >
> > Starting engine version 18, the failover mechanism includes both networking and services functionalities, and adjusts the priority accordingly to achieve the highest performance of the Private ThreatCloud.
> >
> > Before activating the 'keepalived' on the Private ThreatCloud, you must use the same certificate for both the 'Master' and 'Slave' servers.
> >
> > On the 'Master' Private ThreatCloud, get these files:
> >
> > 1. */web/conf/server.crt*
> > 2. */web/conf/server.key*
> >
> > On the 'Slave' Private ThreatCloud:
> >
> > * Transfer the *server.crt* and *server.key* files (from the 'Master' Private ThreatCloud) to the */home/admin/* directory.
> > * Connect to the command line.
> > * Log in to the Expert mode.
> > * Run:
> > *ptc_cli config*
> > * Select:
> > **Generate/import a certificate**
> > * Press the "**i**" key to import a certificate from an external certificate authority.
> > * Provide the location of the files and approve the change.
> >
> > To activate the 'keepalived' on the Private ThreatCloud:
> >
> > 1. Connect to the command line.
> > 2. Log in to the Expert mode.
> > 3. Run:
> > *ptc_cli config*
> > 4. Select:
> > **Cluster Configuration**
> > 5. Configure these settings:
> > * The IP of the Private ThreatCloud interface
> > * The state - Master or Slave
> > * Interface IP address of the second Private ThreatCloud member
> > * Interface name used for the local Private ThreatCloud
> > * Cluster Virtual IP address
> >
> > **Notes:**
> >
> > * Cluster configuration that was made prior to engine version 18:
> > * To use the new failover mechanism, run the '`ptc_cli config`' command in the Expert mode and select '`Cluster Configuration`'. The wizard overwrites the existing configuration in the */etc/keepalived/keepalived.conf* file.
> > * Private Threat Cloud Clusters that are not configured with the new failover capabilities, keep working with the old 'keepalived' mechanism.
> > * The Active cluster member contains the Virtual IP address.
> > To see this VIP address, run in the Expert mode:
> > `ip address`
> > * To stop the 'keepalived' service, run in the Expert mode:
> > *service keepalived stop*
> > * To start the 'keepalived' service, run in the Expert mode:
> > *service keepalived start*
> > * The priority mechanism has changed and by default it is configured to 201 on the 'Master' and 200 on the 'Slave'. **Do not change this configuration manually**.
>
> ### Certificate Best Practice {#Certificate Best Practice}
>
> Show / Hide this section
> > Save certificate files on removable media or an external computer. If you install the Private ThreatCloud again, use the original certificate. If you use a new certificate, you must change the certificate on all the Security Gateways and other devices that receive Private ThreatCloud updates.
> >
> > To export your current certificate, copy these files from your Private ThreatCloud to a different device or computer:
> >
> > 1. */web/conf/server.crt*
> > 2. */web/conf/server.key*
> >
> > To import the certificate you saved elsewhere:
> >
> > 1. Copy both files to the newly installed Private ThreatCloud.
> > 2. Connect to the command line on your Private ThreatCloud.
> > 3. Log in to the Expert mode.
> > 4. Run:
> > *ptc_cli config*
> > 5. Select:
> > **Generate/import a certificate**
> > 6. Follow the instructions in the wizard.
> You must provide the two files you copied from your previous Private ThreatCloud installation.
> > **Upgrade from Smart-1 5XXX series to Smart-1 6XXX series**
> >
> > To preserve the certificate of the Private ThreatCloud and avoid the need to configure the clients again:
> >
> > 1. Follow the instructions in the section 'Certificate Best Practice' to export the Private ThreatCloud certificate.
> > 2. Follow the instructions in the section 'Initial Configuration' to perform a clean install of the Private ThreatCloud on the Smart-1 60XX appliance.
> > 3. Follow the instructions in the section 'Certificate Best Practice' to import the Private ThreatCloud certificate.
>
> ### Private ThreatCloud License
>
> Show / Hide this section
> > Note that a license is required only for the Private ThreatCloud.
> >
> > The Private ThreatCloud Download Agent uses the 'PTC' Certificate Key to download files:
> >
> > * CPAP-PTC-6005-SOC (supports up to 50 gateways)
> > * CPAP-PTC-6025-SOC (supports up to 250 gateways)
> > * CPAP-PTC-6050-SOC (supports up to 500 gateways)
> > * CPAP-PTC-5005-SOC (supports up to 50 gateways)
> > * CPAP-PTC-5025-SOC (supports up to 250 gateways)
> > * CPAP-PTC-5050-SOC (supports up to 500 gateways)
> > * CPSB-PTC-3005-SOC-EVAL (unlimited, can only be obtained through an internal order)
Monitoring {#Monitoring}
------------------------
Show / Hide this section
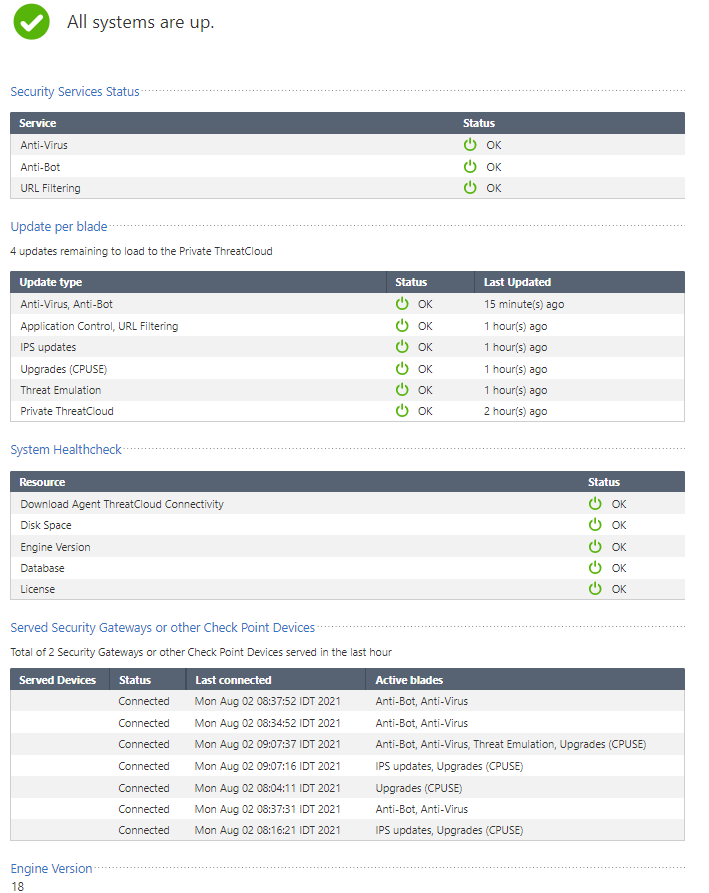
> The Private ThreatCloud Download Agent on the Private ThreatCloud starts to download updates and push them to the Private ThreatCloud.
>
> You can access the ThreatCloud services after the Private ThreatCloud Download Agent finishes downloading updates.
>
> The initial download after set up takes approximately 2 hours, depending on your connection speed.
>
> You can monitor the Private ThreatCloud Download Agent to see the download progress.
>
> If you run Private ThreatCloud monitoring before the Private ThreatCloud Download Agent finishes downloading updates, not all services will be available.
>
> ### **To monitor the Private ThreatCloud Download Agent:**
>
> * On the command line of the Private ThreatCloud Download Agent, run in the Expert mode:
> *ptc_cli downloads*
>
> ### **To monitor the Private ThreatCloud:**
>
> > Use one or more of these options to make sure that the Private ThreatCloud appliance is ready and that all services are available:
> >
> > * If you enabled web access to the system monitoring, browse to:
> > *http://\/ptcd/report.html*
> > * Browse to (JSON viewer is recommended):
> > *http://IP_Address_of_Private_ThreatCloud/ptcd/monitor*
> > * On the command line of the Private ThreatCloud, run in the Expert mode:
> > *ptc_cli monitor*
>
> 
Logging {#Logging}
------------------
Show / Hide this section
> Private ThreatCloud supports the syslog mechanism to send syslog messages to the logging server.
>
> To configure a new Syslog server:
>
> 1. **Private ThreatCloud Configuration:**
>
> 1. Connect to the command line on the Private ThreatCloud.
> 2. Log in to the Expert mode.
> 3. Run:
> *ptc_cli config*
> 4. Select:
> **Syslog Configuration**
> 5. Follow the instructions in the wizard.
> 6. Transfer these files from the Private ThreatCloud to your computer:
> 1. */opt/CPtms/cur/rad_logger/key.c*
> 2. */opt/CPtms/cur/rad_logger/addParsingFile*
> 2. **Log Server Configuration:**
>
> 1. Configure the Log Server to accept syslog messages:
> 1. Connect with SmartConsole to the Management Server that manages the Log Server.
> 2. From the left navigation panel, click **Gateways \& Servers**.
> 3. Double-click the Log Server object.
> 4. From the left tree, click **Logs** \> **Additional Logging Configuration**.
> 5. Select **Accept Syslog messages**.
> 6. Click **OK**.
> 7. From the top left corner, click **Menu** \> **Install database** \> select the Management Server and the Log Server objects \> click **Install**.
> 2. Connect to the command line on the Log Server.
> 3. Log in to the Expert mode.
> 4. Restart the Check Point services:
> *cpstop ; cpstart*
> 5. Make sure the syslog services are up and running:
> *ps aux \| grep syslog*
> The output must show these lines:
> 1. `/bin/bash /opt/CPsuite-/fw1/bin/syslog 514 all`
> 2. `syslogd -m 0 -z 515 -P info -f /var/run/syslog.conf`
> 6. Transfer these files from your computer to the Log Server (the files you transferred from the Private ThreatCloud):
> 1. *key.c*
> 2. *addParsingFile*
> 7. Go to the directory where you put these files:
> *cd /path_to/directory*
>
> 8. Assign the required ownership and permission:
> 1. *chmod +x addParsingFile*
> 2. *./addParsingFile -p key.c*
Private ThreatCloud Diagnostic Tool {#Private ThreatCloud Diagnostics Tool}
---------------------------------------------------------------------------
Show / Hide this section
> * Introduced in engine version 12.
> * Script location:
> */opt/CPtms/cur/scripts/ptc_doctor.sh*
> * To run this script:
> /opt/CPtms/cur/scripts/ptc_doctor.sh
> * Script output file:
> */var/log/ptc_doctor_output_XX-XX-XXXX.tgz*
> * Collected information:
> installation type, system information, missing packages, monitor status, download status, log files, certificate, and so on.
> * You can run this script on all servers:
> Download Agent only, Private ThreatCloud only, and Single Box.
Documentation {#Documentation}
------------------------------
Show / Hide this section
> * [sk113332 - Private ThreatCloud - Engine Updates](https://supportcenter.checkpoint.com/supportcenter/portal?eventSubmit_doGoviewsolutiondetails=&solutionid=sk113332)
> * [sk110972 - Check Point Private ThreatCloud - Troubleshooting](https://supportcenter.checkpoint.com/supportcenter/portal?eventSubmit_doGoviewsolutiondetails=&solutionid=sk110972)
> * [sk112692 - Check Point Private ThreatCloud - Manual Deployment Mode Instructions](https://supportcenter.checkpoint.com/supportcenter/portal?eventSubmit_doGoviewsolutiondetails=&solutionid=sk112692)
> * [sk142152 - Threat Emulation files are not updated on Private ThreatCloud (PTC) environment](https://supportcenter.checkpoint.com/supportcenter/portal?eventSubmit_doGoviewsolutiondetails=&solutionid=sk142152)
>
>
>
Downloads {#Downloads}
----------------------
Show / Hide this section
> Private Threat Cloud requires a dedicated license immediately after installation (there is no trial or EVAL).
>
> In addition, due to the sensitivity of the data stored on it, customers who would like to purchase it must sign an NDA.
>
> To get the package, contact your sales representative.
Known Limitations {#Known Limitations}
--------------------------------------
Show / Hide this section
>
> | **Feature** | **Limitation** |
> |--------------------------------------------------------|---------------------------------------------------------------------------------------------------------------------------------------------------------------------------------------------------------------------------------------|
> | Security Management / Multi- Domain Management upgrade | After upgrade of the Multi-Domain Security Management / Security Management Server, the package "*ptc_mgmt_addon.rpm*" must be installed again on the upgraded server. |
> | IPS | Offline Update is not supported (Using the offline method of the upf file to update the Private ThreatCloud itself is not supported). |
> | Multi-Domain Security Management environment | It is not possible to configure only one Domain to work with the Private ThreatCloud. It is only possible to configure all Domains or none. |
> | Threat Prevention | In SmartDashboard, when you try to access the **Threat Prevention** tab - **Protections** pane, the pane will not be displayed, and an error message will appear: "`Cannot access protection information due to connectivity issue.`" |
> | Threat Emulation Data Sharing | Not supported. |
> | Application \& URL Filtering | Categorizing of social network widgets is not supported. |
> | Anti-Spam | Anti-Spam is not supported when using Private ThreatCloud. |
> | ThreatWiki | Access from logs to ThreatWiki is not supported. |
> | SmartConsole overview | Updates for 'Protections' overview in SmartConsole are not supported. |
> | Client configuration on the Private ThreatCloud | Adding a client from the SmartConsole connected to Private ThreatCloud is not supported. The client must be connected from a different Management Server. |
> | Jumbo Hotfixes | Installing Jumbo Hotfixe Accumulators (any version) on top of the Private ThreatCloud is not supported. |
> | Platform Portal Port | Configuring the Platform Portal port in the Private ThreatCloud object in SmartConsole is not supported (the URL must **not** contain a port number, so it uses the default TCP port 443). |
---
# Agent Instructions
This content is from the Check Point Support Center (https://support.checkpoint.com), the official knowledge base for Check Point cybersecurity products.
## Navigating This Knowledge Base
- **Complete index**: [llms.txt](https://support.checkpoint.com/llms.txt)
- **All SK articles**: [SecureKnowledge Sitemap](https://support.checkpoint.com/sitemaps/secureknowledge-sitemap-index.xml)
- **SK article URL pattern**: `https://support.checkpoint.com/results/sk/{skId}`
- **Markdown responses**: AI bot User-Agents automatically receive `text/markdown` content