> Source: [sk130372](https://support.checkpoint.com/results/sk/sk130372)
# sk130372 - How to Install a Security Management Server with Cloud Firewall for AWS
| Property | Value |
|----------|-------|
| Solution ID | sk130372 |
| Date Created | 2018-06-24 |
| Last Modified | 2026-04-25 |
| Technical Level | General |
| Products | Cloud Firewall |
| Versions | R82.10, R81.20, R82 |
| OS | Gaia |
| Platform | AWS |
## Solution
**Table of Contents:**
1. Overview
2. Installing Check Point Security Management Server
* Deploying a Security Management Server in AWS
* Deploying a Security Management Server on-premises
3. Creating an AWS IAM User and IAM Role
* Terms
* AWS account authentication
* Creating an AWS IAM User (for authentication using AWS IAM User)
* Creating an AWS IAM Role (for authentication using AWS IAM role)
* Creating AWS IAM policies
* Attach the IAM policy to the IAM User or Role
4. Downloading and installing the latest Security Management Server add-on package
5. Automatic Provisioning with Security Management Server
* Setting up Automatic Provisioning
* Enabling and Disabling Software Blades
* Connecting with Additional AWS accounts
* Provisioning using AWS controller
* Automatic Provisioning in Multi-Domain Security Management Server environment
* Advanced Automatic Provisioning configuration
6. Highly available Security Management Server
7. Exporting and importing Security Management Server database
8. On-premises Security Management Server in-place upgrade
9. Known Limitations
Click Here to Show the Entire Article
### (1) Overview {#Overview}
Check Point Security Management Server that manages Cloud Firewall (formerly CloudGuard) Gateways deployed in AWS includes unique and dedicated capabilities for key AWS features, such as the management of Security Gateways in Amazon EC2 Auto Scaling Group, AWS Transit Gateway, and AWS Gateway Load Balancer.
Amazon EC2 Auto Scaling is a service offered by Amazon Web Services (AWS) that helps customers automatically adjust their Amazon EC2 capacity according to the current load. For more information about the Cloud Firewall Auto Scaling solution in AWS, see [Cloud Firewall for AWS Auto Scale Group Deployment Guide](https://sc1.checkpoint.com/documents/IaaS/WebAdminGuides/EN/CloudGuard_Network_for_AWS_AutoScaling_DeploymentGuide/Default.htm).
A Transit Gateway functions as a regional virtual router for traffic that flows between your Virtual Private Clouds (VPC) and VPN connections. A Transit Gateway scales elastically based on the volume of network traffic. This simplifies your network and eliminates complex peering relationships. It acts as a cloud router: each new connection is made only once. For more information about Cloud Firewall Transit Gateway Auto Scaling Group, see [Cloud Firewall for AWS Auto Scale Group with Transit Gateway Deployment Guide](https://sc1.checkpoint.com/documents/IaaS/WebAdminGuides/EN/CP_CloudGuard_AWS_AutoScale_with_Transit_Gateway/Default.htm).
The AWS Gateway Load Balancer (GWLB) is a managed service that allows AWS users to easily deploy, scale, and manage virtual appliances, such as firewalls, intrusion detection and prevention systems, and deep packet inspection systems. AWS customers can deploy virtual appliances with high availability, scaling, and load balancing. For more information about Cloud Firewall Gateway GWLB Auto Scaling Group, see [Cloud Firewall for AWS Gateway Load Balancer Auto Scaling Group Deployment Guide](https://sc1.checkpoint.com/documents/IaaS/WebAdminGuides/EN/CP_CloudGuard_Network_for_AWS_Gateway_Load_Balancer_ASG/Default.htm).
### (2) Installing Check Point Security Management Server {#Installing Check Point Security Management Server}
Cloud Firewall Gateways deployed in AWS can be managed by a Security Management Server that is deployed either in AWS or on-premises.
**To manage Cloud Firewall Gateways deployed in AWS:**
* The Management Server must be able to initiate connections to the Cloud Firewall Gateways.
* The Cloud Firewall Gateways must be able to initiate connections to the Management Server (for example, to send logs).
The Security Management Server communicates with the Security Gateways over private and public IP addresses.
Communication over private IP addresses is possible in one of these cases:
* The Management Server is in the same VPC as the Security Gateways.
* The Management Server is in another VPC that is peered with the VPC in which the Security Gateways are deployed.
* The Management Server is in an on-premises network that has connectivity to the VPC in which the Security Gateways are deployed, over [Direct Connect](https://aws.amazon.com/directconnect/).
* The Management Server is in an on-premises network that has connectivity to the VPC in which the Security Gateways are deployed, over a VPN connection.
* The Management Server is in an on-premises network or a VPC that has connectivity to the VPC in which the Security Gateways are deployed, over [AWS Transit Gateway](https://aws.amazon.com/transit-gateway/).
In all other cases, the Security Management Server and Security Gateways have to communicate with each other with the use of public IP addresses, and the object that represents the Management Server in the [SmartConsole](https://supportcenter.checkpoint.com/supportcenter/portal?eventSubmit_doGoviewsolutiondetails=&solutionid=sk170416) must have the public IP address as its main address. If you deploy the Management Server in AWS using the [CloudFormation template](https://s3.amazonaws.com/CloudFormationTemplate/management.json), you can do this by selecting **Over the internet** in the **Gateways management** field. Otherwise, do these steps:
1. Connect to the Management Server with **SmartConsole**.
2. Select **Gateways \& Servers**.
3. Double-click on the object representing the Management Server.
4. Insert the Management Server's public IP address in the IP Address field.
5. Publish the changes.
#### Deploying a Security Management Server in AWS {#Deploying a Security Management Server in AWS}
Show / Hide sub section
To deploy a Security Management Server in AWS, select and subscribe to one of these licensing options:
* [Check Point Security Management (BYOL)](https://aws.amazon.com/marketplace/pp/B07KSBV1MM)
* [Check Point Security Management for 25 Security Gateways MGMT-PAYG](https://aws.amazon.com/marketplace/pp/B07KSBM119)
If you want to manage more than 25 Security Gateways, select the **BYOL** option and purchase a license. To purchase BYOL licenses, contact [Check Point Sales](https://www.checkpoint.com/contact-sales/).
**Note**: All licensing has to use the private IP address. The Elastic IP is temporary and not known by the EC2 instance.
See [sk111013](https://supportcenter.checkpoint.com/supportcenter/portal?eventSubmit_doGoviewsolutiondetails=&solutionid=sk111013#Security%20Management%20Server) to deploy a Security Management Server.
**Deployment minimum permissions**
For a successful deployment, the relevant IAM policy must have minimum permissions set configured below.
In the AWS VPC Console navigate to IAM service, select the relevant IAM policy and copy/paste this text:
Show / Hide sub section
Minimum permissions for Management:
|-----------------------------------------------------------------------------------------------------------------------------------------------------------------------------------------------------------------------------------------------------------------------------------------------------------------------------------------------------------------------------------------------------------------------------------------------------------------------------------------------------------------------------------------------------------------------------------------------------------------------------------------------------------------------------------------------------------------------------------------------------------------------------------------------------------------------------------------------------------------------------------------------------------------------------------------------------------------------------------------------------------------------------------------------------------------------------------------------------------------------------------------------------------------------------------------------------------------------------------------------------------------------------------------------------------------------------------------------------------------------------------------------------------------------------------------------------------------------------------------------------------------------------------------------------------------------------------------------------------------------------------------------------------------------------------------------------------------------------------------------------------------------------------------------------------------------------------------------------------------------------------------------------------------------------------------------------------------------------------------------------------------------------------------------------------------------------------------------------------------------------------------------------------------------------------------------------------------------------------------------------------------------------------------------------------------------------------------------------------------------------------------------------------------------------------------------------------------------------------------------------------------------------------------------------------------------------------------------------------------------------------------------------------------------------------------------------------------------------------------------------------------------------------------------------------------------------------------------------------------------------------------------------------------------------------------------------------------------------------------------------------------------------|
| ``` { "Version": "2012-10-17", "Statement": [ { "Sid": "Permissions", "Effect": "Allow", "Action": [ "SNS:CreateTopic", "SNS:DeleteTopic", "SNS:GetTopicAttributes", "SNS:Subscribe", "autoscaling:CreateAutoScalingGroup", "autoscaling:DeleteAutoScalingGroup", "autoscaling:DeletePolicy", "autoscaling:DescribeAutoScalingGroups", "autoscaling:DescribeScalingActivities", "autoscaling:PutNotificationConfiguration", "autoscaling:PutScalingPolicy", "autoscaling:UpdateAutoScalingGroup", "cloudformation:CreateStack", "cloudformation:DeleteStack", "cloudformation:DescribeStacks", "cloudformation:ListStackResources", "cloudformation:ValidateTemplate", "cloudwatch:DeleteAlarms", "cloudwatch:PutMetricAlarm", "ec2:AllocateAddress", "ec2:AssociateAddress", "ec2:AuthorizeSecurityGroupEgress", "ec2:AuthorizeSecurityGroupIngress", "ec2:CreateLaunchTemplate", "ec2:CreateNetworkInterface", "ec2:CreateSecurityGroup", "ec2:CreateTags", "ec2:DeleteLaunchTemplate", "ec2:DeleteNetworkInterface", "ec2:DeleteSecurityGroup", "ec2:DescribeAddresses", "ec2:DescribeInstanceAttribute", "ec2:DescribeInstances", "ec2:DescribeKeyPairs", "ec2:DescribeLaunchTemplateVersions", "ec2:DescribeLaunchTemplates", "ec2:DescribeNetworkInterfaces", "ec2:DescribeSecurityGroups", "ec2:DescribeSubnets", "ec2:DescribeVolumes", "ec2:DescribeVpcs", "ec2:DetachNetworkInterface", "ec2:DisassociateAddress", "ec2:ModifyNetworkInterfaceAttribute", "ec2:ReleaseAddress", "ec2:RevokeSecurityGroupEgress", "ec2:RunInstances", "ec2:TerminateInstances", "elasticloadbalancing:ApplySecurityGroupsToLoadBalancer", "elasticloadbalancing:AttachLoadBalancerToSubnets", "elasticloadbalancing:ConfigureHealthCheck", "elasticloadbalancing:CreateLoadBalancer", "elasticloadbalancing:CreateLoadBalancerListeners", "elasticloadbalancing:CreateLoadBalancerPolicy", "elasticloadbalancing:DeleteLoadBalancer", "elasticloadbalancing:DeleteLoadBalancerPolicy", "elasticloadbalancing:DescribeInstanceHealth", "elasticloadbalancing:DescribeLoadBalancerAttributes", "elasticloadbalancing:DescribeLoadBalancerPolicies", "elasticloadbalancing:DescribeLoadBalancers", "elasticloadbalancing:DescribeTags", "elasticloadbalancing:DescribeTargetHealth", "elasticloadbalancing:ModifyLoadBalancerAttributes", "iam:AddRoleToInstanceProfile", "iam:AttachRolePolicy", "iam:CreateInstanceProfile", "iam:CreatePolicy", "iam:CreateRole", "iam:DeleteInstanceProfile", "iam:DeletePolicy", "iam:DeleteRole", "iam:DeleteRolePolicy", "iam:DetachRolePolicy", "iam:GetInstanceProfile", "iam:GetPolicy", "iam:GetPolicyVersion", "iam:GetRole", "iam:ListAttachedRolePolicies", "iam:ListInstanceProfilesForRole", "iam:ListPolicyVersions", "iam:PutRolePolicy", "iam:RemoveRoleFromInstanceProfile" ], "Resource": "*" }, { "Sid": "IAMPassRole", "Effect": "Allow", "Action": "iam:PassRole", "Resource": "*", "Condition": { "StringEquals": { "iam:PassedToService": "ec2.amazonaws.com" } } } ] } ``` |
> The template accepts these parameters:
>
> |--------------------------------------|------------------------------------------------------------------------------------------------------------------------------------------------------------------------------------------------------------------------------------------------------------------------------------------------------------------------------------------------------------------------------------------------------------------------------------------------------------------------------------------------------------------------------------------|
> | Parameter | Description |
> | VPC | The ID of your existing VPC (e.g., vpc-0123456789abcdef0), into which to deploy the Management Server. |
> | Management Subnet | Select a preexisting Subnet in the selected VPC. If you wish to access the Management Server from the Internet, make sure the subnet has a route to the Internet. |
> | Management Name | **Optional** Specify a name of the Management Server as it will appear in the AWS EC2 console. This name will not be used in the rest of the configuration. |
> | Instance Type | The EC2 instance type for the Management Server. |
> | Key name | A public/private key pair, which allows you to connect securely to your instance after it launches. When you created an AWS account, this is the key pair you created in your preferred region. |
> | Allocate an Elastic IP | Set this value to true to associate an Elastic IP to the Management Server and to access it from the Internet via a public IP address. |
> | Root volume size (GB) | Default - 100. |
> | Volume Type | General Purpose SSD Volume Type. Available types are gp3 and gp2. |
> | Volume encryption KMS key identifier | KMS or CMK key Identifier - Use key ID, alias or ARN. Key alias should be prefixed with 'alias/' (e.g. for KMS default alias 'aws/ebs' - insert 'alias/aws/ebs'). |
> | Enable AWS Instance Connect | Enable SSH connection over AWS web console, see [sk163494](https://supportcenter.checkpoint.com/supportcenter/portal?eventSubmit_doGoviewsolutiondetails=&solutionid=sk163494) |
> | IAM role | The IAM role to attach to the Management Server instance profile. The permissions required vary and depend on the solution being deployed. |
> | Existing IAM role name | If you have chosen to use an existing IAM role in the IAM role field, specify the role's name here. For more information, see [Creating an AWS IAM Role for CME in Security Management Server](https://supportcenter.checkpoint.com/supportcenter/portal?eventSubmit_doGoviewsolutiondetails=&solutionid=sk122074) |
> | STS roles | To enable this Management Server to perform AWS API calls using an STS role, specify the STS Roles to assume (comma separated list of ARNs, without spaces). See [sk122074](https://supportcenter.checkpoint.com/supportcenter/portal?eventSubmit_doGoviewsolutiondetails=&solutionid=sk122074) for more information on how to create IAM roles used by a Management Server, in the same or another AWS account as the managed resources. |
> | Version \& license | The version and license you have selected above. |
> | Admin Shell | Change the admin shell to enable advanced command line configuration. |
> | Password Hash | **Optional** To manage the environment's security, administrators can connect to the Management Server with a SmartConsole client. You can set the administrator password for the Management Server using this field. To protect the administrator password you must provide the password's MD5-based BSD password algorithm 1 salted hash instead of the password itself. You can generate the password's salted hash with this command: `openssl passwd -6 ` Replace *\* with the desired administrator password. |
> | Management hostname | The Management Server host name. |
> | ManagementInstallationType | Determines the Management Server installation type. |
> | SIC Key | This parameter is mandatory only if deploying a secondary Management Server, for high availability purposes. For more information, see the section "Highly available Security Management Server". The secure internal communication (SIC) key creates trusted connections between Security Gateways, Management Servers, and other Check Point components. Select a random string consisting of at least 8 alphanumeric characters and specify it in the SIC key parameter during deployment. |
> | Allow upload \& download | Automatically download Blade Contracts and other important data. Improve product experience by sending data to Check Point. |
> | Administrator addresses | Allow web, SSH, and graphical clients only from this network to communicate with the Management Server, in [CIDR notation](https://en.wikipedia.org/wiki/Classless_Inter-Domain_Routing). |
> | Gateways management | Select **Over the internet** if any of the gateways you wish to manage are not directly accessed via their private IP address. Otherwise select **Locally managed**. |
> | Gateways addresses | The CIDR IP address range that is permitted to access the Management Server. Only gateways from this network can communicate with the Management Server. |
> | Management bootstrap script | An optional script with semicolon (;) separated commands to run on the initial boot. |
> | Primary NTP server | Optional Primary NTP server. |
> | Secondary NTP server | Optional Secondary NTP server. |
> | IP Mode | Specifies the IP mode for the Security Management and other AWS resources (IPv4 \| DualStack). **Default:** IPv4. |
>
> **Note:** When the management instance is started, it will automatically execute its own First Time Configuration Wizard. It can take up to 45 minutes for this step to complete.
>
> To check the Management Server's readiness, log in to the **Expert** mode and run this command:
>
> `api status`
>
> When the Management Server is ready, the output of the command should include:
>
> ```
> --------------------------------------------
> Overall API Status: Started
> --------------------------------------------
> API readiness test SUCCESSFUL. The server is up and ready to receive connections
> ```
#### Deploying a Security Management Server on-premises {#Deploying a Security Management Server on-premises}
Show / Hide sub section
1. In the AWS IAM portal, create an IAM policy that contains the required permissions. These permissions vary and depend on the solution being deployed.
2. In the AWS IAM portal, create a new IAM user.
You can name the user *CheckPointManagement*.
Download and save the automatically generated *Access Key* and *Secret Key*.
On the *Permissions* tab, select *Attach Policy*, and attach the newly created IAM policy.
3. Follow the standard procedure to install the Check Point Management Server on-premises
4. Downloading and installing the latest Cloud Management Extension (CME) version on the Security Management Server, as described in the section "Downloading and installing the latest Security Management Server add-on package" below.
### (3) Creating an AWS IAM User and IAM Role {#Creating an AWS IAM User and IAM Role}
Check Point Security Management Server with CME requires some permissions in your AWS account to manage Cloud Firewall resources deployed in AWS and, in some cases, make changes in the environment for the solutions to work correctly. These permissions can be different depending on the solution that is deployed.
#### Terms {#Terms}
Show / Hide subsection
* An IAM user is an identity with long-term credentials that is used to interact with AWS in an account.
* An IAM role is an identity you can create that has specific permissions with credentials that are valid for short durations. Roles can be assumed by entities that you trust.
* A policy is an object in AWS that defines permissions.
#### AWS account authentication {#AWS account authentication}
Show / Hide sub section
In order to make a request for an action or operation on an AWS resource, CME must be authenticated (signed in to AWS) using credentials to send a request to AWS.
Available authentication methods:
* Using AWS Access keys. Access keys consist of an access key ID and secret access key
* Using the AWS IAM role. This method requires the Security Management Server to be deployed in AWS.
Next steps required for authenticating with AWS account using **AWS Access keys**:
1. Create an AWS IAM policy
2. Create an AWS IAM User
3. Attach the IAM policy to the IAM User (If you create the user in the AWS Management Console, then policy attachment is done as part of IAM User creation)
Next steps required for authenticating with AWS account using **AWS IAM role**:
1. Create an AWS IAM policy
2. Create an AWS IAM Role
3. Attach the IAM policy to the IAM Role (If you create the role in the AWS Management Console, then policy attachment is done as part of IAM role creation)
#### Creating an AWS IAM User (for authentication using AWS IAM User) {#Creating an AWS IAM User}
Show / Hide sub section
Refer to the official AWS documentation [Creating an IAM user in your AWS account](https://docs.aws.amazon.com/IAM/latest/UserGuide/id_users_create.html)
**Notes:**
1. IAM user must have programmatic access allowed, as CME requires to make API calls to AWS resources
2. An access key (access key ID and a secret access key) for that user must be created
#### Creating an AWS IAM Role (for authentication using AWS IAM role) {#Creating an AWS IAM Role}
Show / Hide sub section
These options can be used:
1. Refer to [Creating an AWS IAM Role for CME in Security Management Server via CloudFormation Template](https://supportcenter.checkpoint.com/supportcenter/portal?eventSubmit_doGoviewsolutiondetails=&solutionid=sk122074)
2. Refer to the official AWS documentation [Creating a role to delegate permissions to an IAM user](https://docs.aws.amazon.com/IAM/latest/UserGuide/id_roles_create_for-user.html)
#### Creating AWS IAM policies {#Creating AWS IAM policies}
Show / Hide sub section
Refer to official AWS documentation [Creating IAM policies](https://docs.aws.amazon.com/IAM/latest/UserGuide/access_policies_create.html)
*Examples of Policy Permissions for:*
* [Cloud Firewall Auto Scaling](https://sc1.checkpoint.com/documents/IaaS/WebAdminGuides/EN/CloudGuard_Network_for_AWS_AutoScaling_DeploymentGuide/Default.htm) and [Cloud Firewall for AWS Gateway Load Balancer Security VPC for Transit Gateway](https://sc1.checkpoint.com/documents/IaaS/WebAdminGuides/EN/CP_CloudGuard_Network_for_AWS_Gateway_Load_Balancer_Security_VPC_for_Transit_Gateway/Default.htm):
|------------------------------------------------------------------------------------------------------------------------------------------------------------------------------------------------------------------------------------------------------------------------------------------------------------------------------------------------------------------------------------------------------------------------------------------------------------------------------------------------------------------------------------------------|
| ``` { "Version": "2012-10-17", "Statement": [ { "Action": [ "autoscaling:DescribeAutoScalingGroups", "ec2:DescribeInstances", "ec2:DescribeNetworkInterfaces", "ec2:DescribeSubnets", � � � � � �"ec2:DescribeRegions", � � � � � �"elasticloadbalancing:DescribeLoadBalancers", "elasticloadbalancing:DescribeTags", "elasticloadbalancing:DescribeListeners", "elasticloadbalancing:DescribeTargetGroups", "elasticloadbalancing:DescribeRules", "elasticloadbalancing:DescribeTargetHealth" ], "Resource": "*", "Effect": "Allow" } ] } ``` |
| |
| |
* [Cloud Firewall for AWS Centralized Gateway Load Balancer](https://sc1.checkpoint.com/documents/IaaS/WebAdminGuides/EN/CP_CloudGuard_Network_for_AWS_Centralized_Gateway_Load_Balancer/Default.htm):
|-------------------------------------------------------------------------------------------------------------------------------------------------------------------------------------------------------------------------------------------------------------------------------------------------------------------------------------------------------------------------------------------------------------------------------------------------------------------------------------------------------------------------------------------------------------------------------------------------------------------------------------------------------------------------------------------------------------------------------------------------------------------------------------------|
| ``` { "Version": "2012-10-17", "Statement": [ { "Action": [ "autoscaling:DescribeAutoScalingGroups", "ec2:DescribeInstances", "ec2:DescribeNetworkInterfaces", "ec2:DescribeSubnets", � � � � � �"ec2:DescribeRegions", � � � � � �"elasticloadbalancing:DescribeLoadBalancers", "elasticloadbalancing:DescribeTags", "elasticloadbalancing:DescribeListeners", "elasticloadbalancing:DescribeTargetGroups", "elasticloadbalancing:DescribeRules", "elasticloadbalancing:DescribeTargetHealth", "ec2:DescribeInternetGateways", "ec2:DescribeVpcEndpoints", "ec2:DescribeVpcEndpointServiceConfigurations", "ec2:CreateRoute", "ec2:ReplaceRoute", "ec2:DeleteRoute", "ec2:CreateRouteTable", "ec2:AssociateRouteTable", "ec2:CreateTags" ], "Resource": "*", "Effect": "Allow" } ] } ``` |
* [Transit Gateway Auto Scaling Group](https://sc1.checkpoint.com/documents/IaaS/WebAdminGuides/EN/CP_CloudGuard_AWS_Transit_Gateway/Default.htm):
|-----------------------------------------------------------------------------------------------------------------------------------------------------------------------------------------------------------------------------------------------------------------------------------------------------------------------------------------------------------------------------------------------------------------------------------------------------------------------------------------------------------------------------------------------------------------------------------------------------------------------------------------------------------------------------------------------------------------------------------------------------------------------------------------------------------------------------------------------------------------------------------------------------------------------------------------------------------------------------------------------------------------------------------------------------------------------------------------------------------------------------------------------------------------------------------------------------------------------------------------------------------------------------------------------------------------------------------------------------------------------------------------------------------------------------------------------------------------------------------------------------------------------------------------------------------------------------------------------------|
| ``` { "Version": "2012-10-17", "Statement": [ { "Action": [ "ec2:DescribeInstances", "ec2:DescribeNetworkInterfaces", "ec2:DescribeSubnets", "ec2:DescribeVpcs", "ec2:DescribeSecurityGroups", � � � � "ec2:DescribeRegions", � � � �"elasticloadbalancing:DescribeLoadBalancers", "elasticloadbalancing:DescribeTags", "elasticloadbalancing:DescribeListeners", "elasticloadbalancing:DescribeTargetGroups", "elasticloadbalancing:DescribeRules", "elasticloadbalancing:DescribeTargetHealth", "autoscaling:DescribeAutoScalingGroups", "ec2:DescribeCustomerGateways", "ec2:CreateCustomerGateway", "ec2:DeleteCustomerGateway", "ec2:DescribeRouteTables", "ec2:EnableVgwRoutePropagation", "ec2:DisableVgwRoutePropagation", "ec2:DescribeVpnGateways", "ec2:CreateVpnGateway", "ec2:AttachVpnGateway", "ec2:DetachVpnGateway", "ec2:DeleteVpnGateway", "ec2:DescribeVpnConnections", "ec2:CreateVpnConnection", "ec2:DeleteVpnConnection", "ec2:DescribeTransitGateways", "ec2:DescribeTransitGatewayRouteTables", "ec2:DescribeTransitGatewayAttachments", "ec2:AssociateTransitGatewayRouteTable", "ec2:DisassociateTransitGatewayRouteTable", "ec2:EnableTransitGatewayRouteTablePropagation", "ec2:DisableTransitGatewayRouteTablePropagation", "ec2:GetTransitGatewayAttachmentPropagations", "cloudformation:DescribeStacks", "cloudformation:DescribeStackResources" ], "Resource": "*", "Effect": "Allow" }, { "Action": [ "cloudformation:CreateStack", "cloudformation:DeleteStack" ], "Resource": "arn:aws:cloudformation:*:*:stack/vpn-by-tag--*/*", "Effect": "Allow" } ] } ``` |
#### Attach the IAM policy to the IAM User or Role {#Attach the IAM policy to the IAM User or Role}
Show / Hide subsection
Refer to the official AWS documentation on [Adding and removing IAM identity permissions](https://docs.aws.amazon.com/IAM/latest/UserGuide/access_policies_manage-attach-detach.html).
### (4) Downloading and installing the latest Cloud Management Extension (CME) on a Security Management Server {#Downloading and installing the latest CloudGuard Security Management Server add-on package}
To enable AWS dedicated capabilities on the Check Point Security Management Server, install the latest CME version.
Follow the instructions in [sk157492 CME (Cloud Management Extension) for Cloud Firewall Latest Updates](https://supportcenter.checkpoint.com/supportcenter/portal?eventSubmit_doGoviewsolutiondetails=&solutionid=sk157492).
### (5) Automatic Provisioning with Security Management Server {#Automatic Provisioning with Security Management Server}
The Security Management Server can be configured to automatically connect to your AWS environment and scan for newly deployed Cloud Firewall Gateways, create trusted connections with them, and to automatically provision them.
#### Setting up Automatic Provisioning {#Setting up Automatic Provisioning}
Show / Hide subsection
To configure a Security Management Server to automatically provision Cloud Firewall Gateways newly deployed in AWS, follow these steps:
1. Connect to the command line on the Management Server.
2. Log in to the **Expert** mode
3. Run this command:
`autoprov_cfg -h`
Specific help documentation is available for each option you choose.
For example, this command will display the available initialization parameters for AWS and their meaning:
`autoprov_cfg init AWS -h`
If you receive the error "`autoprov_cfg: command not found`" error, refer to the section "Downloading and installing the latest Security Management Server add-on package".
Configure the automatic provisioning of Cloud Firewall Gateways (placeholders and their meanings are described in a table below):
* **Initialization**
To test if automatic provisioning has been initialized, run this command:
`autoprov_cfg show all`
If it was not yet initialized, this message will be displayed:
`configuration file was not initialized, please use init`
To configure automatic provisioning for the first time, initialize it with this command:
`autoprov_cfg init AWS -mn -tn -otp -ver -po -cn -r `
* **Connecting to your AWS cloud environment**
To connect to your AWS account and automatically provision Security Gateways deployed in it, the Security Management Server needs AWS-specific information, such as credentials and regions. This information is associated with a controller in the automatic provisioning configuration.
To view the existing controllers used by the Management Server to connect to cloud environments, run this command:
`autoprov_cfg show controllers`
To add a new AWS controller to an existing automatic provisioning configuration, run this command:
`autoprov_cfg add controller AWS -cn -r `
**Important:** each controller in the configuration must have unique credentials.
* **Cloud Firewall Gateways configuration templates**
Information required to automatically provision Security Gateways, such as what policy to install and which Software Blades to enable, is placed in a configuration template in the automatic provisioning configuration.
To view existing configuration templates that can be applied to Security Gateways, run this command:
`autoprov_cfg show templates`
To add a new configuration template to an existing automatic provisioning configuration, run this command:
`autoprov_cfg add template -tn -otp -ver -po `
|---------------------------------|---------------------------------------------------------------------------------------------------------------------------------------------------------------------------------------------------------------------------------------------------------------------------------------------------------------------------------------------------------------------------------------------------------------------------------------------------------------------------------------------------------------------------------------------------------------------------------------------------------------------------------------------------------------------------------------------------------------------------------------------------------------------------------------------------------------------------------------------------------------------------------------------------------------------------------------------------------------------------------------------------------------------------------------------|
| Placeholder | Description |
| \ | Choose a name to represent the Management Server. This name is used to tag the Security Gateways, so they will be identified and automatically provisioned by this Management Server. For example, 'my-management'. |
| \ | Choose a name to represent the configuration template. Information required to automatically provision Security Gateways, such as what policy to install and which Software Blades to enable, will be placed under this template name. This name is used to tag Security Gateways as a reference to the relevant set of configurations to apply on them. For example, 'my-configuration-template'. |
| \ | Choose a random string consisting of at least 8 alphanumeric characters. The Secure Internal Communication (SIC) key creates trusted connections between gateways, Management Servers and other Check Point components. Trust is required to install policies on gateways and to send logs between gateways and Management Servers. This value is used when the Security Gateways are deployed, so make note of it. This value will be obfuscated in the configuration. |
| \ | The gateway version. |
| \ | Specify the name of the policy to install on the Security Gateways. The **Standard** policy is the default security policy defined in a newly deployed Security Management Server, and initially contains a default cleanup rule that drops all traffic. If you intend to configure additional policy packages (for example, if you plan to manage the security of additional environments protected by Check Point's products) and want to install a different policy package on the Security Gateways, specify the name you want to give that policy package. Then, [create and configure](https://sc1.checkpoint.com/documents/R80.10/WebAdminGuides/EN/CP_R80.10_SecurityManagement_AdminGuide/html_frameset.htm?topic=documents/R80.10/WebAdminGuides/EN/CP_R80.10_SecurityManagement_AdminGuide/159917) the policy by connecting to your Security Management Server with [SmartConsole](https://supportcenter.checkpoint.com/supportcenter/portal?eventSubmit_doGoviewsolutiondetails=&solutionid=sk111841). For example, 'Standard'. |
| \ | Choose a name to represent the controller. Information required to connect to your AWS environment, such as credentials and regions, will be placed under this controller name. When you change the credentials or their type, change or add regions, this name will be used to reference the controller in order to modify it. For example, 'AWS-Production'. |
| \ | Specify a comma-separated list of AWS regions, in which the gateways are deployed. For example: "us-east-1,eu-central-1,ap-southeast-1". |
| \ | Specify one of these options to provide the Management Server credentials so it will be able to connect to your AWS environment: * To specify credentials explicitly, use: `-ak -sk ` AWS-SECRET-KEY will be obfuscated in the configuration. * To specify a file that contains credentials in this format: `AWSAccessKeyId=` `AWSSecretKey=` Use: `-fi ` Replace *\* and *\* with the *Access Key* and *Secret Key* of the IAM user that will be used by the Management Server to make the API calls to AWS. * If you deploy the Management Server in AWS and wish to specify the Management Server's IAM profile, use: `-iam` To assume an STS role with one of the above options, use: `-sr ` |
**Notes:**
* To verify the configuration and that the Security Management Server can connect to your AWS cloud environment, run this command:
`service cme test`
* To skip confirmation prompts and execute the commands immediately, and to restart the *CME* service to apply the changes, use the "`-f`" option in the "`autoprov_cfg`" command.
For example:
`autoprov_cfg -f add controller AWS -cn AWS-Production -r us-east-1,eu-central-1,ap-southeast-1 -iam`
* Values that replace the placeholders should be quoted as required by the shell used.
#### Enabling and Disabling Software Blades {#Enabling and disabling Software Blades}
Show / Hide subsection
You can enable additional Software Blades, such as IPS, Application Control, URL Filtering, Identity Awareness (for CloudGuard Controller) and HTTPS Inspection, by running this command:
`autoprov_cfg set template -tn `
To disable a blade, delete it by running this command:
`autoprov_cfg delete template -tn `
Replace:
1. *\* with the name of the configuration template you have chosen in the section "Setting up Automatic Provisioning" above (e.g., 'my-configuration-template')
2. *\* according to this table:
|---------------------------------------------------------------------------------------------------------------------------------------------------------------------------------------------------------------------------|-------|
| Blade | Flag |
| Anti-Bot | -ab |
| Anti-Virus | -av |
| Application Control | -appi |
| HTTPS Inspection ([more info](https://supportcenter.checkpoint.com/supportcenter/portal?eventSubmit_doGoviewsolutiondetails=&solutionid=sk112575#Additional%20information%20-%20Enabling%20inbound%20HTTPS%20Inspection)) | -hi |
| Identity Awareness | -ia |
| Intrusion Prevention | -ips |
| URL Filtering | -uf |
To enable multiple blades with a single command, for example:
`autoprov_cfg set template -tn my-configuration-template -ips -uf -hi`
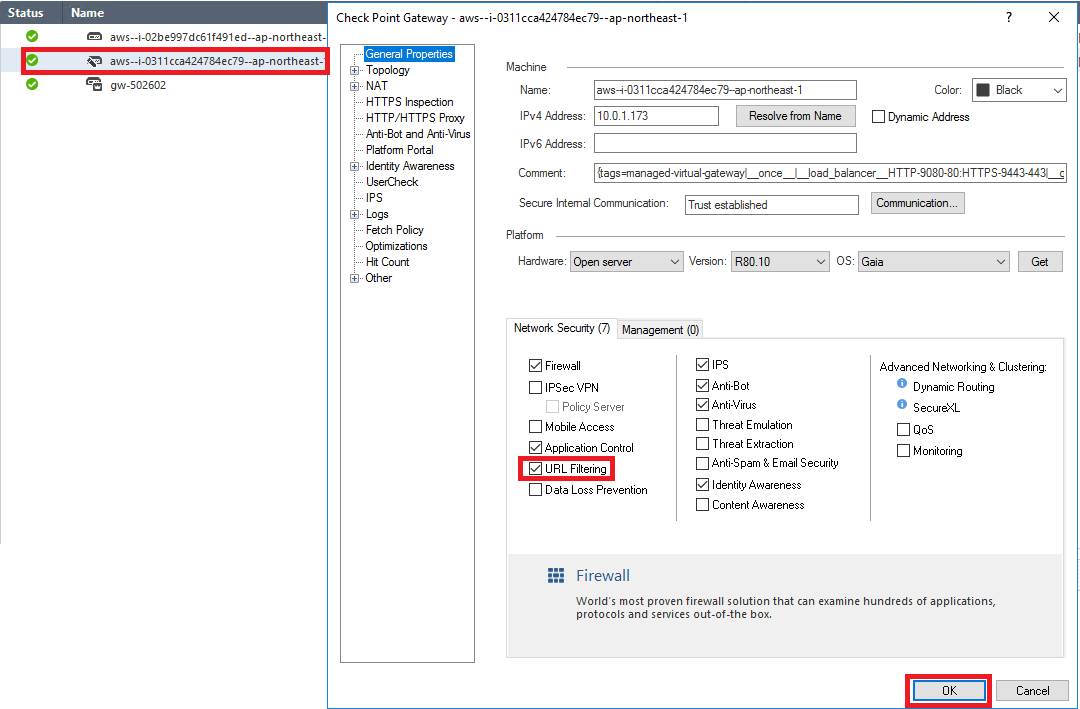
To enable or disable Software Blades on existing Security Gateways, do these steps for each gateway:
1. Open **SmartConsole**.
2. From the left navigation panel, click **GATEWAYS \& SERVERS**.
3. Double-click the Security Gateway object.
4. Enable the desired Software Blades.
5. Click **OK**.
6. Install Policy.
Example:
#### Connecting with Additional AWS accounts {#Connecting with Additional AWS accounts}
Show / Hide subsection
The Security Management Server can be configured so that Cloud Firewall Gateways in one AWS account are automatically provisioned to route traffic to resources in a different AWS account. To achieve this, run this command:
`autoprov_cfg set controller AWS -cn `
|---------------------|-----------------------------------------------------------------------------------------------------------------------------------------------------------------------------------------------------------------------------------------------------------------------------------------------------------------------------------------------------------------------------------------------------------------------------------------------------------------------------------------------------------------------------------------------------------------------------------------------------------------------------------------------------------------------------------------------------------------------------------------------------------------------------------------------------------------------------------------------------------------------------------------------------------------------------------------------------------------------------------------------------------------------------------------------------------------------------------------------------------------------------------------------------------------------------------------------------------------------------------------------------------------------------------------|
| Parameter | Description |
| \ | The name of the existing AWS controller that contains information required to connect to the AWS environment in which the Security Gateways are deployed. |
| \ | 1. Choose a name to represent the sub-account: `-sn ` The name must be unique in each AWS controller. 2. Specify one of these as the credentials for the sub-account: 1. To assume an STS role use: `-ssr ` See [sk122074](https://supportcenter.checkpoint.com/supportcenter/portal?eventSubmit_doGoviewsolutiondetails=&solutionid=sk122074) for more information on how to create an IAM role used by a Management Server, in the same or another AWS account as the managed resources. If you wish to use different credentials in order to assume the STS role, specify the STS role and additional credentials (explicit or use "-siam" to use the Management Server's IAM role). Otherwise, the top-level credentials will be used to assume the STS role. 2. To specify the sub-account credentials explicitly, use: `-sak -ssk ` The *\* will be obfuscated in the configuration. 3. To specify a file that contains the sub-account credentials in this format: ` AWSAccessKeyId=` `AWSSecretKey=` Use: `-sfi ` Replace the *\* and *\* with the AWS access and secret keys for the sub-account, respectively. |
If you did not specify the STS role ARN when you deployed the Security Management Server in AWS as described in [Deploying a Security Management Server in AWS section](https://supportcenter.checkpoint.com/supportcenter/portal?eventSubmit_doGoviewsolutiondetails=&solutionid=sk130372#Deploying%20a%20Security%20Management%20Server%20in%20AWS), or if the Management Server is deployed elsewhere, you can grant a Security Management Server permissions to assume the STS role via one of these options:
1. Create a new IAM role that contains these permissions to replace the one used by the Management Server, as described in [sk122074](https://supportcenter.checkpoint.com/supportcenter/portal?eventSubmit_doGoviewsolutiondetails=&solutionid=sk122074) and attach it to your Management Server.
2. Create a new IAM policy that contains these permissions and attach it to the existing IAM role used by your Management Server, by following these steps:
1. Open the **AWS console**.
2. Select **IAM**.
3. Select **Policies**.
4. Select **Create Policy**.
5. In the **Visual editor** fill in these values:
* Service: `STS`
* Actions: `AssumeRole`
* Resources: click **Add ARN** and paste the STS role's ARN
6. Choose **Review policy** , fill in a name and a description and choose **Create policy**.
7. In the **Policies** tab, select the newly created policy, click **Policy Actions** , click **Attach** and choose the IAM role that is used by your Management Server.
3. Add the above policy, [inline](https://docs.aws.amazon.com/IAM/latest/UserGuide/access_policies_manage-attach-detach.html#add-policies-console), to the Management Server IAM role.
**Note:**provisioning gateways deployed in sub accounts is not supported
#### Provisioning using AWS controller {#Provisioning using AWS controller}
Show / Hide sub section
By default the AWS controller will provision gateways and load balancers.
To enable specific provisioning, use this command:
`autoprov_cfg set controller -cn `
Replace *\* with the name of the controller name you have chosen in the section "Setting up Automatic Provisioning" (e.g., 'aws-controller'), and \ according to this table:
|---------------|------|
| Provisioning | Flag |
| Gateway | -sg |
| Load Balancer | -slb |
| VPN object | -sv |
To enable multiple provisioning with a single command, for example:
`autoprov_cfg set controller AWS -cn aws-controller -sg -slb -sv`
#### Automatic Provisioning in Multi-Domain Security Management Server environment {#Automatic Provisioning in Multi-Domain Security Management Server environment}
To configure automatic provisioning in a Multi-Domain Security Management Server environment see [sk120992](https://supportcenter.checkpoint.com/supportcenter/portal?eventSubmit_doGoviewsolutiondetails=&solutionid=sk120992).
#### Advanced Automatic Provisioning configuration {#Advanced Automatic Provisioning configuration}
Show / Hide sub section
Any other attribute that can be set with the "`set-simple-gateway`" Web API (see the [Management API Reference](https://sc1.checkpoint.com/documents/latest/APIs/index.html#web/set-simple-gateway)), can be set with this command:
`autoprov_cfg set template -tn -nk `
Replace:
1. *\* with the name of the configuration template you have chosen in the section "Setting up Automatic Provisioning" (e.g., 'my-configuration-template')
2. *\* with the parameter name from the [Management API Reference](https://sc1.checkpoint.com/documents/latest/APIs/index.html#web/set-simple-gateway)
3. *\* with the desired value
### (6) Highly available Security Management Server {#Highly available Security Management Server}
An additional, secondary Security Management Server can be deployed and configured as a standby Management Server to provide high availability in case of a failure or of unexpected downtime. Secondary Management Server is currently supported with R80.40 and higher.
* A standby Management Server that is deployed in AWS should be deployed using the same CloudFormation template as described in the section "Installing Check Point Security Management Server", specifying these values during stack creation:
|----------------------------|--------------------------------------------------------------------------|
| Parameter | Description |
| ManagementInstallationType | Secondary Management |
| SIC Key | Select a random string consisting of at least 8 alphanumeric characters. |
* If the standby Management Server is deployed on-premises, install the add-on package as described in the "Downloading and installing the latest Security Management Server add-on package" section.
Then, configure the second machine as a secondary server, as described in [R81.10 Security Management Administration Guide](https://sc1.checkpoint.com/documents/R81.10/WebAdminGuides/EN/CP_R81.10_SecurityManagement_AdminGuide/Default.htm), section *Management High Availability*.
While the Secondary Management Server acts as a standby server, you should make sure that the auto provisioning script on it is *not* running by executing these commands:
1. `service cme stop`
2. `chkconfig --del cme`
To switch the Management Servers' roles, run these commands:
* On the Management Server being promoted to the active role:
1. `chkconfig --add cme`
2. `service cme start`
* On the Management Server being demoted to the standby role:
1. `service cme stop`
2. `chkconfig --del cme`
Then, promote the standby Management Server to active, as described in [R81.10 Security Management Server Administration Guide](https://sc1.checkpoint.com/documents/R81.10/WebAdminGuides/EN/CP_R81.10_SecurityManagement_AdminGuide/Default.htm), section "*Changing a Server to Active or Standby*".
### (7) Exporting and importing Security Management Server database {#Exporting and importing Security Management Server database}
To export the database of a Security Management Server and import it to another server, see section **Backing Up and Restoring** in the [R81.10 Installation and Upgrade Guide](https://sc1.checkpoint.com/documents/R81.10/WebAdminGuides/EN/CP_R81.10_Installation_and_Upgrade_Guide/Default.htm).
If the database consists of Security Gateways that are managed by their public IP address, make sure to create, in the source Management Server, a Check Point Security Management Server host object using the public IP address of the destination Management Server. Otherwise, create the object using the destination Management Server's private IP address.
### (8) On-premises Security Management Server in-place upgrade {#On-premises Security Management Server in-place upgrade}
To perform an in-place upgrade of an on-premises Security Management Server, you must also install the latest add-on package, as described in the "Downloading and installing the latest Security Management Server add-on package" section.
In-place upgrades are supported on Management Servers deployed in AWS. For more information, refer to [sk177714](https://support.checkpoint.com/results/sk/sk177714).
### (9) Known Limitations {#Known limitations}
1. All SmartConsole GUI clients must be closed before collecting a Management Server export.
2. While it is possible to back up a Security Management Server deployed on an AWS instance and restore it to the same instance, backing up a Management Server deployed on an AWS instance or on-premise and restoring it to another AWS instance is not supported.
*** ** * ** ***
**Note** - By default, it is possible to connect to Gaia Portal on every Check Point Security Gateway and Management Server at *https://\*. Restricting access to Gaia Portal is possible by configuring a Network Group, or by configuring the Check Point Security Gateway and Management Server settings.
---
# Agent Instructions
This content is from the Check Point Support Center (https://support.checkpoint.com), the official knowledge base for Check Point cybersecurity products.
## Navigating This Knowledge Base
- **Complete index**: [llms.txt](https://support.checkpoint.com/llms.txt)
- **All SK articles**: [SecureKnowledge Sitemap](https://support.checkpoint.com/sitemaps/secureknowledge-sitemap-index.xml)
- **SK article URL pattern**: `https://support.checkpoint.com/results/sk/{skId}`
- **Markdown responses**: AI bot User-Agents automatically receive `text/markdown` content