> Source: [sk124532](https://support.checkpoint.com/results/sk/sk124532)
# sk124532 - Configuring custom SNMP traps using OID of CloudGuard controller fields provided via chkpnt.mib
| Property | Value |
|----------|-------|
| Solution ID | sk124532 |
| Date Created | 2018-04-15 |
| Last Modified | 2026-01-29 |
| Technical Level | General |
| Products | Cloud Firewall |
| Versions | R81 (EOS), R81.10 (EOS), R81.20, R82 |
## Solution
Since R80.10 CloudGuard Controller/vSEC Controller Hotfix 1, CloudGuard has the ability to send SNMP traps.
Here are instructions to configure custom traps using the OID of CloudGuard fields exposed via *chkpnt.mib*:
1. Go to the Web UI of the Management, and configure an SNMP trap according to [sk90860 - How to configure SNMP on Gaia OS](https://supportcenter.checkpoint.com/supportcenter/portal?eventSubmit_doGoviewsolutiondetails=&solutionid=sk90860).
1. In sk90860, go to [(II) SNMP configuration](https://supportcenter.checkpoint.com/supportcenter/portal?eventSubmit_doGoviewsolutiondetails=&solutionid=sk90860#SNMP configuration).
2. Go to "Activate the SNMP service on the Gaia OS."
3. Click on "Show / Hide instructions for Gaia Portal" and follow the instructions. This is how it looks on my Management:
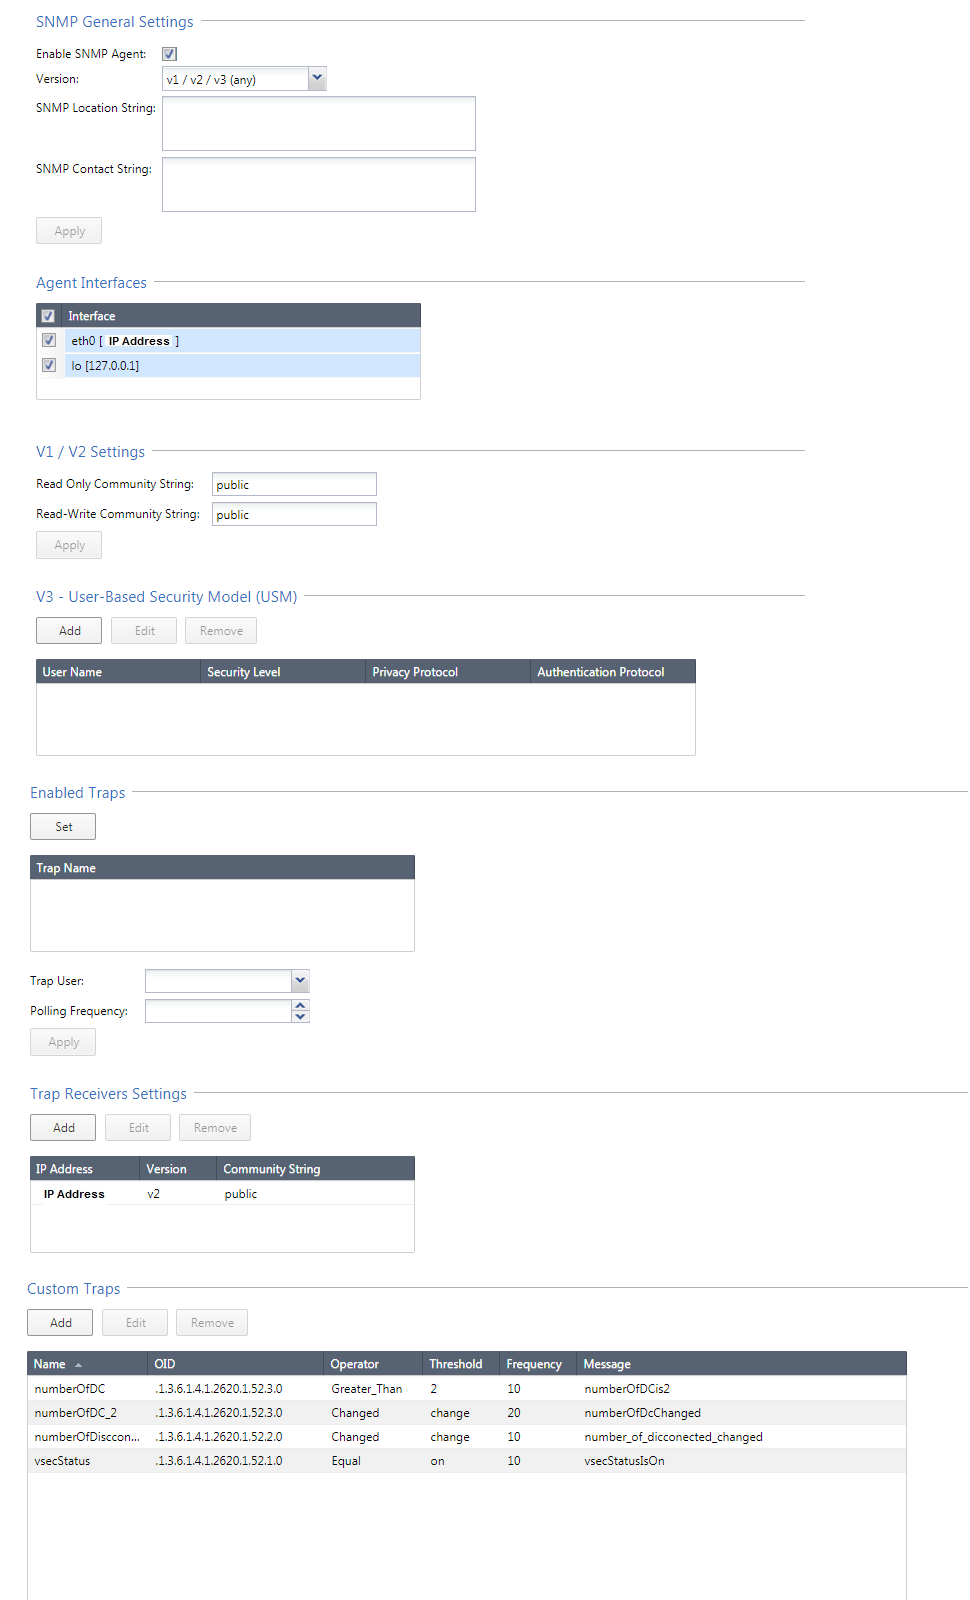
*
* Configure your custom traps, as follows:
1.
1. In sk90860, go to [(IV-2) Advanced SNMP configuration - Custom SNMP traps](https://supportcenter.checkpoint.com/supportcenter/portal?eventSubmit_doGoviewsolutiondetails=&solutionid=sk90860#Advanced SNMP configuration - Custom SNMP traps).
2. Go to "Show / Hide instructions for Gaia Portal" and follow the instructions to add a custom trap.
3. In order to create a custom trap you need the OID of the field you want to monitor. To identify the OID:
1. Download your preferred MIB Browser from the Web. (For example, ).
2. In the "Address" field, fill in the IP address of your Management.
3. Load the MIB file from the path *$CPDIR/lib/snmp/chkpnt.mib* on the Management.

1. Click on "Advanced" in the MIB browser, and fill in the fields, as follows:

1. In the left-hand pane, navigate in the tree to "vsecController":

1. When you double-click each field under vsecController, you will see its OID in the "OID" field in the upper part of the window. This is the OID that you need to enter in the Web UI when you configure a custom trap.
* vSEC SNMP OID Map:
All CloudGuard Controller (vSEC) monitoring OIDs are located under the following enterprise tree:
* 1.3.6.1.4.1.2620.1.52
* This tree exposes:
* Controller status
* Number of disconnected Data Centers
* Per-Data Center name, type and status
* Gateway enforcement status
* Key OIDs for Monitoring:
* 1.3.6.1.4.1.2620.1.52.1.0
on -- vSEC Controller is enabled and running
off -- vSEC Controller is disabled or not running
* Number of Disconnected Data Centers:
* 1.3.6.1.4.1.2620.1.52.2.0
A value greater than 0 indicates that one or more Data Centers are disconnected or not scanning.
* Per-Data Center Status:
Each Data Center is represented by an index (DC ID) under:
* 1.3.6.1.4.1.2620.1.52.6.1
* For a given DC ID:
Data Center name:
* 1.3.6.1.4.1.2620.1.52.6.1.2.\.0
Data Center type:
* 1.3.6.1.4.1.2620.1.52.6.1.3.\.0
Data Center connection status
* 1.3.6.1.4.1.2620.1.52.6.1.4.\.0
* Gateway Status:
Each Gateway is represented by an index (GW ID) under:
* 1.3.6.1.4.1.2620.1.52.7.1
* For a given GW ID:
Gateway name:
* 1.3.6.1.4.1.2620.1.52.7.1.2.\.0
Gateway update status:
* 1.3.6.1.4.1.2620.1.52.7.1.5.\.0
*
* On the other side, you will have the SNMP trap receiver. If you watch the traffic using wireshark, you can see the SNMP custom trap that is sent by the Management:
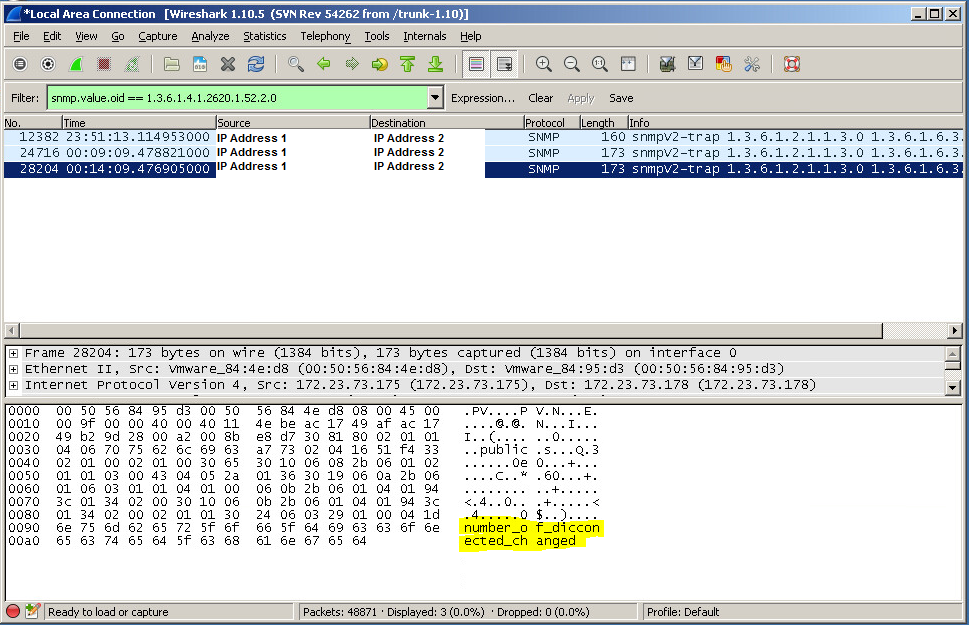
Here you can see the message (in yellow) that was configured in the custom trap:

1. To send an email, or perform any other action as triggered by the received traps, you will need a "Trap receiver" application. Those apps have the ability to receive the traps and perform actions (e.g. send an email).
---
# Agent Instructions
This content is from the Check Point Support Center (https://support.checkpoint.com), the official knowledge base for Check Point cybersecurity products.
## Navigating This Knowledge Base
- **Complete index**: [llms.txt](https://support.checkpoint.com/llms.txt)
- **All SK articles**: [SecureKnowledge Sitemap](https://support.checkpoint.com/sitemaps/secureknowledge-sitemap-index.xml)
- **SK article URL pattern**: `https://support.checkpoint.com/results/sk/{skId}`
- **Markdown responses**: AI bot User-Agents automatically receive `text/markdown` content