> Source: [sk120296](https://support.checkpoint.com/results/sk/sk120296)
# sk120296 - Carrier Grade NAT (CGNAT)
| Property | Value |
|----------|-------|
| Solution ID | sk120296 |
| Date Created | 2017-09-01 |
| Last Modified | 2026-01-14 |
| Technical Level | General |
| Products | Security Gateway |
| Versions | R82.10, R82, R81.20, R81.10 (EOS), R81 (EOS) |
| OS | Gaia |
## Solution
**Table of Contents:**
* CGNAT Overview
* CGANT Prerequisites
* CGANT Known Limitations
* CGNAT Port Allocation
* CGNAT Logging
* CGNAT Configuration
* RFC 4787 Compliance
* RFC 4787, REQ 9 - UDP NAT Hairpinning
* Related Solutions for R77.30
Click Here to Show the Entire Article
### CGNAT Overview {#TOC01}
Extending the traditional Hide NAT solution, Carrier Grade NAT (CGNAT) uses improved allocation techniques for NAT ports and a more efficient method for NAT logging.
### CGANT Prerequisites {#TOC02}
|-------------------|-------------------------------------------------------------------------------------------------------------------------------------------------------------------------------------------------------------------------------------------------------------------------------------------------------------------------------------------------------------|
| Version | Prerequisite |
| R80.10 and higher | 1. Security Management Server / Multi-Domain Security Management Server R81 and higher. The Management Server does not require an additional "Carrier" license. 2. Security Gateway R80.10 and higher. On the Security Gateway, you must install the additional "Carrier" license (CPSB-CARRIER). |
| R77.30 | 1. Security Management Server / Multi-Domain Security Management Server R77.30 with the [R77.30 Add-on](https://support.checkpoint.com/results/sk/sk105412). The Management Server does not require an additional "Carrier" license. 2. Security Gateway R77.30. On the Security Gateway, you must install the additional "Carrier" license (CPSB-CARRIER). |
### CGNAT Known Limitations {#TOC03}
|------------|--------------------------------------------------------------------------------------------------------------------------------------------------------------------------------------------------------------------------|
| ID | Description |
| - | GNAT ([sk165153](https://support.checkpoint.com/results/sk/sk165153)) is not supported with CGNAT and must be disabled before you configure CGNAT. |
| PMTR-58368 | CoreXL Dynamic Dispatcher ([sk105261](https://support.checkpoint.com/results/sk/sk105261)) is not supported with CGNAT and must be disabled before you configure CGNAT. Resolved in R82. |
| PMTR-54110 | Proxy ARP entries are not generated automatically for CGNAT translated Address Range. To resolve: Configure the Proxy ARP entries manually as described in [sk30197](https://support.checkpoint.com/results/sk/sk30197). |
| PMTR-60382 | ISP Redundancy is not supported with CGNAT and must be disabled before you configure CGNAT. |
| PMTR-58383 | Scalable Platforms do not support CGNAT with the Layer 4 distribution. Resolved in R82. |
Notes:
* For R81 and higher versions, refer to the SK article with Known Limitations for your version.
* For Scalable Platforms R80.20SP, R80.30SP, R81, R81.10, and R81.20, refer to [sk148074: Known Limitations for Scalable Platforms (Maestro Appliances and Chassis)](https://support.checkpoint.com/results/sk/sk148074)
### CGNAT Port Allocation {#TOC04}
> Show / Hide this section
> A CGNAT rule defines a range of original source IP addresses and a range of translated IP addresses. Each IP address in the original range is automatically allocated a range of translated source ports, based on the number of original IP addresses and the size of the translated range.
>
> CGNAT port allocation is Stateless and is performed during policy installation. This way, the need for per-connection calculation is eliminated, and there is no need to synchronize these data between cluster members.
>
> The number of ports allocated per IP address strongly depends on the amount of the available external IP addresses. To make better use of every port, CGNAT is able to identify connections that go to different destinations and reuse the same port for multiple outgoing connections.
>
> When configuring a CGNAT rule, the number of anticipated connections must be taken into account. However, sometimes, the real needs of certain IP address exceeds the allotted port range. To overcome this, Stateful Port Allocation is performed using the global Reserved Port Pool.
>
> This global Reserved Port Pool is mainly used for DNS requests, which require source port randomization as a measure against DNS poisoning. However, additional services may also be configured to use this pool.
### CGNAT Logging {#TOC05}
> Show / Hide this section
> Where such large numbers of connections exist, logging every connection both creates a load on the system, and too much data for the administrator to analyze efficiently.
>
> CGNAT logs are produced only when a user connects for the first time, describing their allocated IP address and port range. Additional logs are produced either when a change is made to this allocation, or when the global reserved port pool is used for a dynamic port allocation.
>
> Note: CGNAT does not disable connection logs, and it is the administrator choice. If an administrator does not disable connection logs, the Security Gateway generates both CGNAT and regular logs.
### CGNAT Configuration {#TOC06}
**Important Notes for CGNAT Rules in the NAT Policy**
> Show / Hide this section
> * In the **Translated Source** cell, use only **Address Range** objects.
>
> * Do **not** change the default values in the cells **Original Destination** , **Original Services** , **Translated Destination** , and **Translated Destination**.
>
> * Do **not** use overlapping IP addresses.
>
> When CGNAT rules include overlapping IP address ranges, only the first occurrence of the overlapping IP address is used.
>
> For example, if:
> * CGNAT Rule 1 uses an Address Range object 10.10.10.1 - 10.10.10.**50**
> * CGNAT Rule 2 uses an Address Range object 10.10.10.**30** - 10.10.10.100
>
> Then:
> * CGNAT Rule 1 applies to the full range 10.10.10.1 - 10.10.10.50
> * CGNAT Rule 2 applies only to the sub-range 10.10.10.**51** - 10.10.10.100.
**CGNAT Configuration in R81 and higher**
> Show / Hide this section
> Read the Important Notes above this procedure.
>
> 1. Connect with SmartConsole to your Security Management Server / Domain Management Server.
>
> 2. From the left navigation panel, click **Gateways \& Servers**.
>
> 3. Create a **Network** object that represents the subscriber's original IP addresses.
>
> You can use one Network object to handle traffic for one subscriber or for many subscribers.
>
> On the **General** tab, enter the applicable values in the **Network address** field and **Net mask** field.
>
> Configure other properties as necessary.
> 4. Create an **Address Range** object that represents the subscriber's IP addresses after the NAT.
>
> **Important:**
> * Configure a large enough range of IP addresses to cover the required IP addresses.
>
> * If you cannot define the Hide range with one continuous address range, you must divide the subscriber networks into subnets and then create different CGNAT rules for each network segment.
>
> 5. In the NAT policy, configure a CGNAT Rule:
>
> 1. From the left navigation panel, click **Security Policies**.
>
> 2. In the top panel, in the **Access Control** section, click **NAT**.
>
> 3. Create a new NAT rule:
>
> |------------|-------------------------------------------------------------------------|----------------------|-------------------|--------------------------------------------------------------------------------------------------------------------------------------------------------------------|------------------------|---------------------|
> | Name | Original Source | Original Destination | Original Services | Translated Source | Translated Destination | Translated Services |
> | CGNAT Rule | Select the **Network** object that represents the original IP addresses | `= Original` | `*Any` | (1) Select the **Address Range** object that represents the NATed IP addresses (2) Right-click this cell (3) Click **NAT Method** (4) Click **Carrier Grade Hide** | `= Original` | `= Original` |
>
> 6. Install the Policy.
**CGNAT Configuration in R77.30**
> Show / Hide this section
> Read the Important Notes above this procedure.
>
> 1. Connect with SmartDashboard to your Security Management Server / Domain Management Server.
>
> 2. Create a **Network** object that represents the subscriber's original IP addresses.
>
> You can use one Network Object to handle traffic for one subscriber or for many subscribers.
>
> On the **General** tab, enter the applicable values in the **IPv4 address** field and **Subnet mask** field.
>
> Configure other properties as necessary.
> 3. Create an **Address Range** object that represents the subscriber's IP addresses after the NAT.
>
> **Important:**
> * Configure a large enough range of IP addresses to cover the required IP addresses.
>
> * If you cannot define the Hide range with one continuous address range, you must divide the subscriber networks into subnets and then create different CGNAT rules for each network segment.
>
> 4. In the NAT policy, configure a CGNAT Rule:
>
> 1. At the top, click **Firewall** and click the **NAT** page.
>
> 2. Create a new NAT rule:
>
> |-------------------------------------------------------------------------|--------------|---------|-----------------------------------------------------------------------------------------------------------------------------------------|--------------|--------------|----------------|------------|
> | Original Packet ||| Translated Packet ||| Install On | Comment |
> | Source | Destination | Service | Source | Destination | Service | Install On | Comment |
> | Select the **Network** object that represents the original IP addresses | `= Original` | `*Any` | (1) Right-click this cell (2) Click **Add (Hide CGNAT)** (3) Select the **Address Range** object that represents the NATed IP addresses | `= Original` | `= Original` | Policy Targets | CGNAT rule |
>
> 5. Install the Firewall Policy.
### RFC 4787 Compliance {#TOC07}
[RFC 4787](https://tools.ietf.org/html/rfc7857) focuses on requirements from NAT implementation, which allow better handling of application protocols over UDP, such as gaming, VoIP, and more.
To support these requirements, you can configure these global parameters on your Check Point Management Server:
|---------------------|----------------------------|----------------------------------------------------------------------------------------------------------------------------------------------------------------------------------------------------------------------------|
| RFC Requirement | Check Point Parameter | Description |
| UDP low range | `cgnat_low_range_support` | Default value: `false` (disabled). When you set the value "`true`" (enable it), a source port below 1023 is allocated a NAT hide port, which is also below 1023. |
| UDP port parity | `cgnat_parity_support` | Default value: `true` (enabled). When you set the value "`true`" (enable it), the port parity of the allocated NAT port will match the parity of the original source port. |
| UDP port stickiness | `cgnat_stickiness_support` | Default value: `true` (enabled). When you set the value "`true`" (enable it), connections from the same subscriber to different destinations will be allocated the same combination of the public IP address and NAT port. |
**Important Note** - This configuration applies to all managed Security Gateways on the Management Server.
Follow these steps:
> Show / Hide this section
> 1. Back up the Security Management Server / relevant Domain Management Server.
>
> Refer to:
> * [sk108902 - Best Practices - Backup on Gaia OS](https://support.checkpoint.com/results/sk/sk108902)
> * [sk91400 - System Backup and Restore feature in Gaia](https://support.checkpoint.com/results/sk/sk91400)
> * [sk98153 - How to take a snapshot of Endpoint Security Management Server database](https://support.checkpoint.com/results/sk/sk98153)
> 2. Close **all** SmartConsole windows that are connected to the Security Management Server.
>
> On a Multi-Domain Server, this applies to both the Global Domain and the relevant Domain Management Server.
>
> Verify by running the "*cpstat mg*" command on the Security Management Server / in the context of the relevant Domain Management Server.
> 3. Connect with [Database Tool (GuiDBedit Tool)](https://support.checkpoint.com/results/sk/sk13009) to the Security Management Server / relevant Domain Management Server.
>
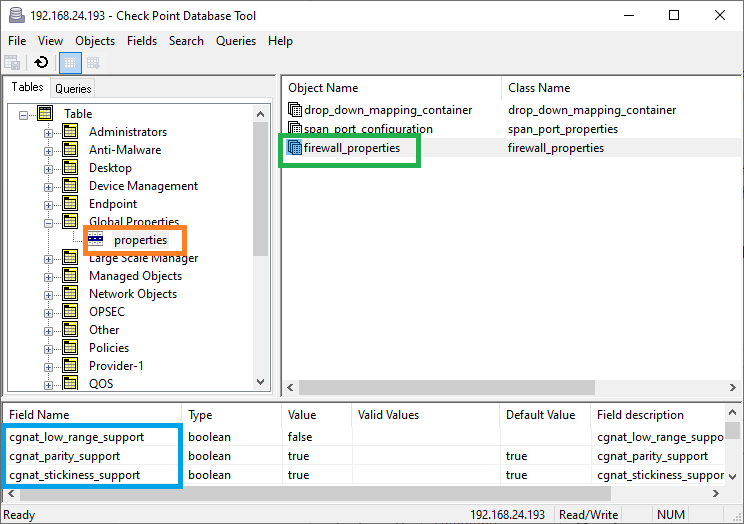
> 4. In the upper left pane, go to ***Table*** \> ***Global Properties*** \> ***properties***.
>
> 5. In the upper right pane, select the ***firewall_properties***.
>
> 6. Press CTRL+F (or go to ***Search*** menu \> ***Find*** ) \> paste the name of the relevant parameter \> click ***Find Next***.
>
> These are the name of the relevant global parameters (see the summary table above):
> * **cgnat_low_range_support**
> * **cgnat_parity_support**
> * **cgnat_stickiness_support**
>
> Example:
>
> 
> 7. In the lower pane, right-click the parameters name \> select ***Edit*** \> select the required value \> click ***OK***.
>
> 8. Save the changes: go to the ***File*** menu \> click ***Save All***.
>
> 9. Close the Database Tool (GuiDBedit Tool).
>
> 10. Connect with SmartConsole to the Security Management Server / Domain Management Server.
>
> 11. Install the Security Policy onto the applicable Security Gateway / Cluster / VSX Virtual System object.
### Support for UDP NAT hairpinning (RFC 4787, REQ 9) {#TOC09}
> Support for UDP NAT hairpinning requires configuration both on the Management side and on the Gateway side.
>
> On the Management side:
>
> Add an inspect table before the last line of the *$FWDIR/conf/user.def.FW1* file on the Security Management Server or within a Domain in a Multi Domain Management:
>
> `all@all fwx_cgnat_sticky_ranges = { < range_start, range_end > };`
>
> * Specify as many ranges as needed.
> * Separate ranges with a comma.
> * Ranges must be in ascending order.
> Example:
> `all@all fwx_cgnat_sticky_ranges= { <16384, 16388> , <16393,`
>
> On the enforcement point side:
>
> 1. In Expert mode, run:
> `echo 'enable_cgnat_hairpinning=1' >> $FWDIR/boot/modules/fwkern.conf`
> 2. Reboot the machine.
>
> Notes:
>
> * To undo. edit the file *$FWDIR/boot/modules/fwkern.conf*.
> * Either remove the line, or set the value to **0**.
> * A reboot is required.
> * In a cluster environment, repeat the procedure for each member.
### Related Solutions for R77.30 {#TOC08}
* [sk119314: Long-Term Evolution (LTE) - FAQ](https://support.checkpoint.com/results/sk/sk119314)
* [sk118253: R77.30 Carrier Security (LTE) Jumbo Hotfix Accumulator](https://support.checkpoint.com/results/sk/sk118253)
---
# Agent Instructions
This content is from the Check Point Support Center (https://support.checkpoint.com), the official knowledge base for Check Point cybersecurity products.
## Navigating This Knowledge Base
- **Complete index**: [llms.txt](https://support.checkpoint.com/llms.txt)
- **All SK articles**: [SecureKnowledge Sitemap](https://support.checkpoint.com/sitemaps/secureknowledge-sitemap-index.xml)
- **SK article URL pattern**: `https://support.checkpoint.com/results/sk/{skId}`
- **Markdown responses**: AI bot User-Agents automatically receive `text/markdown` content