> Source: [sk114577](https://support.checkpoint.com/results/sk/sk114577)
# sk114577 - Check Point Reference Architecture for Google Cloud Platform
| Property | Value |
|----------|-------|
| Solution ID | sk114577 |
| Date Created | 2016-11-17 |
| Last Modified | 2026-09-15 |
| Technical Level | General |
| Products | Cloud Firewall |
| Versions | R82.10, R81 (EOS), R81.10 (EOS), R81.20, R82, R82.20 |
| OS | Gaia |
| Platform | GCP |
## Solution
**Table of Contents:**
1. Introduction
2. Overview
3. Management
4. Deployment
5. Connecting to the instance
6. Connecting the Cloud Firewall Gateway to its Management Server
7. Setting up a load balancer
8. Inspecting traffic
9. Setting up a VPN tunnel
10. Multiple web applications
11. Licensing
12. Supported machine types
13. Known Limitations
Click Here to Show the Entire Article
### (1) Introduction {#Introduction}
Show / Hide this section
This article provides a reference architecture for deploying Check Point [Cloud Firewall Gateways](https://www.checkpoint.com/products/vsec-google-cloud-platform/) on [Google Cloud Platform](https://cloud.google.com/).
The article assumes that you have a basic expertise with:
* The Google Cloud Platform and specifically Google Compute Engine.
* Check Point Cloud Firewall Gateway and Security Management Server.
If deploying a Single Gateway solution does not fit your needs, Check Point offers additional cloud solutions in GCP, including [Managed Instance Group](https://sc1.checkpoint.com/documents/IaaS/WebAdminGuides/EN/CP_CloudGuard_Network_for_GCP_Autoscaling_MIG/Content/Topics-GCP-Autoscaling-MIG/Introduction.htm), [High Availability](https://sc1.checkpoint.com/documents/IaaS/WebAdminGuides/EN/CP_CloudGuard_Network_for_GCP_HA_Cluster/Content/Topics-GCP-HA/Workflow.htm), and [Network Security Integration](https://sc1.checkpoint.com/documents/IaaS/WebAdminGuides/EN/CP_CloudGuard_Network_for_GCP_NSI_AG/Content/Topics-GCP-NSI-AG/Overview-GCP-NSI.htm).
### (2) Overview {#Overview}
Show / Hide this section
This reference architecture illustrates how to protect resources deployed on the Google Cloud Platform using Cloud Firewall Gateway.
A common use case involves a web application environment deployed in a virtual network in Google Compute Engine.
The web application can consist of multiple tiers, such as a Web tier and an Application tier.
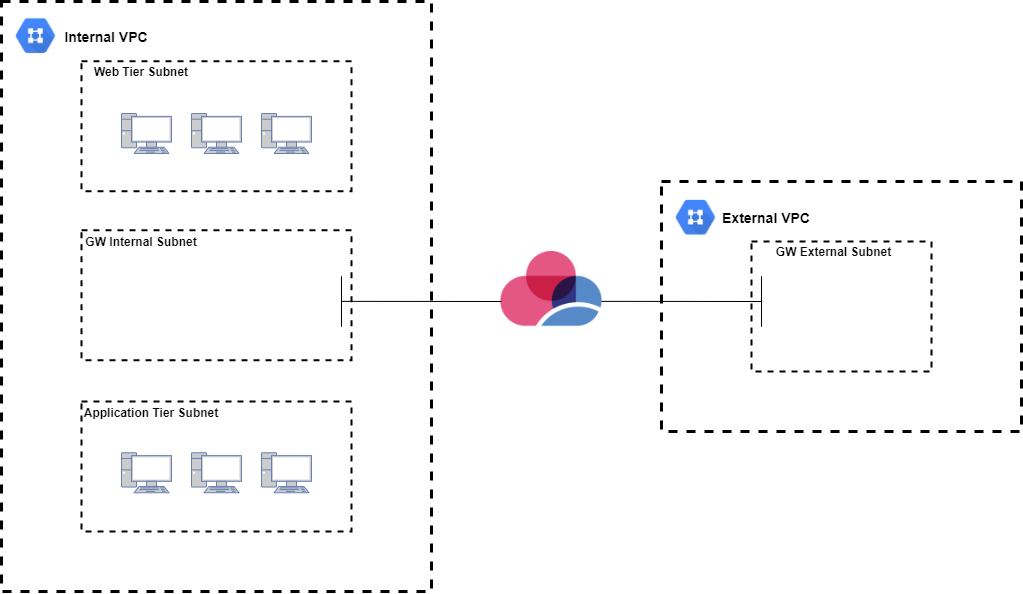
The traffic flow in this environment usually consist of:
* Traffic arriving from the Internet to the Web tier.
* Traffic between the Web tier and the Application tier.
* Traffic between the environment and an on-premises network for administration and backend services.
* Outgoing connections from the environment to the Internet for software updates and access to external web services.
* Roaming users' remote access connections to the environment.
From a security perspective, these traffic flows should all be inspected and governed by the same security policy enforced elsewhere by the organization.
These security controls should include:
* Access Control (Firewall).
* Logging.
* Application Control.
* Intrusion Prevention (IPS).
* Advanced Threat Prevention.
* Site-to-Site VPN (for communication with the on-premises network).
* Remote Access VPN (for communication with roaming users).
* Network Address Translation (for Internet bound traffic).
[Check Point Cloud Firewall for Google Cloud Platform](https://www.checkpoint.com/products/vsec-google-cloud-platform/) can be deployed in [Google Compute Engine](https://cloud.google.com/compute/) to provide all of the above services.
### (3) Management {#Management}
Show / Hide this section
The Check Point Cloud Firewall Gateway can be managed in several ways, including:
* A standalone configuration, in which the Cloud Firewall Gateway acts as its own Security Management Server.
* Centrally managed, in which the Security Management Server is located on-premises.
* Centrally managed, in which the Security Management Server is located in the same virtual network.
**Notes:**
* The [Cloud Firewall for Google Cloud Platform](https://www.checkpoint.com/products/vsec-google-cloud-platform/) version **R80.X** can be managed by a Check Point [Security Management Server](https://supportcenter.checkpoint.com/supportcenter/portal?eventSubmit_doShowproductpage&productTab=downloads&product=184) running version **R80.X or higher**.
* The [Cloud Firewall for Google Cloud Platform](https://www.checkpoint.com/cloudguard/cloud-network-security/iaas-public-cloud-security/) version **R81.X** can be managed by a Check Point [Security Management Server](https://supportcenter.checkpoint.com/supportcenter/portal?eventSubmit_doShowproductpage&productTab=downloads&product=184) running version **R81.X or higher**.
### (4) Deployment {#Deployment}
Show / Hide this section
Google Compute Engine supports two modes for networking:
* **Legacy (non-subnetwork) mode**.
* **Subnet mode**.
Subnet mode is further divided into two:
* **Automatic**
* In this mode, a subnet is automatically created in each region.
* In this mode, some Google Compute Engine firewall rules are automatically created for the user.
* **Custom**
* In this mode, the customer can create 0, 1 or more subnets in each region.
Cloud Firewall Gateway can be deployed in both modes, but for simplicity, we will assume **Subnet mode** is used.
For additional information, see .
For the rest of this document, we will assume that a **Custom Subnet mode** environment has already been created consisting of the following:
|-----------------|----------------|
| Subnet name | CIDR (example) |
| **security** | 10.0.0.0/24 |
| **web** | 10.0.1.0/24 |
| **application** | 10.0.2.0/24 |
All of these subnets are assumed to be in the same region (e.g., `us-central-1`).
In addition, we will assume that an on-premises network (`172.16.0.0/16`) exists.
When deploying the Check Point solution, you can select the Cloud Firewall installation type.
The installation type can be any of the following:
* Gateway and Management (Standalone)
* Gateway only
* Management only
* Manual configuration
A Gateway-only instance can be centrally managed by a Security Management Server in your on-premises network or in the public cloud.
If your Security Management Server is on-premises, then you can manage the Cloud Firewall Gateway:
* Over the Internet using the Cloud Firewall Gateway's public IP address.
* Over a **Cloud Router** connection () using the Cloud Firewall Gateway's private IP address.
To deploy, go to one of the following:
|-------------------------------|-------------------------------------------------------------------------------------------------------------------------------------------------------------------------------------------------|
| Deployment Option | Link |
| BYOL (Bring Your Own License) | [https://console.cloud.google.com/marketplace/details/checkpoint-public/check-point-cloudguard-byol](https://console.cloud.google.com/launcher/details/checkpoint-public/check-point-vsec-byol) |
| PAYG (Pay As You Go) | [https://console.cloud.google.com/marketplace/details/checkpoint-public/check-point-cloudguard-payg](https://console.cloud.google.com/launcher/details/checkpoint-public/check-point-vsec-payg) |
*Example*:

**Deployment options**
|------------------------------------------------------------|-----------------------------------------------------------------------------------------------------------------------------------|-------------------------------------------------|----------------------------------------------------------------------------------------------------------------------------|
| Option | Valid values | Default value | Comment |
| Deployment name | At most 40 alphanumeric characters or dashes | check-point-cloudguard-\ | Deployment name cannot end with a dash |
| Zone | Any one of the zones offered by GCP (e.g. us-east1-b, europe-west2-a etc.) | us-central1-a | |
| Machine type | Any one of the machine types listed, depending on your needs | n1-standard-4 | |
| Network | An existing VPC | | |
| Subnetwork | An existing Subnetwork under the selected VPC | | Only subnets that are in the same Zone as the machine are listed |
| Firewall rules | | All firewall rules are checked off | **By default, if no rules are created, incoming traffic will be blocked** |
| External address type | Static/ephemeral/none | Static | |
| Installation type | One of the following solutions: * Gateway and Management (Standalone). * Gateway only. * Management only. * Manual configuration. | R81 Gateway only | See Comment #1 |
| Disk type | * `SSD` * `standard` | `SSD` | The type of disk used by the Check Point instance |
| Disk size | At least 100 GB | `100` | See Comment #2 |
| Automatically generate an administrator password | * `Checked` * `Unchecked` | `Unchecked` | See Comment #3 |
| Allow download from/upload to Check Point | * `Checked` * `Unchecked` | `Checked` | Automatically download Blade Contracts and other important data. Improve product experience by sending data to Check Point |
| Admin shell | * `/etc/cli.sh` * `/bin/bash` * `/bin/csh` * `/bin/tcsh` | `/etc/cli.sh` | Select the administrator default shell |
| Public SSH key for the user '`admin`' | | None | See Comment #3 |
| SIC key | An empty string, or at least 8 alphanumeric characters | None | See Comment #5 |
| Allowed GUI clients | CIDR notation | None | See Comment #6 |
| The network, in which the managed Security Gateways reside | CIDR notation | 0.0.0.0/0 | See Comment #7 |
| Additional network interfaces | | No additional network interface will be created | see Comment #8 |
**Comments:**
1. Once the instance starts, it will set itself up automatically based on the installation type you have selected.
The use of the Manual configuration installation type is discouraged as it will require you to manually perform additional steps, such as:
* Set up Google Compute Engine firewall rules.
* Run the first time wizard manually.
* Tag the instance.
2. The size of the disk. If a value larger than the default is supplied, then you will need to follow [sk95566 - Managing partition sizes via LVM manager on Gaia OS](https://support.checkpoint.com/results/sk/sk95566).
3. If checked, a password would be automatically generated for the user '`admin`'. These credentials could be used for:
* Connecting to the Gaia Portal.
* Connecting [using a serial console](https://cloud.google.com/compute/docs/instances/interacting-with-serial-console).
* When installing a Security Management Server, this password could be used to connect to the Security Management Server using **SmartConsole GUI clients**.
* Note this password ***will not work*** over SSH, as SSH password authentication is disabled by default.
4. By default, the instance will trust all instance level and project level public keys as explained here:
.
To lock down access to the instance even further, you can enter here a specific SSH public key.
If one is given, only the owner of the corresponding private key would be able to connect over SSH to the instance.
5. The Secure Internal Communication (SIC) Activation key needed to establish trust between the Cloud Firewall Gateway and its Security Management Server. If not provided and needed, then a key will be automatically generated.
6. Only used in **Gateway and Management (Standalone)** and **Management-only** installations. Access to the Security Management Server over SSH, HTTPS and SmartConsole GUI clients would only be allowed from this address range.
7. Only used in **Management-only** installations. Communication from gateways to this Management Server will only be allowed from this address range.
8. You should select networks and sub-networks for all network interfaces even if they are not used. The unused network interfaces will be ignored and will not be deployed.
Google Compute Engine supports instances with multiple network interfaces. For more information on how to configure Cloud Firewall for GCP with multiple interfaces, refer to [sk121637](https://supportcenter.checkpoint.com/supportcenter/portal?eventSubmit_doGoviewsolutiondetails=&solutionid=sk121637).
9. By default, every Check Point Security Gateway and Security Management Server's WebUI is accessible from the internet by browsing to http://\. Restricting access to the WebUI is possible by configuring a Firewall Rule, or by configuring the Check Point Gateway and Management Server settings.
Click ***Deploy*** to start the deployment process. The deployment time will depend on the **installation type** and is expected to complete in less than 10 minutes.
If a public address was *not* allocated, then the deployment will complete once the instance has started. Note that in such a case, you should wait a few more minutes until the first time wizard completes.
If a public address is allocated, then the deployment will be pending until the first time wizard has completed running, and the product is ready for use.
Once completed, you should be presented with a page similar to this:
Note that some variations on the below are possible depending on the deployment options you have selected.
*Example*:
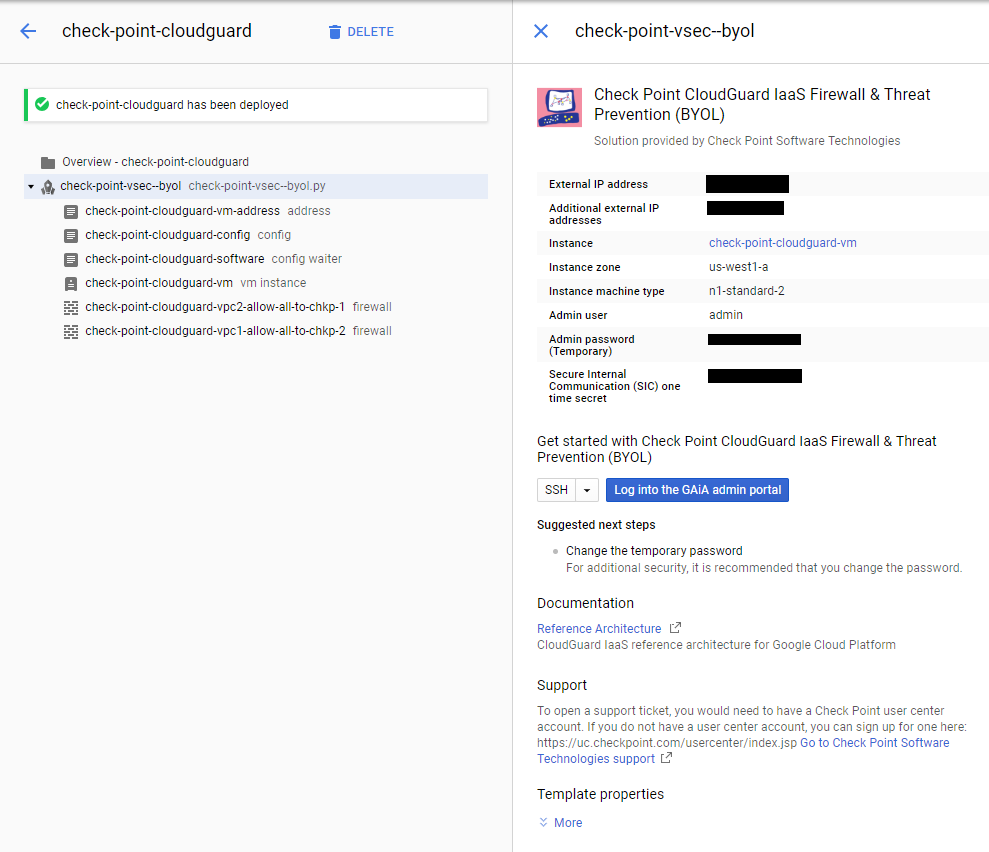
The page contains the following items:
|-----------------------------------------------------|---------------------------------------------------------------------------------------------------------------------------------------------------------------------------------------------------------------------------------------------------------------------------------------------------------------------------------------------------------------------------------------------------------------------------------------------------------------------------------------------------------------------------------------------------------------------------------------------------------------------------------------------------------------------------------------------------------------------------------------------------------------------------------------|
| Attribute name | Comment |
| External IP address | The Cloud Firewall instance public address. Will only be presented, if ***External IP address*** of the primary (first) network interface was set to ***Static*** or ***Ephemeral***. |
| Additional external IP addresses | List of additional external IP addresses. Will only be presented if any of the additional External IP addresses was set to *Static* or *Ephemeral*. |
| Instance | A link to the instance in the Google Compute Engine console. |
| Instance zone | The zone, in which the instance was deployed. |
| Instance machine type | The instance machine type. |
| Admin user | The username. Use this username to connect to the instance using SSH and the Web portal. Also, if this instance acts as a Security Management Server, then use this username to connect using the SmartConsole GUI clients. |
| Admin password (Temporary) | An automatically randomly generated password. Use this password to connect to the instance's web portal. Also, if this instance acts as a Security Management Server, then use this password to connect using the SmartConsole GUI clients. **Note** : This password ***will not work*** over SSH, as SSH password authentication is disabled by default. This field will only be presented if ***Automatically generate an administrator password*** was selected. We recommend that you change this password. To change or set the SmartConsole clients login password, connect over SSH to the instance and run the '`cpconfig`' command. To change or set the Gaia Portal login password, connect over SSH to the instance and run the '`set user admin ...`' Gaia Clish command. |
| Secure Internal Communication (SIC) one-time secret | The one-time SIC key is used to establish trust between the Cloud Firewall Gateway and its Security Management Server. Will only be presented if this Security Gateway is managed by an external Security Management Server. |
In addition to the Check Point instance, this template will perform the following:
* Allocate a public address and associate it with the instance (unless None was requested).
* Create the following Google Compute Engine firewall rules for each configured network interface:
* For a **Gateway only** , or a **Gateway and Management (Standalone)** deployment:
* A permissive Google Compute Engine firewall rule allowing all traffic.
The rationale for this is that the instance already enforces a Check Point
security policy, and there is no need for a second security mechanism.
* For a **Management-only** deployment:
* A rule allowing connections from the Check Point Cloud Firewall Gateways to the Security Management Server.
* A rule allowing connections over SSH / HTTPS, with SmartConsole GUI clients to the Security Management Server.
* For a **Manual configuration** deployment, no firewall rules should be created.
* Tag the instance:
* For a **Gateway-only** installation type, the following tag would be added:
* `checkpoint-gateway`
* For a **?anagement-only** installation type, the following tag would be added:
* `checkpoint-management`
* For a **Gateway and Management (Standalone)** installation type, these tags would be added:
* `checkpoint-gateway`
* `checkpoint-management`
### (5) Connecting to the instance {#Connecting to the instance}
Show / Hide this section
After deployment, you can connect to the instance using the following methods:
* **SSH**
You can connect to the instance using SSH as explained in .
**Notes:**
* The username to connect with is '`admin`'.
* SSH using passwords is disabled by default. Instead you should use SSH public keys.
* If you use the web based SSH client provided by Google, then make sure to set the username in the client to '`admin`' as explained here:
.
* **Gaia Portal**
You can connect to the Gaia Portal over HTTPS using a web browser.
**Notes:**
* The username is '`admin`'.
* If you have selected ***Automatically generate an administrator password*** , then use the ***Admin password (Temporary)*** shown at the end of the deployment.
* If you have *not* selected ***Automatically generate an administrator password*** , then first you will need to connect over SSH to the machine and set the user '`admin`' password.
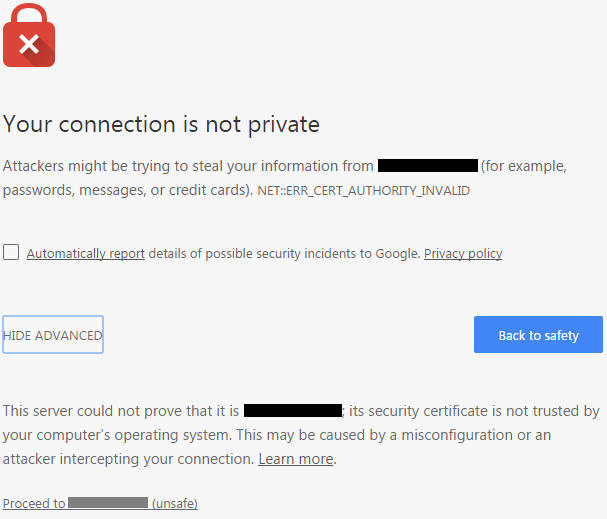
* When you connect to the Gaia Portal, you will be presented with an SSL warning similar to the following:
`Your connection is not private`
` NET::CERT_AUTHORITY_INVALID`
*Example*:
[](https://sc1.checkpoint.com/sc/SolutionsStatics/sk114577/Your_connection_is_not_private.png "Click the image to see it in full size in a new tab/window")
This is due to the fact that the certificate presented by the Gaia Portal is *self-signed*.
You can validate the certificate by comparing its fingerprint to the fingerprint of the certificate found on the Cloud Firewall Gateway.
To retrieve the Cloud Firewall Gateway's certificate fingerprint, connect to the Cloud Firewall Gateway over SSH and run the following command:
`[Expert@HostName:0]# cpopenssl x509 -in /web/conf/server.crt -fingerprint`
Alternatively, you can install your own SSL certificate. Refer to the following articles:
* [sk97648 - How to create and set certificate for Gaia Portal](https://supportcenter.checkpoint.com/supportcenter/portal?eventSubmit_doGoviewsolutiondetails=&solutionid=sk97648)
* [sk108252 - How to change Gaia Portal's certificate from SHA-1 to SHA-256](https://supportcenter.checkpoint.com/supportcenter/portal?eventSubmit_doGoviewsolutiondetails=&solutionid=sk108252)
* [sk109593 - How to configure Gaia Portal to use a 3rd party CA-issued Wildcard certificate](https://supportcenter.checkpoint.com/supportcenter/portal?eventSubmit_doGoviewsolutiondetails=&solutionid=sk109593)
* [sk103129 - Not able to connect to Gaia Portal due to issues with SSL certificate](https://supportcenter.checkpoint.com/supportcenter/portal?eventSubmit_doGoviewsolutiondetails=&solutionid=sk103129)
* **Serial Console**
Follow the instructions in .
**Notes:**
* The username is '`admin`'.
* If you have selected ***Automatically generate an administrator password*** , then use the ***Admin password (Temporary)*** shown at the end of the deployment.
* If you have *not* selected ***Automatically generate an administrator password*** , then first you will need to connect over SSH to the machine and set the user '`admin`' password using the clish CLI command "set user admin password".
* **SmartConsole GUI clients** (when the instance acts as Security Management Server)
If the instance acts as a Security Management Server, then you can connect to it using the SmartConsole GUI clients.
You can download and install these clients from either the Gaia Portal or the [Check Point Download Center](https://supportcenter.checkpoint.com/supportcenter/portal?eventSubmit_doShowproductpage&productTab=downloads&product=191).
**Notes:**
* The username is '`admin`'.
* If you have selected ***Automatically generate an administrator password*** , then use the ***Admin password (Temporary)*** shown at the end of the deployment.
* If you have *not* selected Automatically generate an administrator password, then first you will need to connect over SSH to the machine and set the Security Management password (run the '`cpconfig`' command and select the relevant option).
### (6) Connecting the Cloud Firewall Gateway to its Management Server {#Connecting the vSEC Security Gateway to its Management Server}
Show / Hide this section
If you are deploying a centrally managed Security Gateway, then you will need to define the Cloud Firewall Gateway on the Security Management Server.
Follow the steps described in the Security Management Server Administration Guide \> chapter "Managing Gateways".
### (7) Setting up a load balancer {#Setting up a load balancer}
Show / Hide this section
This section explains how to add a load balancer to your environment. After the the procedure described in the section has been done, the gateways will respond to GCP probes.
**Note:** this feature is only available on machines running a Cloud Firewall version of R81.10 or higher.
1. Create a load balancer and health checks as explained in [MIG admin guide](https://sc1.checkpoint.com/documents/R80.30/WebAdminGuides/EN/CP_R80.30_and_Above_CG_Autoscaling_Managed_Instance_Group_for_GCP/AdminGuide/Content/Topics-Google-Managed-Instance-Group/Configuring-GCP.htm?tocpath=Configuring%20the%20Google%20Cloud%20Platform%7C_____0#Configuring_the_Google_Cloud_Platform).
2. In the management, add the following to "*$FWDIR/conf/user.def.FW1* ":
`cloud_balancer_ips = {`
`<35.191.0.1, 35.191.255.254>,`
`<130.211.0.1, 130.211.3.254>,`
`<209.85.152.1, 209.85.155.254>,`
`<209.85.204.1, 209.85.207.254>`
`};`
3. In each Cloud Firewall Gateway, run the following commands:
`fw ctl set int cloud_balancer_use_ip_ranges 2`
`fw ctl set int cloud_balancer_allow_any_dst 1`
`fw ctl set int cloud_balancer_port 8117`
4. In each Cloud Firewall Gateway, add this to */var/opt/fw.boot/modules/fwkern.conf* file:
`cloud_balancer_port=8117`
`cloud_balancer_use_ip_ranges=2`
`cloud_balancer_allow_any_dst=1`
5. Install policy.
### (8) Inspecting traffic {#Inspecting traffic}
* Show / Hide Inbound traffic section
The following diagram depicts the flow of incoming traffic from the Internet to the Web tier of a web application.
1. A user and an attacker are sending HTTP traffic to the web application on TCP port 80.
2. The Cloud Firewall instance works in front of the web application.
3. The Cloud Firewall instance that receives the connection checks the connection against the current security policy and logs the traffic.
4. If the connection is allowed, then the instance translates the connection, so that:
* The source address is changed to be the instance's private address.
* The destination address is changed to the address of an internal web server.
To have this behavior work, an access rule and a NAT rule needs to be created.
1. Create a gateway object to represent the Check Point Cloud Firewall Gateway as is described in "Connecting the Cloud Firewall Security Gateway to its Management Server". We will assume a host object by the name `Gateway-internal-address` that has the internal address of the Gateway and a host object by the name `application` exists.
2. Create the relevant Access / Firewall rule:
* Show / Hide instructions for SmartConsole
1. On SmartConsole Navigation Toolbar, click on the ***SECURITY POLICIES*** app.
2. In the upper middle section ***Access Control*** , click on the ***Policy***.
3. Add this access rule above the Cleanup rule:
|---------|----------------------------|---------|--------------------------|----------|-------|--------------------|
| Source | Destination | VPN | Services \& Applications | Action | Track | Install On |
| `* Any` | `Gateway-internal-address` | `* Any` | `Original` | `Accept` | `Log` | `* Policy Targets` |
Where:
|-------------|------------------------------------|---------------------------------------------------------------------------------------------|
| Column | Value | Comment |
| Source | `Any` | |
| Destination | `Gateway-internal-address` | |
| VPN | `* Any` | This is the default |
| Service | `Original` | If there is a need to only allow specific services or protocols, these can be added instead |
| Action | `accept` | |
| Track | Select the desired tracking option | e.g. `Log` |
3. Add the relevant NAT rule:
* Show / Hide instructions for SmartConsole
1. On SmartConsole Navigation Toolbar, click on the ***SECURITY POLICIES*** app.
2. In the upper middle section ***Access Control*** , click on the ***NAT***.
3. Add the following NAT rule:
|-----|-----------------|----------------------------|-------------------|-------------------|------------------------|---------------------|--------------------|---------|
| No. | Original Source | Original Destination | Original Services | Translated Source | Translated Destination | Translated Services | Install On | Comment |
| 1 | `All_Internet` | `Gateway-internal-address` | `Original` | ~H~ `Gateway` | ~S~ `application` | `Original` | `* Policy Targets` | |
Where:
|------------------------|----------------------------|------------------------------------------------------------------------------------------------------------------------------------|
| Column | Value | Comment |
| Original Source | `All_Internet` | Do not use "`* Any`" |
| Original Destination | `Gateway-internal-address` | |
| Original Service | `Original` | If there is a need to only allow specific services or protocols, these can be added instead |
| Translated Source | `Gateway` | Select "**Hide**" as the translation method |
| Translated Destination | `application` | `application` is a host object representing the application. An object representing an internal load balancer can be added instead |
| Translated Service | `Original` | If there is a need to only allow specific services or protocols, these can be added instead |
4. Install the Access / Network Security policy on your Cloud Firewall Gateways.
* Show / Hide outbound traffic section
If this instance acts as a Security Gateway, then you will need to set up routes in Google Compute Engine, so that outgoing traffic is routed through the instance.
Additional information on routes in Google Compute Engine can be found here:
.
You will also need to set up an appropriate security policy as well as a Network Address Translation policy (NAT) for this traffic.
**Google Compute Engine routes:**
We will be creating two Google Compute Engine routes:
* A route allowing the Check Point instance to access the Internet:
```
gcloud compute routes create NETWORK_NAME-checkpoint-to-internet \
--destination-range=0.0.0.0/0 \
--next-hop-gateway=default-internet-gateway \
--description="Check Point gateway to the Internet" \
--network=NETWORK_NAME \
--priority=100 \
--tags=checkpoint-gateway
```
* A route that will send the traffic of all other instances in the network through the Check Point instance:
```
gcloud compute routes create NETWORK_NAME-default-to-checkpoint \
--destination-range=0.0.0.0/0 \
--next-hop-address=CHECK_POINT_ADDRESS \
--description="Route all egress traffic to Check Point" \
--network=NETWORK_NAME \
--priority=500
```
Execute the above ***gcloud*** commands replacing:
* `NETWORK_NAME` with the network name.
* `CHECK_POINT_ADDRESS` with the private IP address of the Cloud Firewall Gateway.
Comments:
* The first route will be applied to the Cloud Firewall Gateway because it has the **`checkpoint-gateway`** tag and because its priority value (100) has a higher precedence over the priority value of the second route (500).
* The second route will be applied to all other instances, sending their Internet-bound traffic to the Cloud Firewall Gateway.
* By default, Google Compute Engine creates a default route with a priority value of 1000. The two routes above have therefore higher precedence over it, and this third route can be deleted.
**Check Point Firewall and NAT rules:**{#Check Point Firewall and NAT rules}
In SmartConsole, set up Network Address Translation (NAT) rules, so that Internet bound traffic, originating from the Web and Application subnets, is hidden behind the Cloud Firewall Gateway's public address.
Show / Hide instructions for SmartConsole
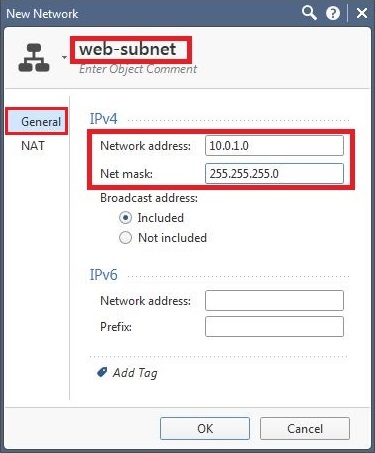
1. Create a network object to represent the Web subnet:
1. On the SmartConsole Navigation Toolbar, click on the ***Gateways and Servers*** app.
2. On the right pane, click on the ***Objects*** tab.
3. Right-click on the ***Network Objects*** - click on the ***Network...***:
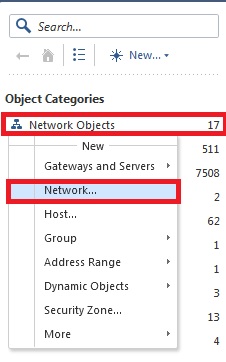
4. In the left tree, click on the ***General*** pane:
1. At the top, enter the desired name
2. On the ***General*** tab, enter the Network address and Network mask:
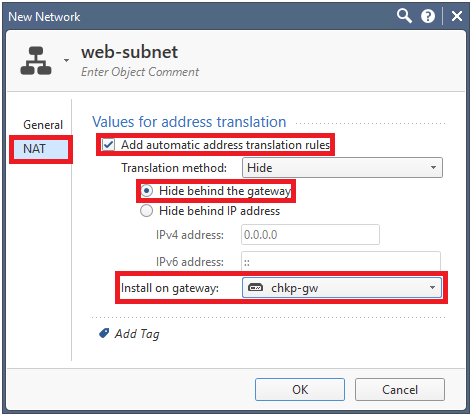
5. In the left tree, click on the ***NAT*** pane:
1. Check the box ***Add automatic address translation rules***.
2. Select the option ***Hide behind the gateway***.
3. In the ***Install on gateway*** field, select the Cloud Firewall Gateway.
**Note:** Refer to the [*R81 Security Management Server Administration Guide*](https://sc1.checkpoint.com/documents/R81/WebAdminGuides/EN/CP_R81_SecurityManagement_AdminGuide/Topics-SECMG/Managing-Gateways.htm?tocpath=Managing%20Gateways%7C_____0) - chapter "Creating an Access Control Policy" - section "Configuring the NAT Policy".
2. Repeat Step 1 to create a network object to represent the Application subnet.
3. The following Automatic NAT rules would be created:
|-----|----------------------|----------------------|-------------------|-------------------------------------------|------------------------|---------------------|------------|---------|
| No. | Original Source | Original Destination | Original Services | Translated Source | Translated Destination | Translated Services | Install On | Comment |
| 1 | `application-subnet` | `application-subnet` | `* Any` | `= Original` | `= Original` | `= Original` | `chkp-gw` | |
| 2 | `application-subnet` | `* Any` | `* Any` | ~H~ `application-subnet` (Hiding Address) | `= Original` | `= Original` | `chkp-gw` | |
| 3 | `web-subnet` | `web-subnet` | `* Any` | `= Original` | `= Original` | `= Original` | `chkp-gw` | |
| 4 | `web-subnet` | `* Any` | `* Any` | ~H~ `web-subnet` (Hiding Address) | `= Original` | `= Original` | `chkp-gw` | |
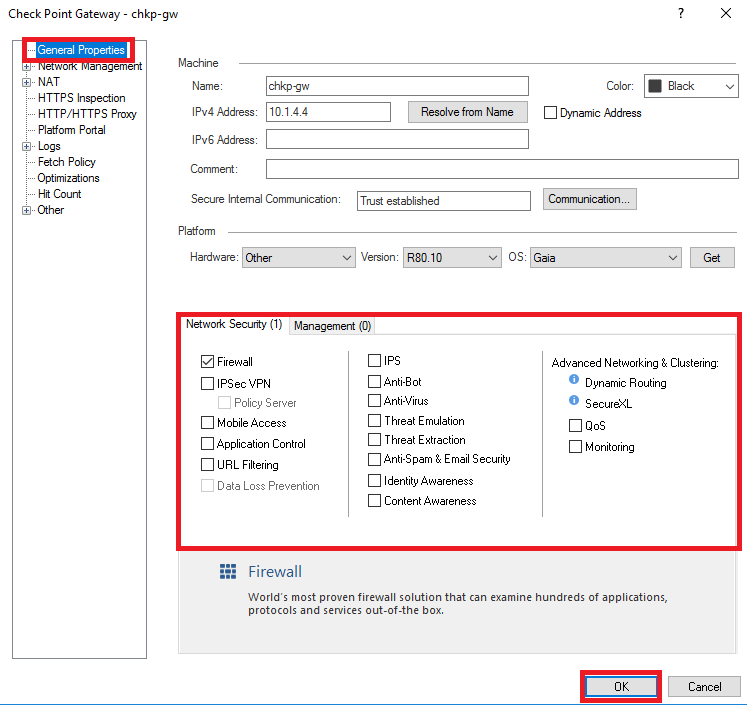
4. Go to the Cloud Firewall Gateway object and enable any additional desired Network Security blades:
5. Edit the Access Policy as required.
6. Install the Access Policy on the Cloud Firewall Gateway.
* Show / Hide East-West traffic section
Follow the instructions in this section, if you want traffic between subnets (e.g., between the Web subnet and the Application subnet) in Google Compute Engine to be inspected by the Check Point Cloud Firewall Gateway.
**(A) Inspecting traffic between subnets from different VPCs**
It is recommended to use Cloud Firewall Gateway using a [hub and spoke](https://en.wikipedia.org/wiki/Spoke%E2%80%93hub_distribution_paradigm) architecture to inspect traffic between subnets from different VPCs. Follow the steps in the **outbound traffic** section under **(8) Inspecting traffic** for each VPC in which the Check Point Cloud Firewall Gateway is deployed.
If the hosts you wish to protect are in a different subnet than the Cloud Firewall Gateway, for each such subnet, follow these steps:
* Connect to the Cloud Firewall Gateway via SSH, and create a static route using the following command: `set static-route `**SUBNET-ADDRESS/SUBNET-MASK**` nexthop gateway address `**GCP-DEFAULT-GATEWAY**` on`
Where:
**SUBNET-ADDRESS/SUBNET-MASK** is the subnet address range (e.g. 10.1.2.0/24).
**GCP-DEFAULT-GATEWAY** is the GCP default gateway of the subnet in which the Cloud FirewallGateway is deployed (e.g. 10.0.2.1).
**For example:** `set static-route 10.1.2.0/24 nexthop gateway address 10.0.2.1 on`
Make sure to run: `save config`, for the configuration to be saved after reboot.
* Create a Network object as described in the **outbound traffic** section under **(8) Inspecting traffic** in the sub-section**Check Point Firewall and NAT rules**.
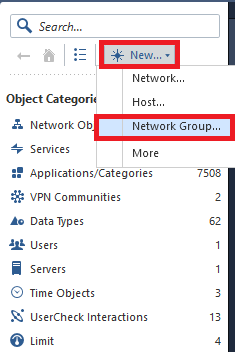
For each VPC that contains such subnets:
* Create a Network Group object.
* Name the object.
* Add all the **Network**objects you have created that represent the subnets within the VPC.
**Example:**
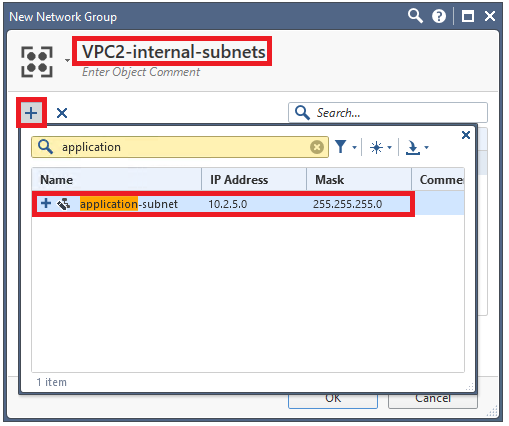
* Select OK.
* Double-click the Cloud Firewall Gateway object.
* In the left pane, select **Network Management**.
* Double-click the interface within the VPC.
* Under **General** in the **Topology** section select **Modify....**
* In the section **Leads To** tick **override**.
* Tick **This Network (Internal)**.
* Tick **Specific:**.
* In the drop-down list select the newly created **Network Group** object.
* Select OK 3 times in order to save the configurations.
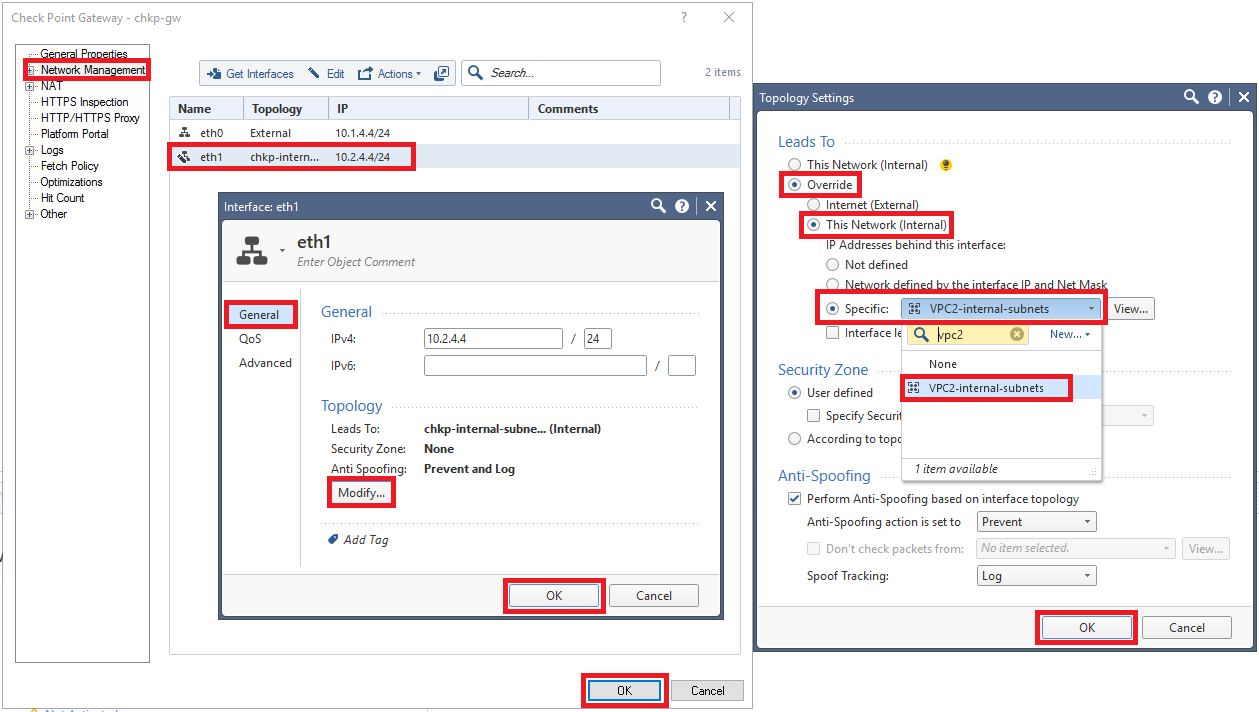
After adding all the VPCs and subnetworks, perform install policy in order to apply the configuration.
**(B) Inspecting traffic between subnets within the same VPC**
Ideally, we would like traffic between the Web and Application subnets to be sent through the Cloud Firewall Gateway using Google Compute Engine routes.
That being said, currently, Google Compute Engine routes can only be applied to traffic ***leaving*** the virtual network, but cannot be applied to traffic that remains inside the virtual network.
To work around this limitation, we will use NAT to force traffic between these subnets to pass through the Cloud Firewall Gateway. To achieve this, we will use "Shadow Subnets", subnets that in fact don't exist and will be used as aliases for the desired destination subnet.
Additional information about Google Compute Engine routes can be found here:
.
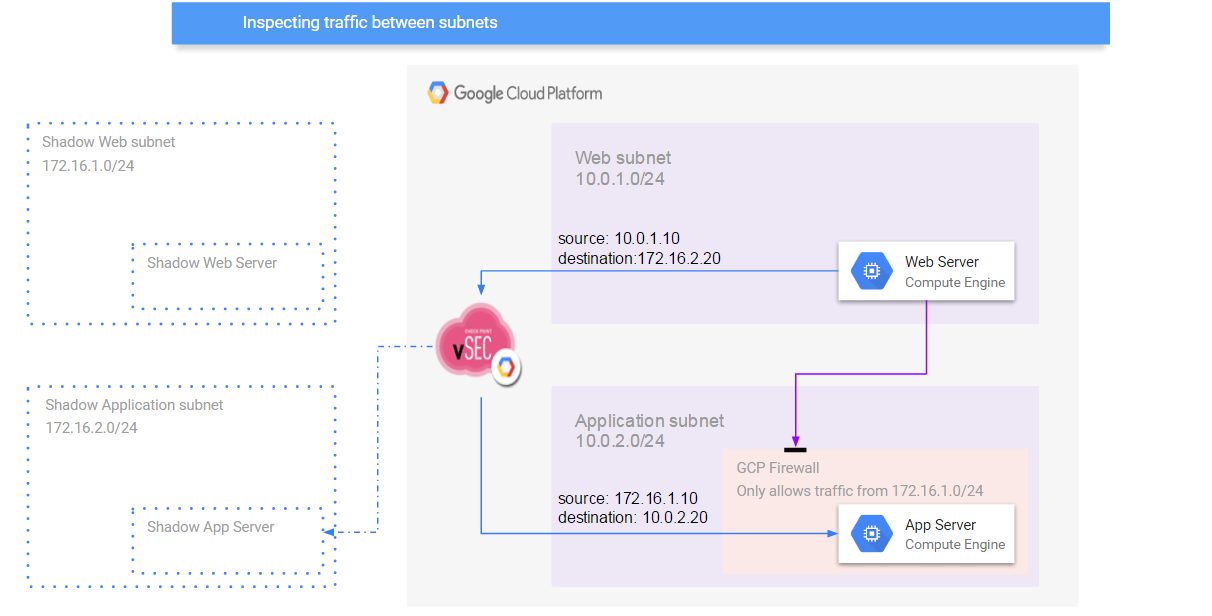
To best explain the configuration steps, we will use the following example environment.
[](https://sc1.checkpoint.com/sc/SolutionsStatics/sk114577/image00.png "Click the image to see it in full size in a new tab/window")
* The Web Server (10.0.1.10) is configured to connect to a Shadow App Server, whose address (172.16.2.20) is in a Shadow Application subnet, which resides outside the virtual network.
* The Web Server initiates a connection to that address.
* Google Compute Engine routes send this connection to the Cloud Firewall Gateway.
* The Cloud Firewall Gateway inspects the traffic and if allowed, translates the source and destination addresses.
* The source address is translated to an address belonging to the Shadow Web Subnet (172.16.1.10), and the destination address is translated to the App Server address (10.0.2.20).
Make sure to replace the addresses to reflect your environment when you follow these steps:
|----------------------------------------|-----------------------------|
| Component / Range | Address |
| Network name | web-application-network |
| Security Subnet | 10.0.0.0/24 |
| Cloud Firewall Gateway private address | 10.0.0.2 |
| Web subnet | 10.0.1.0/24 |
| Application subnet | 10.0.2.0/24 |
| **NAT components** | **Shadow Addresses ^(\*)^** |
| Shadow Web subnet | 172.16.1.0/24 |
| Shadow Application subnet | 172.16.2.0/24 |
^(\*)^ NAT Shadow addresses must be outside the virtual network address space.
Add the following NAT rule to the Check Point NAT policy:
|-------------|---------------|-------------------|------------------------|
| Source | Destination | Translated Source | Translated Destination |
| 10.0.1.0/24 | 172.16.2.0/24 | 172.16.1.0/24 | 10.0.2.0/24 |
**Note** : This rule should be placed above the NAT rules created in the chapter "Inspecting Internet bound traffic" - section "Check Point Firewall and NAT rules" above.
Configure the Web servers to reach the Application servers through the Shadow Application addresses (172.16.2.0).
You would need to create a Google Compute Engine firewall rule to allow traffic from the Shadow Web subnet to the Application subnet.
For example, assuming the servers in the Web subnet need to open connections to servers in the Application subnet over TCP port 8080, the following Google Compute Engine firewall rule should be created:
```
gcloud compute firewall-rules create \
NETWORK_NAME-allow-through-checkpoint \
--allow "tcp:8080" \
--network=NETWORK_NAME \
--source-ranges=172.16.1.0/24
```
**Notes:**
* You should review the Google Compute Engine firewall rules in your network to ensure that no other Google Compute Engine firewall rules allow direct access from the Web subnet to the Application subnet.
* You can limit the scope of this firewall rule further by tagging your application instances and adding the same tag to the above Google Compute Engine firewall rules.
* In this example, we assumed that the servers in the Web subnet need to initiate connections to the servers in the Application subnet. If connections need to also be initiated from the reverse direction, then repeat the steps above reversing the role of the Web and Application subnets.
### (9) Setting up a VPN tunnel {#Setting up a VPN tunnel}
Show / Hide this section
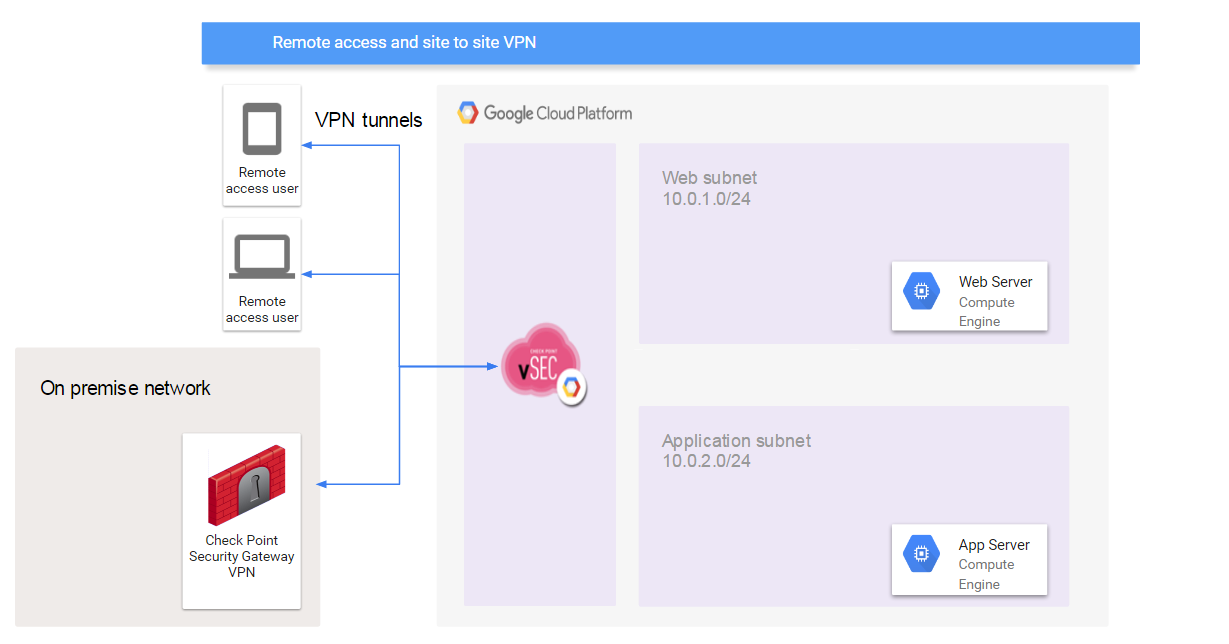
Follow the instructions in this section, if you want to set up a VPN tunnel between the Cloud Firewall Gateway in Google Compute Engine and an on-premises Security Gateway.
In this section, we will setup the encryption domain of the Cloud Firewall Gateway. The encryption domain will consist of the Web and Application subnets.
Traffic from these subnets to the on-premises network will be routed to the Cloud Firewall Gateway using the Google Compute Engine route we have set up in the "Inspecting Internet bound traffic" section above.
For more information about defining VPN tunnels with Security Gateways on different sites and different servers, see the VPN Administration Guide \> Site-to Site and Remote access sections.
[](https://sc1.checkpoint.com/sc/SolutionsStatics/sk114577/image12.png "Click the image to see it in full size in a new tab/window")
In this deployment, the company's on-premises Security Management Server centrally manages the Cloud Firewall Gateway at the company's local site and the Cloud Firewall Gateway protecting the company's private subnets in Google Compute Engine.
You can encrypt the data going between the company's on-premises and the company's private subnets in Google Compute Engine by creating a VPN tunnel.
**Follow these steps to configure the VPN:**
Show / Hide instructions for SmartConsole
1. Open SmartConsole.
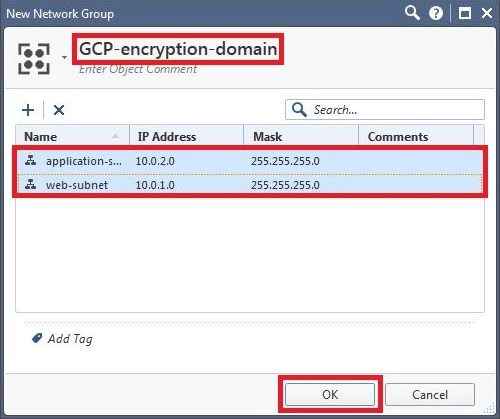
2. Create a Group network object for the encryption domain behind the Cloud Firewall Gateway.
Add the Google Compute Engine subnets (**web-subnet** and **app-subnet**) to this Group network object.
*Example*:
3. Edit the Cloud Firewall Gateway object:
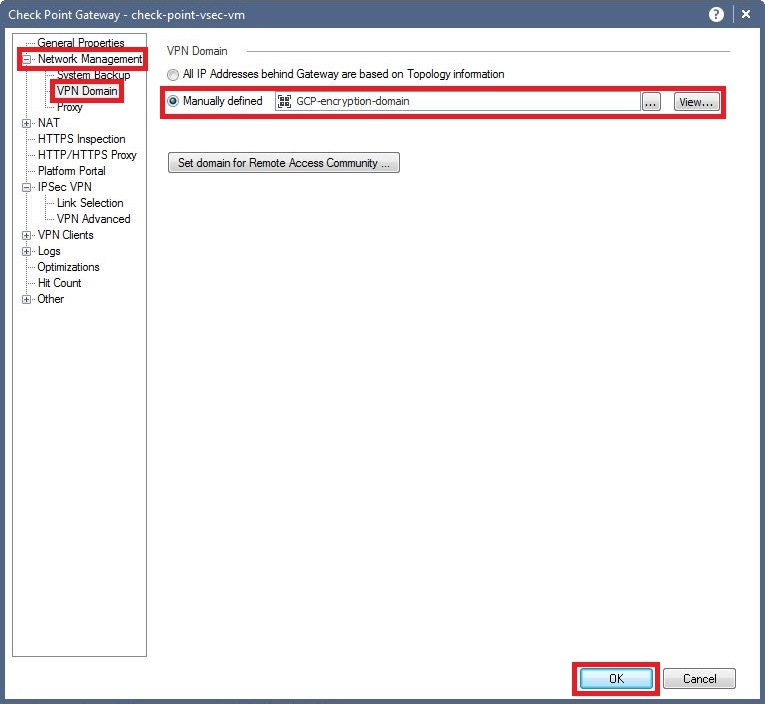
1. On the ***General Properties*** pane, check the ***IPSec VPN*** box.
2. In the left tree, click on the ***\[+\]*** sign to expand the ***Network Management*** pane.
3. Click on the ***VPN Domain*** pane - select the option ***Manually defined*** .
Select the Group network object you created in Step 2.
4. In the left tree, click on the ***\[+\]*** sign to expand the ***IPSec VPN*** - go to the ***Link Selection*** pane.
5. Select the option ***Always Use this IP Address***.
6. Select the option ***Statically NATed IP***.
7. Enter the Cloud Firewall Gateway public IP address.
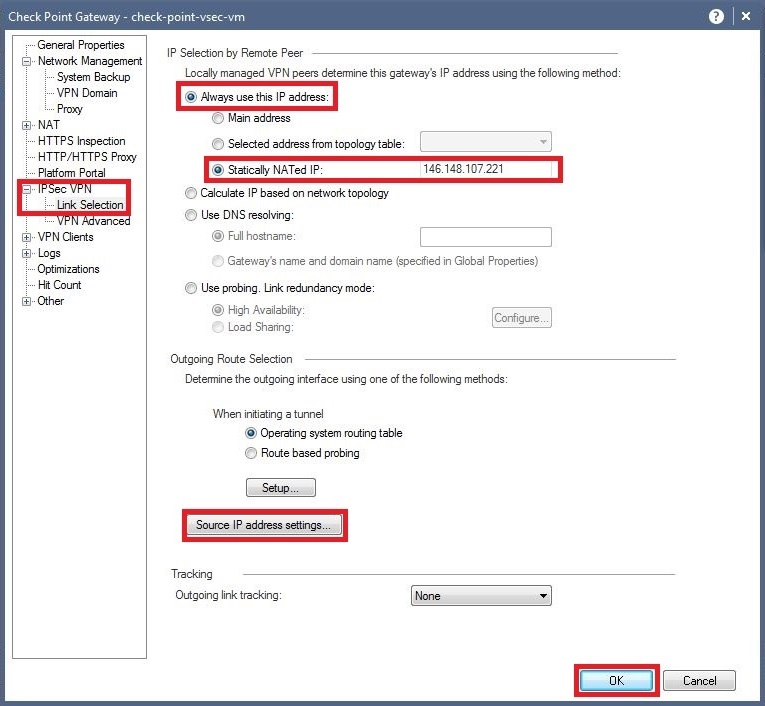
8. Click on the ***Source IP address settings...*** button.
9. Select the option ***Manual*** - select the option ***Selected address from topology table*** - select the private IP address of the external interface.

4. Ensure that the encryption domain of the on-premises gateway is configured correctly.
5. Add the two gateways to a VPN community (such as "`MyIntranet`").
6. If you want to disable NAT inside the VPN tunnel, then do that in the VPN community object:
1. On the SmartConsole Navigation Toolbar, click on the ***Gateways \& Servers*** app.
2. On the right pane, click on the ***Objects*** tab.
3. Click on the ***VPN Communities***.
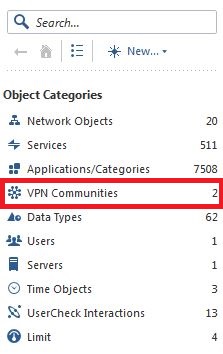
4. Edit the relevant VPN community:
1. Go to the ***Advanced*** pane.
2. Check the box ***Disable NAT inside the VPN community***.
3. Click on OK.

7. Install the Access Policy on the two Security Gateways.
### (10) Multiple web applications {#Multiple web applications}
Show / Hide this section
Using this setup, it is possible to have the same set of Cloud Firewall Gateways inspect traffic belonging to multiple web applications.
* We will assume a second web application named `web2`.
* An external load balancer has already been deployed in the environment. (For instructions on adding a load balancer to your environment, go to "Setting up a load balancer")
To achieve this, you need to assign an additional IP address to the load balancer.
Procedure:
1. While in your load balancer resource page in GCP, click on ***Edit***.
2. Click on ***Frontend configuration*** section.
3. Click on ***ADD FRONTEND IP AND PORT***.
4. Fill in the required information relevant to your environment.
5. Click ***DONE***.
6. Click ***UPDATE***.
In order for the Gateway to direct the traffic to the correct application, A NAT rule needs to be created:
1. Create a Host object to represent the external load balancer:
* Show / Hide instructions for SmartConsole
1. On the right pane, click on the ***Objects*** tab.
2. Right-click on the ***Network Objects*** - click on the ***Host...***:
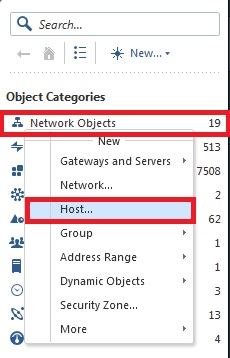
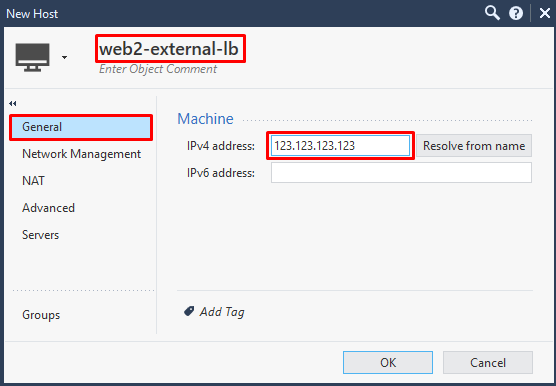
3. On the ***General*** pane:
1. Enter a representative name (e.g., `web2-external-lb`).
2. In the ***IPv4 Address*** field, enter the new IP address of the external load balancer.
3. Click on OK to apply the settings and close the New Host window.
*Example* :
2. Add the relevant Access / Firewall rule:
* Show / Hide instructions for SmartConsole
1. On SmartConsole Navigation Toolbar, click on the ***SECURITY POLICIES*** app.
2. In the upper middle section ***Access Control*** , click on the ***Policy***.
3. Add the following access rule above the Cleanup rule:
|---------|--------------------|---------|--------------------------|----------|-------|--------------------|
| Source | Destination | VPN | Services \& Applications | Action | Track | Install On |
| `* Any` | `web2-external-lb` | `* Any` | `Original` | `Accept` | `Log` | `* Policy Targets` |
Where:
|-------------|------------------------------------|---------------------------------------------------------------------------------------------|
| Column | Value | Comment |
| Source | `Any` | |
| Destination | `web2-external-lb` | |
| VPN | `* Any` | This is the default |
| Service | `Original` | If there is a need to only allow specific services or protocols, these can be added instead |
| Action | `accept` | |
| Track | Select the desired tracking option | e.g. `Log` |
3. Add the relevant NAT rule:
* Show / Hide instructions for SmartConsole
1. On the SmartConsole Navigation Toolbar, click on the ***SECURITY POLICIES*** app.
2. In the upper-middle section, Access Control, click ***NAT***.
3. Add the following NAT rule:
|-----|-----------------|----------------------|-------------------|------------------------|------------------------|---------------------|--------------------|---------|
| No. | Original Source | Original Destination | Original Services | Translated Source | Translated Destination | Translated Services | Install On | Comment |
| 1 | `All_Internet` | `web2-external-lb` | `Original` | ~H~ `web2-external-lb` | ~S~ `web2-application` | `Original` | `* Policy Targets` | |
Where:
|------------------------|--------------------|---------------------------------------------------------------------------------------------------------------------------------------------|
| Column | Value | Comment |
| Original Source | `All_Internet` | Do not use "`* Any`" |
| Original Destination | `web2-external-lb` | |
| Original Service | `Original` | If there is a need to only allow specific services or protocols, these can be added instead |
| Translated Source | `web2-external-lb` | Select "**Hide**" as the translation method |
| Translated Destination | `web2-application` | `web2-application` is a host object representing the new application. An object representing an internal load balancer can be added instead |
| Translated Service | `Original` | If there is a need to only allow specific services or protocols, these can be added instead |
4. Install the Access / Network Security policy on your Cloud Firewall Gateways.
### (11) Licensing {#Licensing}
Show / Hide this section
When deploying a Cloud Firewall Gateway, it can be licensed using either:
* *Bring-Your-Own-License (BYOL)* using the Cloud Firewall license.
* *Pay-As-You-Go (PAYG)* - the Gateway is pre-licensed.
When deploying a Security Management Server, you will need to acquire an open server license.
### (12) Supported machine types {#Supported machine types}
Show / Hide this Section
The table below lists the Google Cloud Compute Engine machine series supported by Check Point and the version for each. For the full machine series comparison, see [Machine series comparison](https://cloud.google.com/compute/docs/machine-resource#machine_series_comparison) in the Google Cloud documentation
| Machine series | Workload type | vCPUs | Memory | Network Interfaces | Supported version |
|----------------|-------------------|------------|--------------------|----------------------|-------------------|
| **C4** | General-purpose | 2 to 288 | 2 to 2,232 GB | gVNIC | R82.20 and higher |
| **N4** | General-purpose | 2 to 80 | 2 to 640 GB | gVNIC | R82.20 and higher |
| **C3** | General-purpose | 4 to 176 | 8 to 1,408 GB | gVNIC | R82.20 and higher |
| **E2** | Cost-optimized | 0.25 to 32 | 1 to 256 GB | gVNIC | R81.20 and higher |
| **N2** | General-purpose | 2 to 128 | 2 to 864 GB | gVNIC and VirtIO-Net | R81.20 and higher |
| **N2D** | General-purpose | 2 to 224 | 2 to 896 GB | gVNIC and VirtIO-Net | R81.20 and higher |
| **N1** | General-purpose | 1 to 96 | 1.8 to 624 GB | gVNIC and VirtIO-Net | R81.20 and higher |
| **C2** | Compute-optimized | 4 to 60 | 16 to 240 GB | gVNIC and VirtIO-Net | R81.20 and higher |
| **C2D** | Compute-optimized | 2 to 112 | 4 to 896 GB | gVNIC and VirtIO-Net | R81.20 and higher |
| **M1** | Memory-optimized | 40 to 160 | 961 to 3,844 GB | gVNIC and VirtIO-Net | R81.20 and higher |
| **M2** | Memory-optimized | 208 to 416 | 5,888 to 11,776 GB | gVNIC and VirtIO-Net | R81.20 and higher |
| **M3** | Memory-optimized | 32 to 128 | 976 to 3,904 GB | gVNIC | R82.20 and higher |
Notes:
* Only the machine series relevant to Check Point are listed in this table.
* Third and fourth generation series (C4, N4, C3, M3) require R82.20 and higher.
* All other series in the table are supported from R81.20 and higher
### (13) Known Limitations {#Known Limitations}
Show / Hide this section
* QoS blade is *not* supported.
* VSX mode is *not* supported.
For supported versions of Jumbo Hotfix Accumulator, refer to [sk109141](https://supportcenter.checkpoint.com/supportcenter/portal?eventSubmit_doGoviewsolutiondetails=&solutionid=sk109141) .
For a list of additional limitations in other related solutions, visit the "Known Limitations" section in [the GCP HA Admin Guide](https://sc1.checkpoint.com/documents/IaaS/WebAdminGuides/EN/CP_CloudGuard_IaaS_HighAvailabilty_for_GCP/Content/Topics-GCP-HA/Known-Limitations.htm?tocpath=_____6) and the [GCP MIG Admin Guide](https://sc1.checkpoint.com/documents/R80.30/WebAdminGuides/EN/CP_R80.30_and_Above_CG_Autoscaling_Managed_Instance_Group_for_GCP/AdminGuide/Content/Topics-Google-Managed-Instance-Group/Additional-Information.htm?tocpath=Additional%20Information%7C_____0#Known_Limitations).
---
# Agent Instructions
This content is from the Check Point Support Center (https://support.checkpoint.com), the official knowledge base for Check Point cybersecurity products.
## Navigating This Knowledge Base
- **Complete index**: [llms.txt](https://support.checkpoint.com/llms.txt)
- **All SK articles**: [SecureKnowledge Sitemap](https://support.checkpoint.com/sitemaps/secureknowledge-sitemap-index.xml)
- **SK article URL pattern**: `https://support.checkpoint.com/results/sk/{skId}`
- **Markdown responses**: AI bot User-Agents automatically receive `text/markdown` content