> Source: [sk105575](https://support.checkpoint.com/results/sk/sk105575)
# sk105575 - How to configure RADIUS authentication between Gaia OS and Microsoft Windows Server 2008
| Property | Value |
|----------|-------|
| Solution ID | sk105575 |
| Date Created | 2015-04-08 |
| Last Modified | 2023-06-26 |
| Technical Level | General |
| Products | Security Gateway, Security Management Server, Multi-Domain Security Management Server |
| Versions | R81.10 (EOS), R81 (EOS), R81.10 (EOS), R81 (EOS), R81 (EOS), R81.10 (EOS) |
| OS | Gaia |
## Solution
**Notes:**
* The configuration steps described below are based on Windows Server 2008R2 and were tested in Check Point's lab.
* This article describes a basic configuration of RADIUS authentication with Check Point's Gaia OS (using vendor specific attributes 229 and 230).
* This article does not replace Microsoft's official documentation. Refer to Microsoft's official documentation for information about any relevant topic (e.g., [Connection Request Policies](https://msdn.microsoft.com/en-us/library/cc753603.aspx)).
* Related Solution: [sk98874 - RADIUS user cannot log in to WebUI or SSH in Gaia](https://supportcenter.checkpoint.com/supportcenter/portal?eventSubmit_doGoviewsolutiondetails=&solutionid=sk98874)
Click Here to Show the Entire Article
* Show / Hide Part I - Configuration on Windows Server
1. In the *Server Manager* , install the ***RADIUS*** server role.
1. In the left pane, click on ***Roles*** - in the ***Role Summary*** section, click on ***Add Roles*** (on the far right).
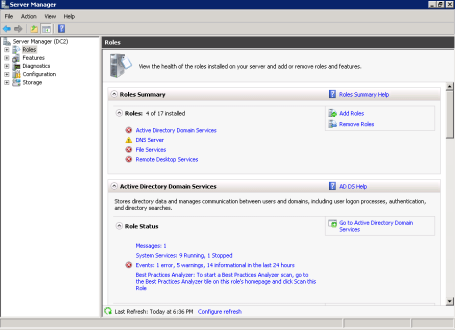
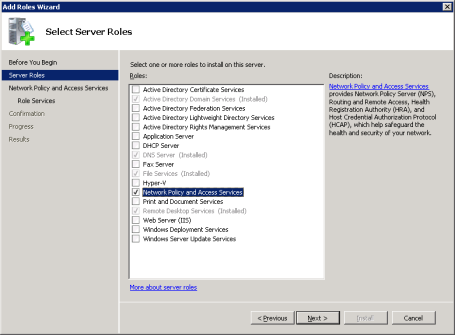
2. In the ***Select Server Roles*** window, select ***Network Policy and Access Services*** - click on *Next* .
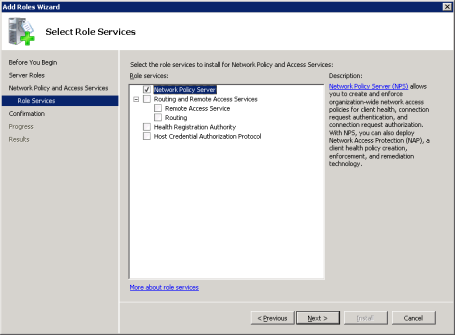
3. In the ***Select Role Services*** window, select only ***Network Policy Server*** - click on *Next* .
4. Click on *Install* - confirm that the installation was successful.
2. Create a RADIUS policy
1. Go to the ***Start*** menu -\> ***Administrative Tools*** -\> ***Network Policy Server*** .
In the left pane, open ***Policies*** - right-click on ***Network Policies*** - select ***New*** from the menu.
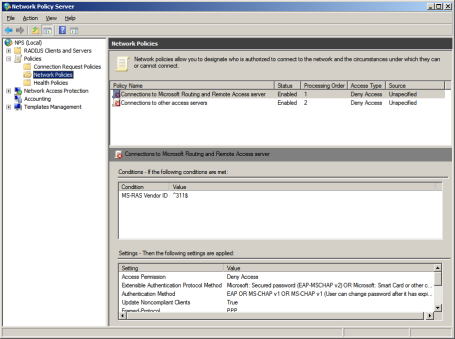
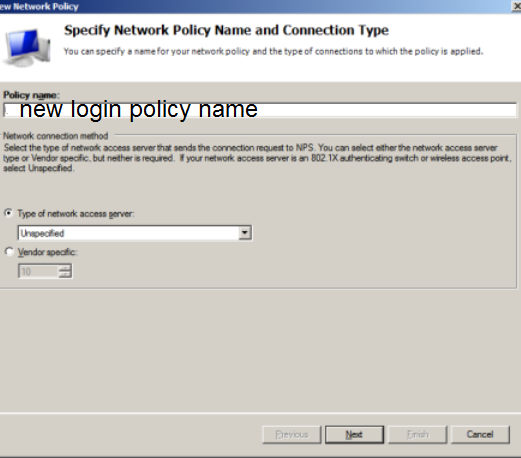
2. Enter a name for the new login policy - in the *Type of network access server* , select *Unspecified* - click on *Next.*
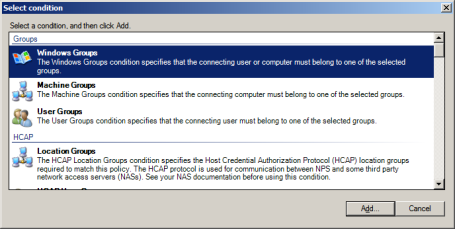
3. Click on ***Add...*** to add the conditions necessary for this network policy to run.

4. In this example, we specify that this policy is run for users in a specific Windows group (it can also be done for the User Groups / Machine Groups / etc.), so select *Windows Group* and click on *Add* .
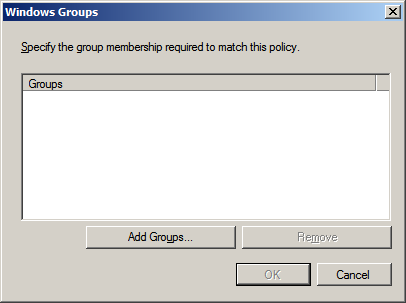
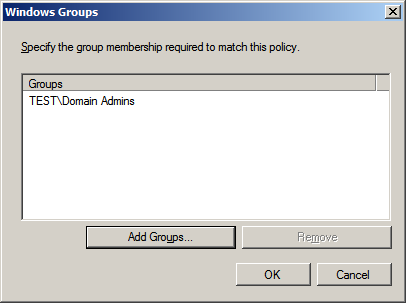
5. Click on ***Add Groups*** - enter the name of the user group to which you want to grant login access.
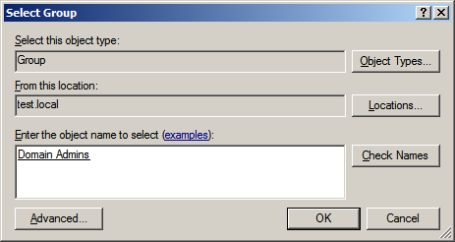
6. In this example, we give access to *Domain Admins* .
Click on *Check Names* to verify - click on *OK* twice.
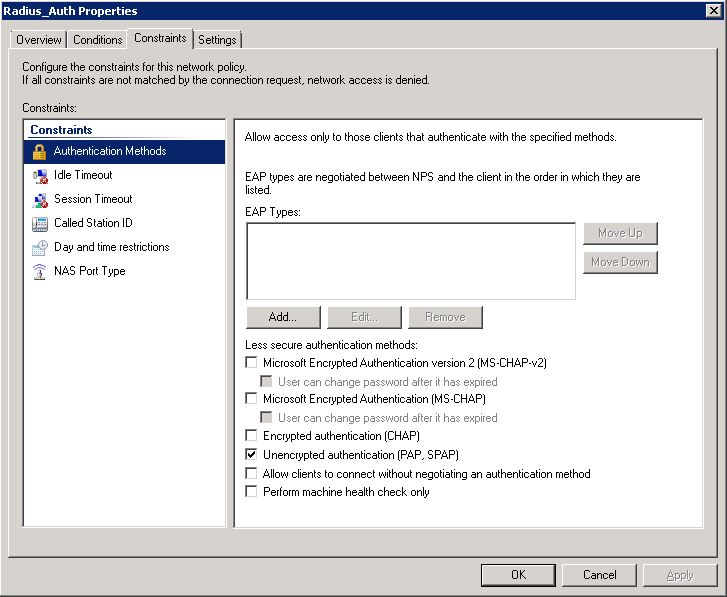
7. In the ***Radius_Auth Properties*** window, on the ***Constraints*** tab, click on ***Authentication methods*** - select what authentication type will be used to authenticate - click on *OK* .
*For example* , select *Unencrypted authentication* . (Refer to [sk121223](https://supportcenter.checkpoint.com/supportcenter/portal?eventSubmit_doGoviewsolutiondetails=&solutionid=sk121223) for more on supported authentication methods.)
3. Configure the RADIUS attributes.
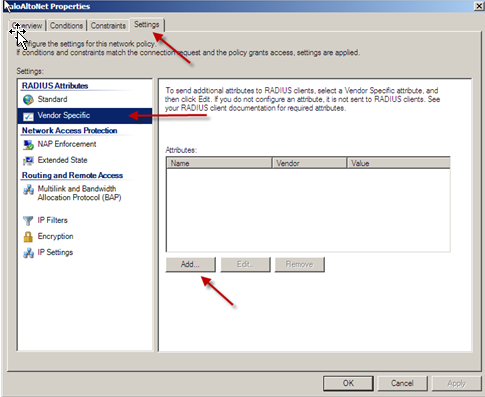
1. In the ***Radius_Auth Properties*** window, on the ***Settings*** tab - click on ***Vendor Specific*** - in the ***Attributes*** section, click on ***Add...***
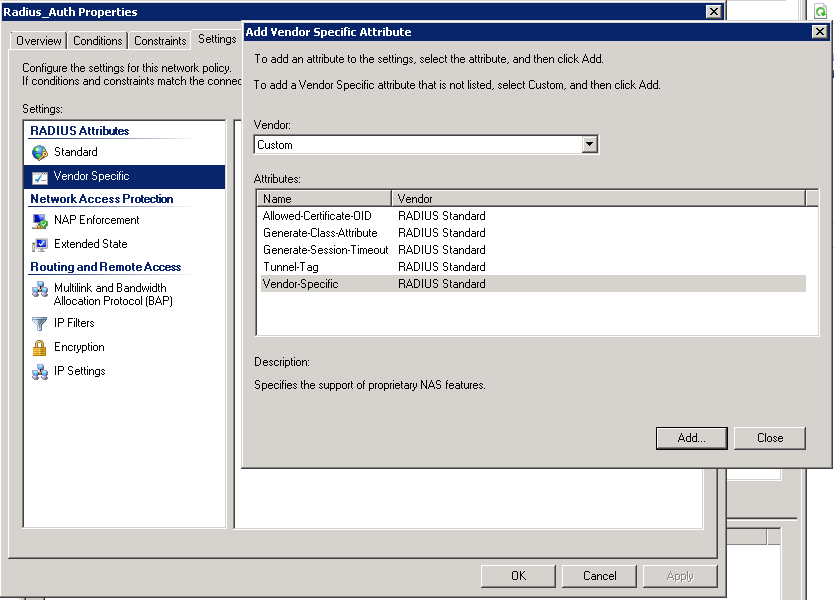
2. In the ***Add Vendor Specific Attribute*** window - in ***Vendor*** , select ***Custom*** - in the ***Attributes*** section, click on ***Vendor-Specific*** - click on ***Add...***
3. In the ***Attribute information*** window, click on ***Add...***
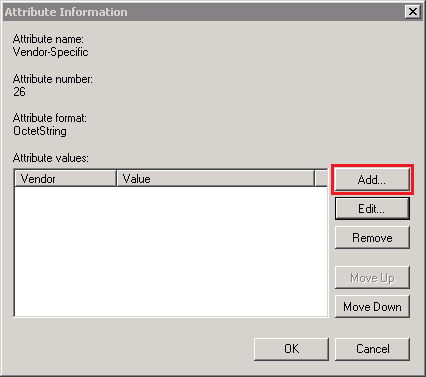
4. In the ***Vendor-Specific Attribute Information*** window:
1. Check the ***Enter Vendor Code*** - select the value ***2620*** (Check Point)
2. Check the box ***Yes. It conforms***
3. Click on ***Configure Attribute...***
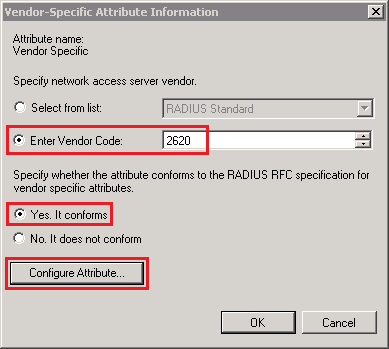
5. In the ***Configure VSA (RFC Compliant)*** window configure the following:
1. ***Vendor-assigned attribute number*** = 229
2. ***Attribute format*** = String
3. ***Attribute value*** = adminRole
4. Click on *OK* until you get back to the *Attribute information* window
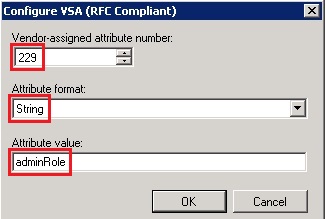
6. In the ***Attribute information*** window, click on ***Add...***
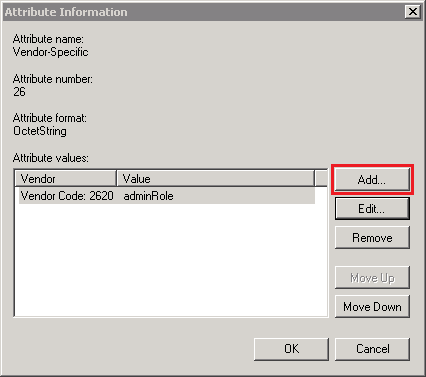
7. In the ***Vendor-Specific Attribute Information*** window:
1. Check the ***Enter Vendor Code*** - select the value ***2620*** (Check Point)
2. Check the box ***Yes. It conforms***
3. Click on ***Configure Attribute...***

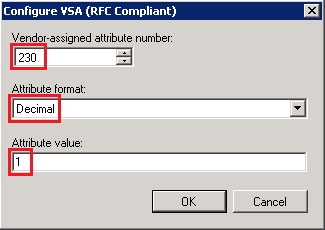
8. In the ***Configure VSA (RFC Compliant)*** window configure the following:
1. ***Vendor-assigned attribute number*** = 230
2. ***Attribute format*** = Decimal
3. ***Attribute value*** = 1
4. Click on *OK* until you get back to *Attribute information* window
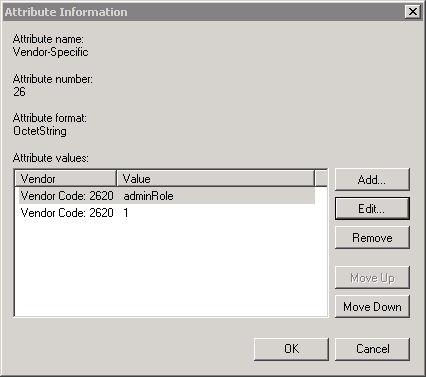
9. The final ***Attribute information*** window should be:
4. Configure the RADIUS client (Check Point machine running Gaia OS)
1. In the ***Server Manager*** , go to ***Roles*** -\> ***Network policy and access services*** -\> ***NPS*** -\> ***RADIUS Clients and Servers*** -\> ***RADIUS Clients***
2. Right-click on ***New clients*** - click on ***Add***
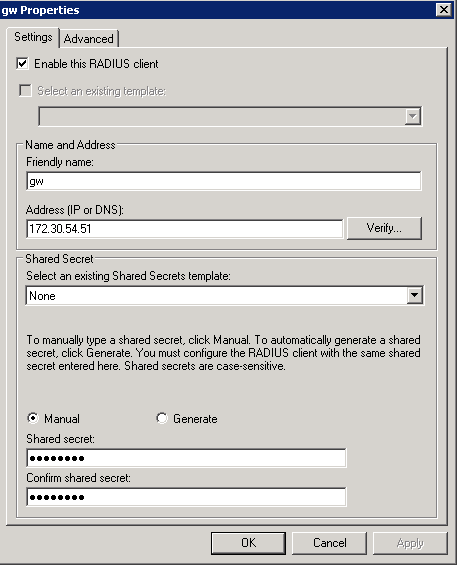
3. Add the following values:
1. ***Enable this RADIUS client*** : make sure to check this box
2. ***Friendly name*** : enter the desired name for the RADIUS client
3. ***Address (IP or DNS)*** : either the IPv4 address, or FQDN of the RADIUS client (Gaia OS IP)
4. ***Select an existing shared secrets templates*** : None
5. Check on ***Manual*** and configure the ***Shared Secret***
6. Click on *OK*
*Example* :
* Show / Hide Part II - Configuration on Gaia OS
* Configuration on Security Gateway in Gateway mode (non-VSX):
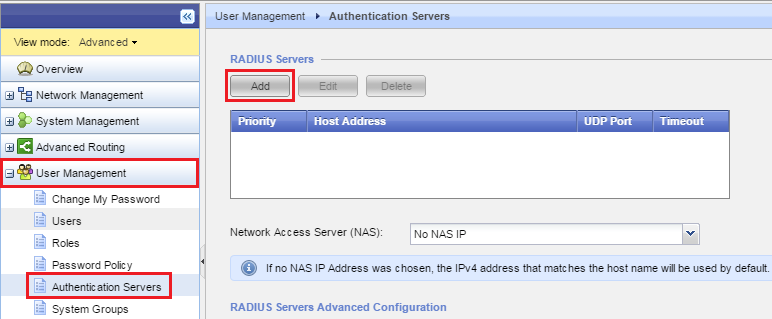
> 1. Connect to Gaia Portal.
>
> 2. Go to the ***User Management*** section - click on the ***Authentication Servers*** page.
>
> 3. In the ***RADIUS Servers*** section, click on ***Add*** .
>
> 
>
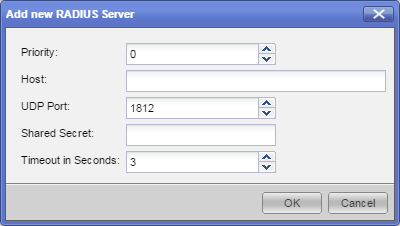
> 4. In the ***Add new RADIUS Server*** window, configure the following:
>
> 1. ***Priority:*** the priority of the RADIUS server, in case there are more than one
> 2. ***Host***: wither IPv4 address, or FQDN of the RADIUS server
> 3. ***UDP Port***: leave the default 1812
> 4. ***Shared Secret***: enter the same shared secret that was configured on the RADIUS server
> 5. Click on *OK*.
>
>
>
> 
>
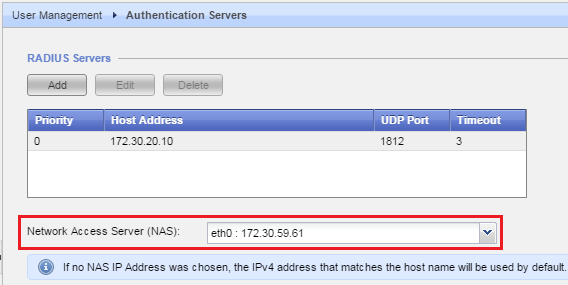
> 5. In the ***Network Access Server (NAS)*** field, select the interface from which the RADIUS Server will be reachable
> (Gaia OS will accept RADIUS authentication on any interface, or only on a specific interface).
>
> *Example* :
> 
>
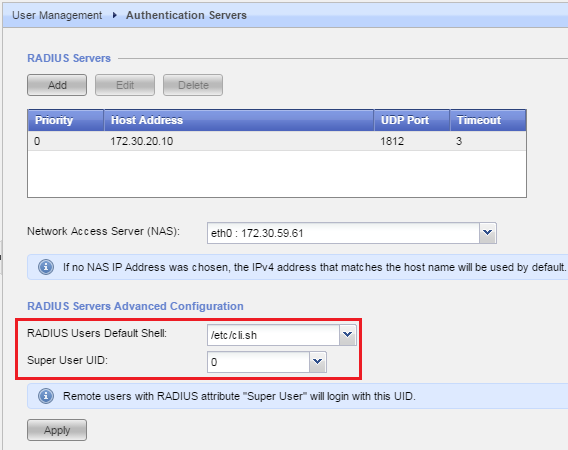
> 6. In the ***RADIUS Users Default Shell*** field, leave the default ***/etc/cli.sh***
>
> 7. In the ***Super User UID*** field, select the value "***0*** " (zero).
>
> *Example* :
> 
>
> 8. Click on *Apply*.
* Configuration on Security Gateway in VSX mode:
> Gaia Portal is disabled on VSX Gateways. Therefore, the following commands should be issued in Gaia Clish:
>
> ```
> HostName> add aaa radius-servers priority 1 host port 1812 secret timeout 3
> HostName> set aaa radius-servers NAS-IP
> HostName> set aaa radius-servers default-shell /etc/cli.sh
> HostName> set aaa radius-servers super-user-uid 0
> HostName> save config
> ```
---
# Agent Instructions
This content is from the Check Point Support Center (https://support.checkpoint.com), the official knowledge base for Check Point cybersecurity products.
## Navigating This Knowledge Base
- **Complete index**: [llms.txt](https://support.checkpoint.com/llms.txt)
- **All SK articles**: [SecureKnowledge Sitemap](https://support.checkpoint.com/sitemaps/secureknowledge-sitemap-index.xml)
- **SK article URL pattern**: `https://support.checkpoint.com/results/sk/{skId}`
- **Markdown responses**: AI bot User-Agents automatically receive `text/markdown` content