> Source: [sk105179](https://support.checkpoint.com/results/sk/sk105179)
# sk105179 - How to clear Anti-Virus and Anti-Bot kernel cache
| Property | Value |
|----------|-------|
| Solution ID | sk105179 |
| Date Created | 2015-03-11 |
| Last Modified | 2026-05-22 |
| Technical Level | General |
| Products | Security Gateway |
| Versions | R82, R81.20, R81.10 (EOS), R81 (EOS) |
## Solution
**Follow these steps to clear the Anti-Virus kernel cache on a Security Gateway / cluster:**
* In versions R80.30 with Jumbo HFA Take 155 and higher and in R80.20 with Jumbo HFA Take 161 and higher:
1. Edit the File
Open the file located at:
$FWDIR/state/local/FW1/local.rad_services
2. Locate the Relevant Entries
The `:policy_install_cache_override(false)` line may appear multiple times in this file. You need to modify the specific entries for Anti-Bot and Anti-Virus services specifically. For Anti-Bot: Locate the entry under `malware_rad_service_0` For Anti-Virus: Locate the entry under `antivirus_rad_service_0`
3. Modify the Line
In each of the relevant entries, find the line:
`:policy_install_cache_override (false)`
Change it to:
`:policy_install_cache_override (true)`
4. Save the file.
5. Run the command:
`fw fetchlocal -d $FWDIR/state/local/FW1`
6. Edit the file *$FWDIR/state/local/FW1/local.rad_services* again and change the line back to:
`:policy_install_cache_override (false)`
7. Run again the command:
`fw fetchlocal -d $FWDIR/state/local/FW1`
8.
Run: fw ctl multik print_bl malware_cache_tbl -s
Note: There are two different cache tables: malware for Anti-Bot and AV for Anti-Virus.
* In versions R80.30 with Jumbo HFA Take 140 and lower, R80.20 with Jumbo HFA Take 160 and lower, R80.10, R77.30 and lower:
1. Connect with SmartDashboard to Security Management Server / Domain Management Server.
2. Go to ***File*** menu - click on ***Database Revision Control...*** - create a revision snapshot.
3. Close all SmartConsole windows (SmartDashboard, SmartView Tracker, SmartView Monitor, etc.).
4. Connect with [GuiDBedit Tool](http://supportcontent.checkpoint.com/solutions?id=sk13009) to Security Management Server / Domain Management Server.
5. In the upper left pane, go to ***Table*** - ***Other*** - ***rad_services*** .
6. In the upper right pane, select ***malware_rad_service_0***:
1. In the lower pane, right-click on the ***policy_install_cache_override*** - select ***Edit...*** .
2. Select "**`true`** " - click on ***OK***.
[](https://sc1.checkpoint.com/sc/SolutionsStatics/sk105179/malware_rad_service_0.png "Click the image to see it in full size in a new tab/window")
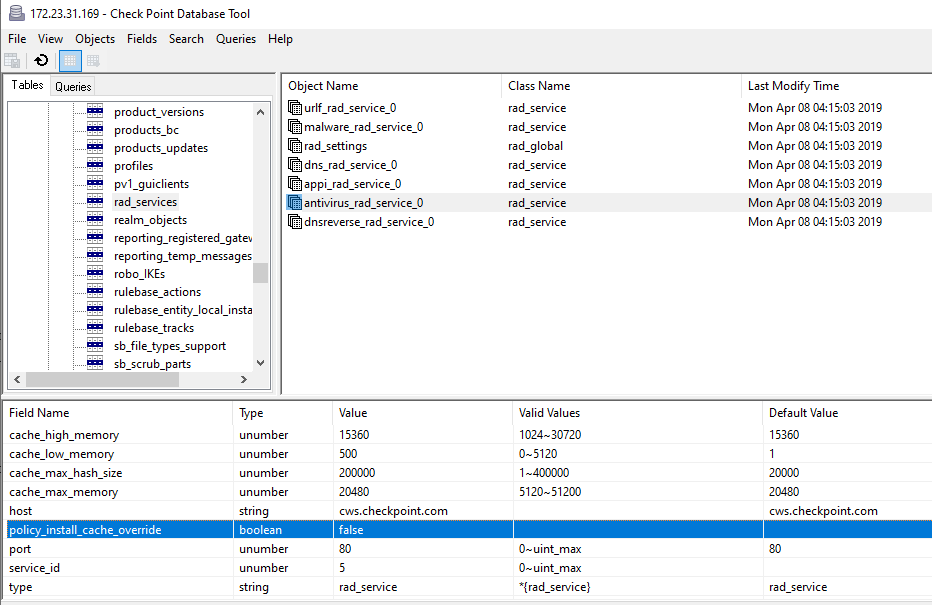
7. In the upper right pane, select ***antivirus_rad_service_0***:
1. In the lower pane, right-click on the ***policy_install_cache_override*** - select ***Edit...*** .
2. Select "**`true`** " - click on ***OK***.
[](https://sc1.checkpoint.com/sc/SolutionsStatics/sk105179/av202104131137041.png "Click the image to see it in full size in a new tab/window")
8. Save the changes: go to ***File*** menu - click on ***Save All*** .
9. Close the GuiDBedit Tool.
10. Connect with SmartDashboard to Security Management Server / Domain Management Server.
11. Install the policy ***only*** on the involved Security Gateway / Cluster object.
12. Verify that the Anti-Virus kernel cache tables are empty on the involved Security Gateway / cluster members:
1. ***\[Expert@HostName\]# fw tab -t av_cache -s***
Output should be:
```
HOST NAME ID #VALS #PEAK #SLINKS
localhost av_cache XXX 0 0 0
```
2. ***\[Expert@HostName\]# fw tab -t malware_cache_tbl -s***
Output should be:
```
HOST NAME ID #VALS #PEAK #SLINKS
localhost malware_cache_tbl XXX 0 0 0
```
13. ***CRUCIAL STEP:*** Restore the default value for ***policy_install_cache_override*** ("false"):
**Note:** If default value ("false") is not restored, then Anti-Virus kernel cache will be cleared on each policy installation.
1. Close all SmartConsole windows (SmartDashboard, SmartView Tracker, SmartView Monitor, etc.).
2. Connect with [GuiDBedit Tool](http://supportcontent.checkpoint.com/solutions?id=sk13009) to Security Management Server / Domain Management Server.
3. In the upper left pane, go to ***Table*** - ***Other*** - ***rad_services*** .
4. In the upper right pane, select ***malware_rad_service_0***:
1. In the lower pane, right-click on the ***policy_install_cache_override*** - select ***Edit...*** .
2. Select "**`false`** " - click on ***OK***.
5. In the upper right pane, select ***antivirus_rad_service_0***:
1. In the lower pane, right-click on the ***policy_install_cache_override*** - select ***Edit...*** .
2. Select "**`false`** " - click on ***OK***.
6. Save the changes: go to ***File*** menu - click on ***Save All*** .
7. Close the GuiDBedit Tool.
14. Connect with SmartDashboard to Security Management Server / Domain Management Server.
15. Install the policy on the relevant Security Gateway / Cluster object.
**Related solutions:**
* [sk64280 - How to clear URL Filtering kernel cache?](http://supportcontent.checkpoint.com/solutions?id=sk64280)
* [sk90422 - How to modify URL Filtering cache size?](http://supportcontent.checkpoint.com/solutions?id=sk90422)
---
# Agent Instructions
This content is from the Check Point Support Center (https://support.checkpoint.com), the official knowledge base for Check Point cybersecurity products.
## Navigating This Knowledge Base
- **Complete index**: [llms.txt](https://support.checkpoint.com/llms.txt)
- **All SK articles**: [SecureKnowledge Sitemap](https://support.checkpoint.com/sitemaps/secureknowledge-sitemap-index.xml)
- **SK article URL pattern**: `https://support.checkpoint.com/results/sk/{skId}`
- **Markdown responses**: AI bot User-Agents automatically receive `text/markdown` content