> Source: [sk102837](https://support.checkpoint.com/results/sk/sk102837)
# sk102837 - Best Practices - ICA Management Tool configuration
| Property | Value |
|----------|-------|
| Solution ID | sk102837 |
| Date Created | 2014-10-07 |
| Last Modified | 2023-02-16 |
| Technical Level | General |
| Products | Security Management Server, Multi-Domain Security Management Server |
| Versions | R81.20, R81.10 (EOS), R81 (EOS) |
| OS | Gaia |
## Solution
*
Background {#Background}
------------------------
The ICA Management Tool is a user-friendly tool that allows an administrator to perform multiple operations on and for the Internal Certificate Authority (ICA), such as:
* Certificate management and searches
* CRL recreation and download
* ICA configuration
* ICA cleanup resulting in the removal of expired certificates
The ICA Management Tool runs on Security Management Server / Multi-Domain Security Management Server.
Procedure {#Procedure}
----------------------
1. Connect to command line on the Security Management Server / Multi-Domain Security Management Server.
2. Log in to Expert mode.
3. Check the status of the ICA Management Tool:
* On Security Management Server
**`[Expert@HostName]# cpca_client set_mgmt_tool print`**
* On Multi-Domain Security Management Server
**`[Expert@HostName]# mdsenv `*Domain_Name***
**`[Expert@HostName]# cpca_client set_mgmt_tool print`**
The *first* line of the output will be:
* ***Management tool is OFF*** - no need to take any further steps
* ***Management tool is ON*** - proceed to the next step
4. This configuration is recommended for ICA Management Tool:
1. Allow access to ICA Management Tool only via *secured* networks.
2. Make sure ICA Management Tool is running using the SSL authentication (this is the default):
Check the current authentication:
**`[Expert@HostName]# cpca_client set_mgmt_tool print`**
The *second* line of the output will be:
* ***Using SSL*** - no need to take any further steps
* ***Not using SSL*** - configure the tool to use SSL by running the command ***`cpca_client set_mgmt_tool on -no_ssl`***
3. Reduce amount of Administrators/Users and Hosts that have access to ICA Management Tool to the required minimum.
Check the current list of Administrators/Users:
**`[Expert@HostName]# cpca_client set_mgmt_tool print`**
Look at the following sections:
* `The authorized administrators:`
* `The authorized users:`
* `The authorized custom users:`
To remove an administrator, run:
**`cpca_client set_mgmt_tool remove -a `*Administrator_DN***
To remove all the users, run:
**`cpca_client set_mgmt_tool clean`**
4. If ICA Management Tool is currently enabled (*ON* ), but is *not* needed, then perform *one* of the following:
* *Either* disable ICA Management Tool:
* On Security Management Server
**`[Expert@HostName]# cpca_client set_mgmt_tool off `**
* On Multi-Domain Security Management Server
**`[Expert@HostName]# mdsenv `*Domain_Name***
**`[Expert@HostName]# cpca_client set_mgmt_tool off `**
* *Or* make sure that certificate used to authenticate to the ICA Management Tool uses "strong private key protection".
Follow these steps to import certificate with use of "strong private key protection":
Reference: [Import or export certificates and private keys](http://windows.microsoft.com/en-us/windows/import-export-certificates-private-keys#1TC=windows-7) - click on "`To import a certificate and private key`".
1. Go to Start menu - click on "`Run...`" / click in "`Search`" field - type/paste ***certmgr.msc*** - press Enter
Administrator permission required. If you are prompted for an administrator password or confirmation, type the password or provide confirmation.
2. Click on "`Trusted Publishers`" to select it - go to '`Action`' menu - go to '`All Tasks`' - click on '`Import`':

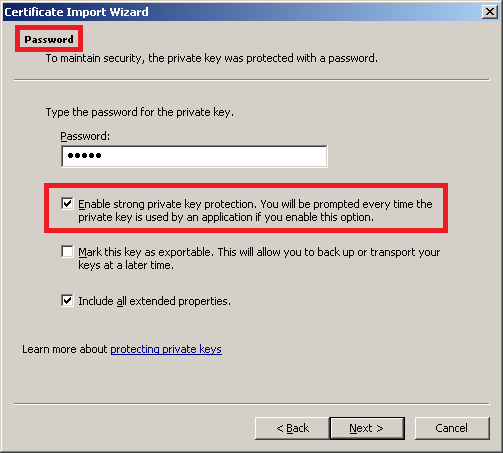
3. Click '`Next`', and then follow the instructions.
**Important Note:** On the "`Password`" sceen, make sure to check this box:
"`Enable strong private key protection. You will be prompted every time the private key is used by an application if you enable this option.`"
---
# Agent Instructions
This content is from the Check Point Support Center (https://support.checkpoint.com), the official knowledge base for Check Point cybersecurity products.
## Navigating This Knowledge Base
- **Complete index**: [llms.txt](https://support.checkpoint.com/llms.txt)
- **All SK articles**: [SecureKnowledge Sitemap](https://support.checkpoint.com/sitemaps/secureknowledge-sitemap-index.xml)
- **SK article URL pattern**: `https://support.checkpoint.com/results/sk/{skId}`
- **Markdown responses**: AI bot User-Agents automatically receive `text/markdown` content